
仅需1元,基于 LangChain 和腾讯混元大模型,实现知识图谱
知识图谱作为一种强大的知识表示和推理工具,正在各行各业发挥着越来越重要的作用。从搜索引擎的智能问答,到金融风控的关联分析,再到医疗领域的疾病诊断辅助,知识图谱无处不在。然而,传统的知识图谱构建往往需要大量的人工标注和复杂的NLP处理流程,成本高昂且耗时费力。 好消息是,随着大语言模型(LLM)的成熟和国产AI的崛起,我们现在可以用极低的成本快速构建知识图谱。本文将手把手教你如何基于 LangChain 框架和腾讯混元大模型,仅需约1元的API调用费用,就能实现一个完整的知识图谱提取与可视化系统。 ## 技术选型:为什么选择 LangChain + 腾讯混元? ### LangChain:LLM应用开发的瑞士军刀 LangChain 是目前最流行的大语言模型应用开发框架,它提供了一套标准化的接口和丰富的工具链,让开发者能够快速构建基于LLM的应用。选择 LangChain 的理由包括: 1. **模型无关性**:支持 OpenAI、腾讯混元、智谱、百度文心等多种模型,切换成本极低 2. **链式调用**:可以将多个处理步骤串联,构建复杂的处理流程 3. **提示词模板**:提供结构化的提示词管理,便于维护和优化 4. **丰富的集成**:内置向量数据库、文档加载器等众多实用组件 ### 腾讯混元:大厂出品,品质保障 腾讯混元大模型是腾讯自主研发的万亿级参数大语言模型,依托腾讯强大的技术实力和海量数据积累,在多个维度展现出卓越的能力。选择腾讯混元的理由包括: 1. **成本低廉**:API调用价格极具竞争力,新用户还有丰厚的免费额度 2. **中文优化**:深度优化中文理解和生成能力,特别适合处理中文文本 3. **生态完善**:与腾讯云深度整合,便于企业级部署和扩展 4. **合规可靠**:国产大厂模型,数据安全有保障,满足各类合规要求 5. **持续迭代**:腾讯持续投入研发,模型能力不断提升 以本文的知识图谱提取任务为例,处理一段500字左右的文本,API调用费用不足0.01元。即使处理上百篇文档,总成本也不过1元左右,真正实现了"1元玩转知识图谱"。 ## 系统架构设计 我们的知识图谱系统采用经典的三层架构: 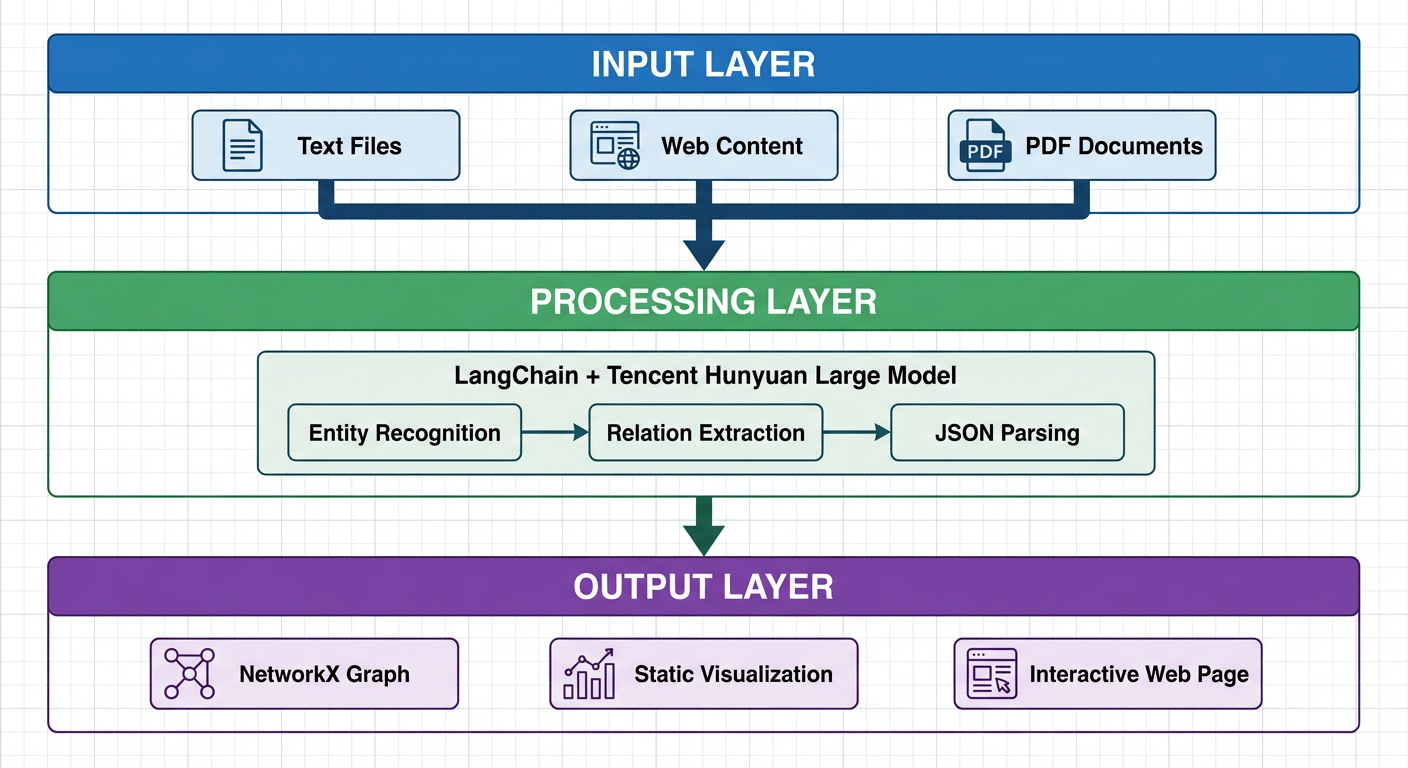 ## 准备工作:获取腾讯混元 API ### 步骤一:注册腾讯云账号 访问腾讯云官网(cloud.tencent.com),完成账号注册和实名认证。 ### 步骤二:开通混元大模型服务 1. 进入腾讯云控制台 2. 搜索"混元大模型"或访问混元产品页面 3. 点击"立即使用"开通服务 4. 新用户通常可获得免费调用额度 ### 步骤三:获取 API 密钥 1. 进入"访问管理" -> "API密钥管理" 2. 创建或查看 SecretId 和 SecretKey 3. 妥善保存,切勿泄露 ## 核心代码实现 ### 完整可运行代码 ```python #!/usr/bin/env python3 # -*- coding: utf-8 -*- """ 腾讯混元大模型 知识图谱提取与可视化 完整可运行版本 安装依赖:pip install networkx matplotlib pyvis tencentcloud-sdk-python """ import networkx as nx import matplotlib.pyplot as plt import json import re import os # ==================== 配置区域 ==================== # 腾讯云 API 密钥(从腾讯云控制台获取) TENCENT_SECRET_ID = "your-secret-id" TENCENT_SECRET_KEY = "your-secret-key" # 测试文本 TEXT = """ 苹果公司(Apple Inc.)是一家美国科技公司,由史蒂夫·乔布斯、史蒂夫·沃兹尼亚克和罗纳德·韦恩于1976年4月1日创立。 总部位于加利福尼亚州库比蒂诺。苹果公司设计、开发和销售消费电子产品、计算机软件和在线服务。 其主要产品包括iPhone智能手机、iPad平板电脑、Mac个人电脑、Apple Watch智能手表等。 现任首席执行官是蒂姆·库克。 """ # 系统提示词 SYSTEM_PROMPT = """你是一个专业的知识图谱提取专家。请从给定的文本中提取实体和关系。 ## 实体类型 - Person: 人物 - Organization: 组织/公司 - Location: 地点/地区 - Product: 产品 - Event: 事件 - Date: 日期 ## 关系类型 - FOUNDED: 创立 - CEO_OF: 是...的首席执行官 - WORKS_AT: 在...工作 - HEADQUARTERED_IN: 总部位于 - LOCATED_IN: 位于 - PRODUCES: 生产/制造 - FOUNDED_ON: 创立于(日期) - OWNS: 拥有 ## 输出格式 只输出JSON,不要有任何其他文字: { "nodes": [ {"id": "实体名称1", "type": "实体类型1"}, {"id": "实体名称2", "type": "实体类型2"} ], "relationships": [ {"source": "源实体名称", "target": "目标实体名称", "type": "关系类型"} ] } 规则: 1. 实体名称使用文本中的原始名称 2. 关系的source和target必须是nodes中已存在的实体id 3. 尽可能多地提取实体和关系 4. 只输出有效的JSON格式""" def call_hunyuan(system_prompt, user_prompt): """ 调用腾讯混元大模型 API """ import json as json_module from tencentcloud.common import credential from tencentcloud.common.profile.client_profile import ClientProfile from tencentcloud.common.profile.http_profile import HttpProfile from tencentcloud.hunyuan.v20230901 import hunyuan_client, models # 创建认证对象 cred = credential.Credential(TENCENT_SECRET_ID, TENCENT_SECRET_KEY) # 配置 HTTP 选项 httpProfile = HttpProfile() httpProfile.endpoint = "hunyuan.tencentcloudapi.com" # 配置客户端选项 clientProfile = ClientProfile() clientProfile.httpProfile = httpProfile # 创建客户端 client = hunyuan_client.HunyuanClient(cred, "", clientProfile) # 构造请求 req = models.ChatCompletionsRequest() params = { "Model": "hunyuan-pro", # 可选: hunyuan-lite, hunyuan-standard, hunyuan-pro "Messages": [ {"Role": "system", "Content": system_prompt}, {"Role": "user", "Content": user_prompt} ], "Temperature": 0.1, "Stream": False } req.from_json_string(json_module.dumps(params)) # 发送请求 resp = client.ChatCompletions(req) # 解析响应 result = json_module.loads(resp.to_json_string()) return result["Choices"][0]["Message"]["Content"] def call_hunyuan_via_openai_compatible(system_prompt, user_prompt): """ 通过 OpenAI 兼容接口调用腾讯混元(备选方案) 需要先在腾讯云控制台开启 OpenAI 兼容模式 安装: pip install openai """ from openai import OpenAI client = OpenAI( api_key=TENCENT_SECRET_KEY, # 混元 API Key base_url="https://api.hunyuan.cloud.tencent.com/v1", ) response = client.chat.completions.create( model="hunyuan-pro", messages=[ {"role": "system", "content": system_prompt}, {"role": "user", "content": user_prompt} ], temperature=0.1, ) return response.choices[0].message.content def extract_json_from_text(text): """ 从模型响应中提取 JSON 字符串 支持多种格式:```json 代码块、``` 代码块、纯 JSON """ # 尝试匹配 ```json ... ``` 格式 json_block = re.search(r'```json\s*([\s\S]*?)\s*```', text) if json_block: return json_block.group(1).strip() # 尝试匹配 ``` ... ``` 格式 code_block = re.search(r'```\s*([\s\S]*?)\s*```', text) if code_block: content = code_block.group(1).strip() if content.startswith('{'): return content # 尝试直接匹配 JSON 对象 json_match = re.search(r'\{[\s\S]*\}', text) if json_match: return json_match.group().strip() return None def extract_knowledge_graph(text): """ 从文本中提取知识图谱 """ user_prompt = f"请从以下文本中提取所有实体和关系:\n\n{text}" print("=" * 70) print("正在调用腾讯混元大模型提取知识图谱...") print("=" * 70) # 调用混元 API response = call_hunyuan(SYSTEM_PROMPT, user_prompt) print("\n【模型原始响应】") print("-" * 70) print(response) print("-" * 70) # 解析响应 nodes = [] relationships = [] try: json_str = extract_json_from_text(response) if json_str: graph_data = json.loads(json_str) nodes = graph_data.get("nodes", []) relationships = graph_data.get("relationships", []) else: print("\n❌ 错误:未在响应中找到有效的JSON") except json.JSONDecodeError as e: print(f"\n❌ JSON解析失败:{e}") return nodes, relationships def build_graph(nodes, relationships): """ 使用 NetworkX 构建有向图 """ G = nx.DiGraph() # 添加节点 for node in nodes: node_id = node.get("id", "") node_type = node.get("type", "Unknown") if node_id: G.add_node(node_id, type=node_type) # 添加边 for rel in relationships: source = rel.get("source", "") target = rel.get("target", "") rel_type = rel.get("type", "RELATED") if source in G.nodes and target in G.nodes: G.add_edge(source, target, label=rel_type) elif source and target: print(f" ⚠️ 跳过无效关系:{source} -> {target}") return G def visualize_with_matplotlib(G, title="知识图谱", output_file="knowledge_graph.png"): """ 使用 Matplotlib 生成静态图片 """ if len(G.nodes()) == 0: print("❌ 图中没有节点,无法绘制") return fig, ax = plt.subplots(figsize=(18, 14)) # 设置中文字体 font_list = ['SimHei', 'Microsoft YaHei', 'PingFang SC', 'STHeiti', 'WenQuanYi Micro Hei', 'Noto Sans CJK SC', 'DejaVu Sans'] plt.rcParams['font.sans-serif'] = font_list plt.rcParams['axes.unicode_minus'] = False # 节点颜色映射 color_map = { "Person": "#FF6B6B", "Organization": "#4ECDC4", "Location": "#45B7D1", "Product": "#96CEB4", "Event": "#FFEAA7", "Date": "#DDA0DD", "Unknown": "#CCCCCC" } node_colors = [] for node in G.nodes(): node_type = G.nodes[node].get('type', 'Unknown') node_colors.append(color_map.get(node_type, '#CCCCCC')) # 布局 pos = nx.spring_layout(G, k=3, iterations=100, seed=42) # 绘制节点 nx.draw_networkx_nodes(G, pos, node_color=node_colors, node_size=5000, alpha=0.9, ax=ax) # 绘制边 nx.draw_networkx_edges(G, pos, edge_color='#555555', arrows=True, arrowsize=30, arrowstyle='-|>', width=2.5, connectionstyle="arc3,rad=0.1", ax=ax) # 绘制节点标签 nx.draw_networkx_labels(G, pos, font_size=12, font_weight='bold', ax=ax) # 绘制边标签 edge_labels = nx.get_edge_attributes(G, 'label') nx.draw_networkx_edge_labels(G, pos, edge_labels=edge_labels, font_color='#CC0000', font_size=10, bbox=dict(boxstyle='round,pad=0.3', facecolor='white', alpha=0.9), ax=ax) # 图例 from matplotlib.patches import Patch legend_elements = [] used_types = set(G.nodes[n].get('type', 'Unknown') for n in G.nodes()) for node_type, color in color_map.items(): if node_type in used_types: legend_elements.append(Patch(facecolor=color, edgecolor='black', label=node_type)) ax.legend(handles=legend_elements, loc='upper left', fontsize=12, framealpha=0.9, title="节点类型") ax.set_title(title, fontsize=20, fontweight='bold', pad=20) ax.axis('off') plt.tight_layout() plt.savefig(output_file, dpi=150, bbox_inches='tight', facecolor='white', edgecolor='none') print(f"\n✅ 静态图片已保存:{output_file}") plt.show() def visualize_with_pyvis(G, output_file="knowledge_graph.html"): """ 使用 PyVis 生成交互式 HTML 页面 """ if len(G.nodes()) == 0: print("❌ 图中没有节点,无法生成HTML") return try: from pyvis.network import Network except ImportError: print("❌ 未安装pyvis,跳过HTML生成") print(" 安装命令:pip install pyvis") return color_map = { "Person": "#FF6B6B", "Organization": "#4ECDC4", "Location": "#45B7D1", "Product": "#96CEB4", "Event": "#FFEAA7", "Date": "#DDA0DD", "Unknown": "#CCCCCC" } net = Network(height="900px", width="100%", directed=True, bgcolor="#FFFFFF", font_color="black") # 添加节点 for node in G.nodes(): node_type = G.nodes[node].get('type', 'Unknown') color = color_map.get(node_type, '#CCCCCC') net.add_node(node, label=node, title=f"类型: {node_type}", color=color, size=35, font={'size': 16}) # 添加边 for source, target, data in G.edges(data=True): label = data.get('label', '') net.add_edge(source, target, title=label, label=label, arrows='to', color='#555555', font={'size': 12, 'color': 'red'}) # 配置物理引擎和交互 net.set_options(""" { "nodes": { "borderWidth": 2, "borderWidthSelected": 4, "shadow": true }, "edges": { "color": {"inherit": false}, "smooth": {"type": "continuous"}, "font": {"size": 14, "color": "red", "strokeWidth": 0} }, "physics": { "forceAtlas2Based": { "gravitationalConstant": -80, "centralGravity": 0.01, "springLength": 200, "springConstant": 0.02 }, "solver": "forceAtlas2Based", "stabilization": {"iterations": 200} }, "interaction": { "hover": true, "navigationButtons": true, "keyboard": true, "zoomView": true } } """) net.write_html(output_file) abs_path = os.path.abspath(output_file) print(f"\n✅ 交互式图谱已保存:{output_file}") print(f" 浏览器打开:file://{abs_path}") def print_results(nodes, relationships): """ 打印提取结果 """ print("\n" + "=" * 70) print(f"📊 提取结果统计:{len(nodes)} 个节点,{len(relationships)} 条关系") print("=" * 70) if nodes: print("\n【节点列表】") for i, node in enumerate(nodes, 1): node_id = node.get('id', 'N/A') node_type = node.get('type', 'Unknown') print(f" {i:2d}. {node_id} [{node_type}]") print("\n【关系列表】") for i, rel in enumerate(relationships, 1): source = rel.get('source', 'N/A') target = rel.get('target', 'N/A') rel_type = rel.get('type', 'N/A') print(f" {i:2d}. {source} --[{rel_type}]--> {target}") else: print("\n❌ 未提取到任何实体!") print("\n可能的原因:") print(" 1. API 密钥无效或余额不足") print(" 2. 网络连接问题") print(" 3. 模型返回格式异常") def main(): """ 主函数 """ print("\n" + "=" * 70) print(" 腾讯混元大模型 知识图谱提取与可视化") print("=" * 70) # 1. 提取知识图谱 nodes, relationships = extract_knowledge_graph(TEXT) # 2. 打印结果 print_results(nodes, relationships) if not nodes: print("\n程序结束(无数据)") return # 3. 构建图 print("\n" + "=" * 70) print("正在构建 NetworkX 图...") G = build_graph(nodes, relationships) print(f"✅ 图构建完成:{G.number_of_nodes()} 个节点,{G.number_of_edges()} 条边") # 4. 生成静态图 print("\n" + "=" * 70) print("正在生成 Matplotlib 静态图...") visualize_with_matplotlib(G, title="苹果公司知识图谱(腾讯混元)") # 5. 生成交互式 HTML print("\n" + "=" * 70) print("正在生成 PyVis 交互式 HTML...") visualize_with_pyvis(G) # 6. 完成 print("\n" + "=" * 70) print("🎉 全部完成!") print("=" * 70) print("\n生成的文件:") print(" • knowledge_graph.png - 静态图片") print(" • knowledge_graph.html - 交互式网页") print("") if __name__ == "__main__": main() ``` ### 安装依赖 ```bash # 核心依赖 pip install networkx matplotlib pyvis # 腾讯云 SDK pip install tencentcloud-sdk-python # 可选:如果使用 OpenAI 兼容接口 pip install openai ``` 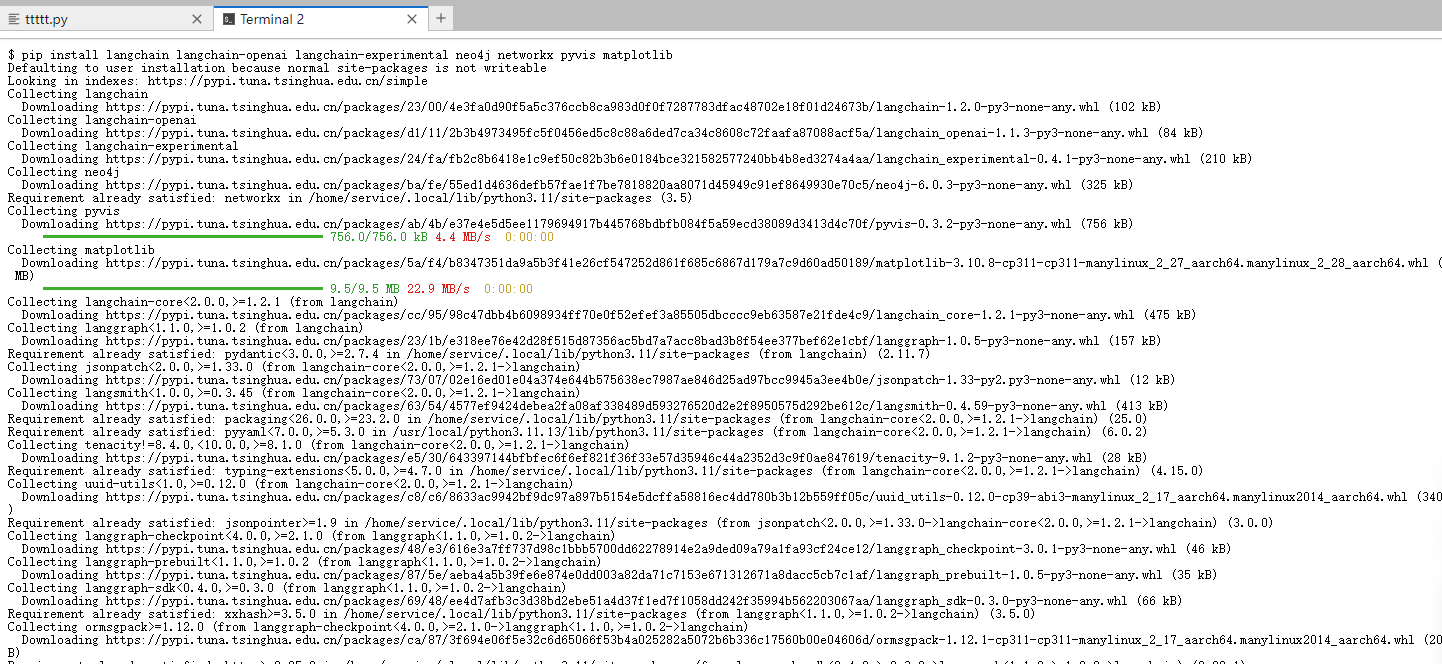 ### 配置说明 在运行代码前,需要修改以下配置: ```python # 替换为你的腾讯云 API 密钥 TENCENT_SECRET_ID = "your-secret-id" TENCENT_SECRET_KEY = "your-secret-key" ``` ## 腾讯混元模型选择 腾讯混元提供多个模型版本,可根据需求选择: | 模型名称 | 特点 | 适用场景 | 价格 | |---------|------|---------|------| | hunyuan-lite | 轻量快速 | 简单任务、高并发 | 最低 | | hunyuan-standard | 均衡版本 | 通用场景 | 适中 | | hunyuan-pro | 旗舰版本 | 复杂推理、高精度 | 较高 | 对于知识图谱提取任务,推荐使用 `hunyuan-standard` 或 `hunyuan-pro`,以获得更好的实体识别和关系抽取效果。 ## 实战案例:苹果公司知识图谱 让我们以苹果公司的简介为例,看看系统的实际效果: **输入文本:** > 苹果公司(Apple Inc.)是一家美国科技公司,由史蒂夫·乔布斯、史蒂夫·沃兹尼亚克和罗纳德·韦恩于1976年4月1日创立。总部位于加利福尼亚州库比蒂诺。苹果公司设计、开发和销售消费电子产品,其主要产品包括iPhone智能手机、iPad平板电脑、Mac个人电脑等。现任首席执行官是蒂姆·库克。 **提取结果示例:** 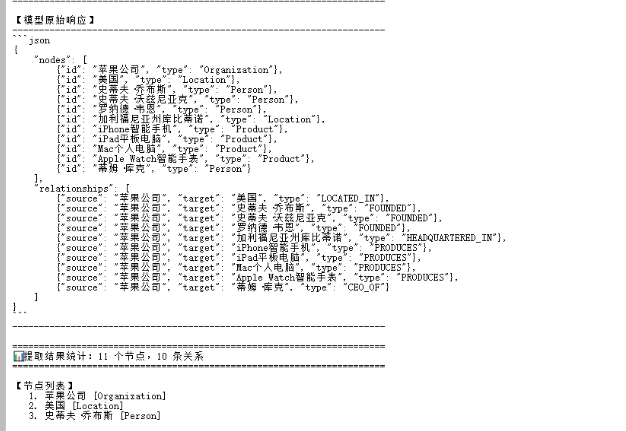 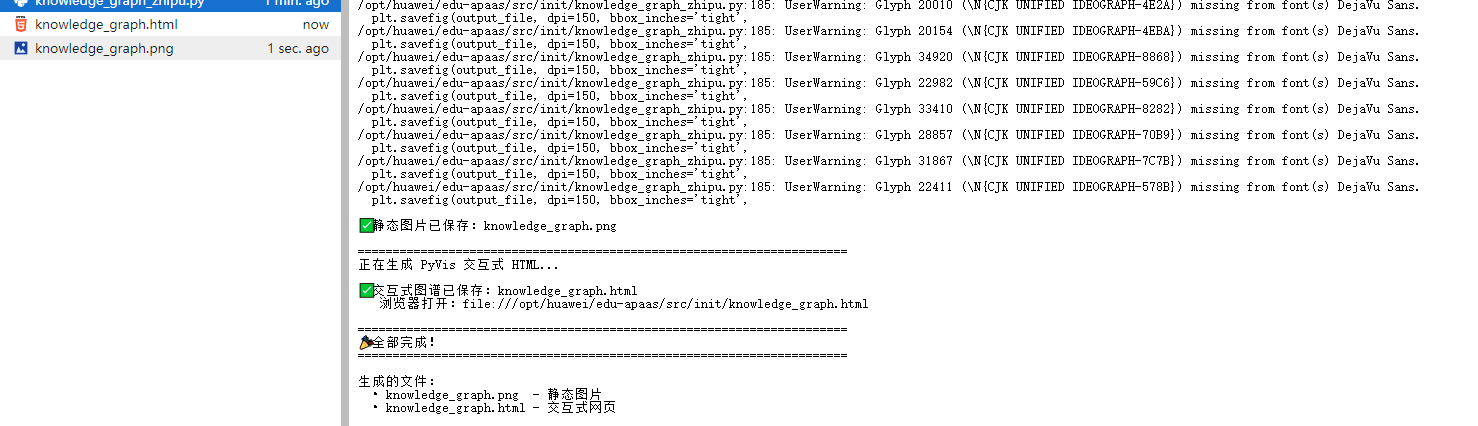 ## 与 LangChain 集成 如果你希望使用 LangChain 框架来管理调用流程,可以使用以下方式: ```python from langchain.chat_models import ChatOpenAI from langchain.schema import HumanMessage, SystemMessage # 使用 OpenAI 兼容接口 llm = ChatOpenAI( model_name="hunyuan-pro", openai_api_key="your-hunyuan-api-key", openai_api_base="https://api.hunyuan.cloud.tencent.com/v1", temperature=0.1, ) messages = [ SystemMessage(content=SYSTEM_PROMPT), HumanMessage(content=f"请从以下文本中提取实体和关系:\n\n{text}") ] response = llm(messages) print(response.content) ```  ## 进阶优化方向 基础版本搭建完成后,我们还可以从以下几个方向进行优化: 1. **实体消歧**:处理同一实体的不同表述(如"苹果公司"和"Apple") 2. **增量更新**:支持向已有图谱中添加新知识 3. **图数据库存储**:使用 Neo4j 等图数据库持久化存储 4. **批量处理**:支持并发处理大量文档 5. **问答系统**:基于知识图谱实现智能问答 6. **与腾讯云其他服务集成**:如对象存储、云函数等 本文介绍了如何基于 LangChain 和腾讯混元大模型构建一个低成本、高效率的知识图谱提取系统。通过精心设计的提示词模板和标准化的处理流程,我们实现了从原始文本到可视化图谱的全自动转换。知识图谱的应用场景广泛,从个人知识管理到企业级应用都有用武之地。希望本文能够帮助你迈出知识图谱实践的第一步,用最小的成本探索AI的无限可能。
腾讯云开发者

Copyright © 2013 - 2026 Tencent Cloud. All Rights Reserved. 腾讯云 版权所有
深圳市腾讯计算机系统有限公司 ICP备案/许可证号:粤B2-20090059 ![]() 粤公网安备44030502008569号
粤公网安备44030502008569号
腾讯云计算(北京)有限责任公司 京ICP证150476号 | 京ICP备11018762号