
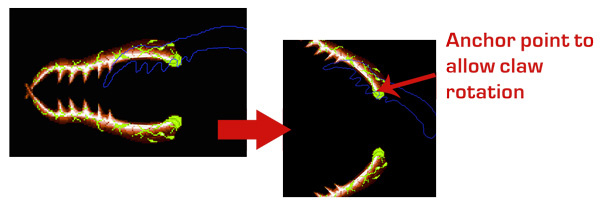
在使用“SKPhysicsBody”(BodyWithTexture)时改变bodyWithTexture的中心点(SpriteKit)
似乎Spritekit的API不允许在使用'bodyWithTexture‘时改变物理体的中心(或者我遗漏了什么)。
我在想,当你使用像素精确的物理体时,你是如何解决这个问题的。
//Upper Claw
SKSpriteNode *claw = [SKSpriteNode spriteNodeWithImageNamed:BOSS_CLAW_SPRITE];
claw.position = CGPointMake(800, 520);
claw.anchorPoint = CGPointMake(1, .7);

//physics
claw.physicsBody = [SKPhysicsBody bodyWithTexture:claw.texture size:claw.size];
你可以清楚地看到,物理体的中心位置就是锚点所在的位置。
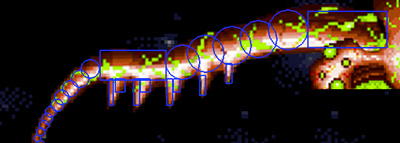
或者,bodyWithCircle / bodyWithRectangle具有“中心”属性。然而,它并不是那么精确,需要大量的代码来制作(不可伸缩)。
-(SKPhysicsBody*)getPhysicsForClaw:(BOOL)isUpperClaw
{
     NSInteger reverseConstant = 1;
     if (!isUpperClaw) {
         reverseConstant = -1;
     }
     SKPhysicsBody *clawTip1 = [SKPhysicsBody bodyWithCircleOfRadius:5 center:CGPointMake(-545, -140*reverseConstant)];
     SKPhysicsBody *clawTip2 = [SKPhysicsBody bodyWithCircleOfRadius:6 center:CGPointMake(-540, -130*reverseConstant)];
     SKPhysicsBody *clawTip3 = [SKPhysicsBody bodyWithCircleOfRadius:7 center:CGPointMake(-535, -120*reverseConstant)];
     SKPhysicsBody *clawTip4 = [SKPhysicsBody bodyWithCircleOfRadius:8 center:CGPointMake(-530, -110*reverseConstant)];
     SKPhysicsBody *clawTip5 = [SKPhysicsBody bodyWithCircleOfRadius:8 center:CGPointMake(-525, -100*reverseConstant)];
     SKPhysicsBody *clawTip6 = [SKPhysicsBody bodyWithCircleOfRadius:9 center:CGPointMake(-515, -90*reverseConstant)];
     SKPhysicsBody *clawTip7 = [SKPhysicsBody bodyWithCircleOfRadius:11 center:CGPointMake(-508, -78*reverseConstant)];
     SKPhysicsBody *clawTip8 = [SKPhysicsBody bodyWithCircleOfRadius:12 center:CGPointMake(-495, -65*reverseConstant)];
     SKPhysicsBody *clawTip9 = [SKPhysicsBody bodyWithCircleOfRadius:13 center:CGPointMake(-480, -50*reverseConstant)];
     SKPhysicsBody *clawTip10 = [SKPhysicsBody bodyWithCircleOfRadius:14 center:CGPointMake(-465, -35*reverseConstant)];

     SKPhysicsBody *clawTeeth1 = [SKPhysicsBody bodyWithRectangleOfSize:CGSizeMake(6, 40) center:CGPointMake(-433, -70)];
     SKPhysicsBody *clawTeeth2 = [SKPhysicsBody bodyWithRectangleOfSize:CGSizeMake(15, 20) center:CGPointMake(-420, -60)];
     SKPhysicsBody *clawTeeth3 = [SKPhysicsBody bodyWithRectangleOfSize:CGSizeMake(9, 40) center:CGPointMake(-395, -70)];
     SKPhysicsBody *clawTeeth4 = [SKPhysicsBody bodyWithRectangleOfSize:CGSizeMake(15, 20) center:CGPointMake(-382, -60)];
     SKPhysicsBody *clawTeeth5 = [SKPhysicsBody bodyWithRectangleOfSize:CGSizeMake(9, 40) center:CGPointMake(-345, -70)];
     SKPhysicsBody *clawTeeth6 = [SKPhysicsBody bodyWithRectangleOfSize:CGSizeMake(10, 20) center:CGPointMake(-334, -60)];
     SKPhysicsBody *clawTeeth7 = [SKPhysicsBody bodyWithRectangleOfSize:CGSizeMake(9, 30) center:CGPointMake(-295, -60)];
     SKPhysicsBody *clawTeeth8 = [SKPhysicsBody bodyWithRectangleOfSize:CGSizeMake(9, 30) center:CGPointMake(-255, -42)];

     SKPhysicsBody *clawBody1 = [SKPhysicsBody bodyWithRectangleOfSize:CGSizeMake(100, 45) center:CGPointMake(-400, -30)];
     SKPhysicsBody *clawBody2 = [SKPhysicsBody bodyWithCircleOfRadius:26 center:CGPointMake(-325, -25*reverseConstant)];
     SKPhysicsBody *clawBody3 = [SKPhysicsBody bodyWithCircleOfRadius:28 center:CGPointMake(-290, -12*reverseConstant)];
     SKPhysicsBody *clawBody4 = [SKPhysicsBody bodyWithCircleOfRadius:29 center:CGPointMake(-250, 0*reverseConstant)];
     SKPhysicsBody *clawBody5 = [SKPhysicsBody bodyWithCircleOfRadius:28 center:CGPointMake(-210, 10*reverseConstant)];
     SKPhysicsBody *clawBody6 = [SKPhysicsBody bodyWithCircleOfRadius:30 center:CGPointMake(-165, 24*reverseConstant)];

     SKPhysicsBody *clawBase1 = [SKPhysicsBody bodyWithRectangleOfSize:CGSizeMake(120, 55) center:CGPointMake(-75, 24)];

     SKPhysicsBody *claw = [SKPhysicsBody bodyWithBodies:@[clawTip1, clawTip2, clawTip3, clawTip4, clawTip5, clawTip6, clawTip7, clawTip8, clawTip9, clawTip10, clawTeeth1, clawTeeth2, clawTeeth3, clawTeeth4, clawTeeth5, clawTeeth6, clawTeeth7, clawTeeth8, clawBody1, clawBody2, clawBody3, clawBody4, clawBody5, clawBody6, clawBase1]];

     return claw;
 }
回答 3
Stack Overflow用户
发布于 2015-05-21 23:55:30
锚点对物理物体没有影响。有几个物理体,你可以为它定义一个中心点。
(SKPhysicsBody *)bodyWithCircleOfRadius:(CGFloat)r
                                 center:(CGPoint)center

(SKPhysicsBody *)bodyWithRectangleOfSize:(CGSize)s
center:(CGPoint)center不幸的是,bodyWithTexture:没有这样的能力。作为一个黑客,您可以使用许多不同大小的矩形,将它们旋转到所需的角度,并将它们与(SKPhysicsBody *)bodyWithBodies:(NSArray *)bodies连接在一起。这将使您可以很好地覆盖您的纹理。
作为一个额外的好处,使用矩形而不是bodyWithTexture也减少了您的FPS的负担。
Stack Overflow用户
发布于 2015-07-31 21:19:12
对于这种情况,我的解决方案是使用不可见的SKNode。
有爪子而没有改变锚点,使它与身体成直线。然后,将该节点的父节点转移到空白的SKNode,并相应地将爪子移到上面。现在,通过旋转空白的SKNode,你可以得到一个改变的锚点的效果,而物理体还在排列。
Stack Overflow用户
发布于 2016-02-03 08:08:01
从primaryartemis的解决方案代码示例,将工作在圆和矩形以外的任何其他形状,这是更实际的。
换句话说,我们使用一个SKNode来包含我们的雪碧,位置将充当锚点**,我们将雪碧从这个SKNode容器转移到我们想要的转换位置上。
这是一个简单的半圆圆弧,大小为(宽度:100,高度: 50),我们希望这个图形在(0.5,0.0)的anchorPoint上旋转。

class SemiArc: SKNode {

    var sprite: SKSpriteNode

    override init() {
        sprite = SKSpriteNode(imageNamed: "semi_arc")

        super.init()

        // Move away from this container SKNode, this SKNode's position act like anchorPoint
        sprite.position.y = sprite.size.height / 2

        // The physicsBody will move along as well
        sprite.physicsBody = SKPhysicsBody(texture: sprite.texture!, size: sprite.size)

        // Add the sprite to this container SKNode
        addChild(sprite)

        // To test the transformation from the anchor point we desire
        let rotationForever = SKAction.repeatActionForever(SKAction.rotateByAngle(CGFloat(M_PI) * 2, duration: 2.0))
        runAction(rotationForever)

    }

}然后我们就可以将这个SemiArc SKNode放到我们的场景中,它将锚定在我们想要的点上。
我们可以为这个SKNode容器创建一个助手,这样我们可以更容易地将它重用到简单的sprite中。
extension SKNode {
    class func containerNodeWithSprite(sprite: SKSpriteNode, withAnchorPoint anchorPoint: CGPoint) -> SKNode {
        let containerNode = SKNode()

        sprite.position.x = (sprite.size.width / 2) - ( sprite.size.width * anchorPoint.x)
        sprite.position.y = (sprite.size.height / 2) - ( sprite.size.height * anchorPoint.y)

        containerNode.addChild(sprite)

        return containerNode
    }
}
示例用法:
// Somewhere in a scene class

let sprite = SKSpriteNode(imageNamed: "semi_arc")
sprite.physicsBody = SKPhysicsBody(texture: sprite.texture!, size: sprite.size)

let container = SKNode.containerNodeWithSprite(sprite, withAnchorPoint: CGPointMake(0.5 , 0.0))

container.position = view!.center

let rotationForever = SKAction.repeatActionForever(SKAction.rotateByAngle(CGFloat(M_PI) * 2, duration: 2.0))
containedNode.runAction(rotationForever)

addChild(container)
注意事项及解决办法
我发现这个解决方案的一个警告,即当您想要删除这个基于物理模拟位置的SKNode时,不会工作,因为您没有给容器SKNode一个物理体,所以它永远不会改变它的位置。检查它是否超出绑定的逻辑将无法工作,因为您正在检查这个容器。这也是同样的,当你发现接触和碰撞,它是身体附着在容器内的节点引起接触和碰撞,而不是容器本身。但是您仍然可以对接触和碰撞作出适当的反应,只有当您想要删除这个SKNode时,才会出现问题。
解决方案1:计算其子节点与物理体和容器位置的相对位置。
enumerateChildNodesWithName("fallingObjectWithMiddleBottomAnchor") {
  (node, stop) in

  if ((node.children.first?.position.y)! + node.position.y) < 0 {
    node.removeFromParent()
  }
}解决方案2:不将其用于动态体,它不需要为动态体处理锚点,因为它的属性应该是模拟的,而不是手动更新的。
解决方案3:一个更好的解决方案是使用SKConstraint来实现您所需要的。
https://stackoverflow.com/questions/30386208
复制相似问题
腾讯云开发者

Copyright © 2013 - 2026 Tencent Cloud. All Rights Reserved. 腾讯云 版权所有
深圳市腾讯计算机系统有限公司 ICP备案/许可证号:粤B2-20090059 ![]() 粤公网安备44030502008569号
粤公网安备44030502008569号
腾讯云计算(北京)有限责任公司 京ICP证150476号 | 京ICP备11018762号