
UIButton子类,填充SafeArea,嵌入内容
在.xib/.storyboard中使用自定义UI元素时,我已经掌握了使用安全区的窍门。
现在我有了一个UIButton子类,它在整个应用程序中随处可见。因为它只是一个子类(而不是.xib中的自定义类),所以我不确定如何更新它以满足我的需要。
见以下照片:
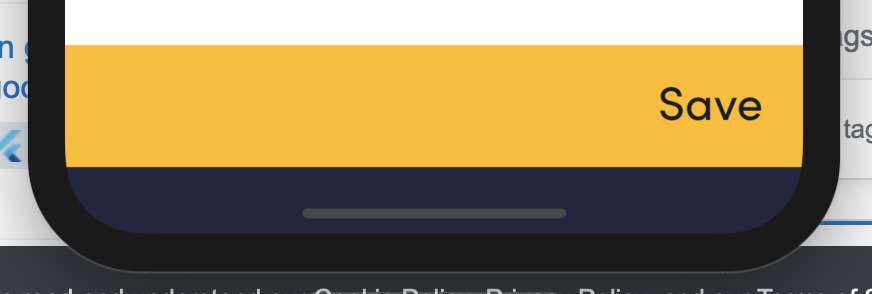
这里黄色是UIButton。在“常规”iPhones上,这个黄色是屏幕的底部。我试图实现的是让按钮一直走到安全区域的底部,同时仍然处于相同的位置(高于安全区)。
通常,我会将按钮约束为superview.bottom,在按钮的.xib中,将内容(titleLabel、buttonImage等)约束为safearea.bottom。
既然这在这里是不可能的,我该怎么做?
我尝试在UIButton子类中以编程方式添加约束,但没有效果。
示例:
if #available(iOS 11.0, *) {
    NSLayoutConstraint.activate([
        (titleLabel?.topAnchor.constraint(equalTo: self.safeAreaLayoutGuide.topAnchor))!,
        (titleLabel?.bottomAnchor.constraint(equalTo: self.safeAreaLayoutGuide.bottomAnchor))!
        ])
} else {
    // Fallback on earlier versions
}
提前感谢!
回答 1
Stack Overflow用户
发布于 2019-05-17 10:34:37
为此,您可以使用以下方法,
- 创建一个
UIView。 - 将一个
UILabel作为一个subView添加到上面创建的view中。 - 将一个
UIButton作为一个subView添加到上面创建的view中。
应用适当的layout constraints来获得所需的UI。
func addSaveButton() {
let height: CGFloat = 60 + self.view.safeAreaInsets.bottom //Height based on safe area
//Custom View
let customView = UIView(frame: CGRect.init(x: 0, y: self.view.bounds.height - height, width: self.view.bounds.width, height: height))
customView.backgroundColor = #colorLiteral(red: 0.9529411793, green: 0.6862745285, blue: 0.1333333403, alpha: 1)
//Save Label
let label = UILabel()
label.text = "Save"
label.textColor = UIColor.black
//Button
let button = UIButton(frame: customView.bounds)
button.addTarget(self, action: #selector(onTapSaveButton), for: .touchUpInside)
//Add label, button as subview in customView
customView.addSubview(label)
customView.addSubview(button)
self.view.addSubview(customView)
customView.translatesAutoresizingMaskIntoConstraints = false
label.translatesAutoresizingMaskIntoConstraints = false
button.translatesAutoresizingMaskIntoConstraints = false
//Add constraints
NSLayoutConstraint.activate([
self.view.leadingAnchor.constraint(equalTo: customView.leadingAnchor),
customView.bottomAnchor.constraint(equalTo: self.view.bottomAnchor),
customView.trailingAnchor.constraint(equalTo: self.view.trailingAnchor),
customView.heightAnchor.constraint(equalToConstant: height),
label.topAnchor.constraint(equalTo: customView.topAnchor, constant: 10),
label.trailingAnchor.constraint(equalTo: customView.trailingAnchor, constant: -10),
button.topAnchor.constraint(equalTo: customView.topAnchor),
button.leadingAnchor.constraint(equalTo: customView.leadingAnchor),
button.trailingAnchor.constraint(equalTo: customView.trailingAnchor),
button.bottomAnchor.constraint(equalTo: customView.bottomAnchor)
])
}
@objc func onTapSaveButton() {
print("Save button pressed")
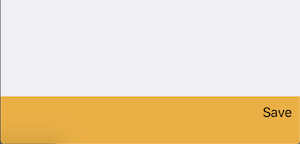
}In iPhone
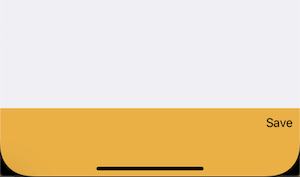
在iPhone-8中的应用
方法2:
通过使用titleEdgeInsets. button's,您可以采用更简单的方法。
func addSaveButton() {
    let height: CGFloat = 60 + self.view.safeAreaInsets.bottom

    //Button
    let button = UIButton(frame: CGRect.init(x: 0, y: UIScreen.main.bounds.height - height, width: UIScreen.main.bounds.width, height: height))
    button.setTitle("Save", for: .normal)
    button.backgroundColor = #colorLiteral(red: 0.9529411793, green: 0.6862745285, blue: 0.1333333403, alpha: 1)
    button.contentHorizontalAlignment = .right
    button.contentVerticalAlignment = .top
    button.titleEdgeInsets.top = 10
    button.titleEdgeInsets.right = 10
    button.addTarget(self, action: #selector(onTapSaveButton), for: .touchUpInside)

    self.view.addSubview(button)
    button.translatesAutoresizingMaskIntoConstraints = false

    //Add constraints
    NSLayoutConstraint.activate([
        self.view.leadingAnchor.constraint(equalTo: button.leadingAnchor),
        button.bottomAnchor.constraint(equalTo: self.view.bottomAnchor),
        button.trailingAnchor.constraint(equalTo: self.view.trailingAnchor),
        button.heightAnchor.constraint(equalToConstant: height)
        ])
}您可以很容易地在storyboard/subclassing中做同样的事情。我觉得这个比前一个好。
方法3:
子类UIButton,并使用它以编程方式创建按钮。
class CustomButton: UIButton {
    override func draw(_ rect: CGRect) {
        self.contentHorizontalAlignment = .right
        self.contentVerticalAlignment = .top
        self.titleEdgeInsets.top = 10
        self.titleEdgeInsets.right = 10
    }
}https://stackoverflow.com/questions/56182815
复制相似问题
腾讯云开发者

Copyright © 2013 - 2026 Tencent Cloud. All Rights Reserved. 腾讯云 版权所有
深圳市腾讯计算机系统有限公司 ICP备案/许可证号:粤B2-20090059 ![]() 粤公网安备44030502008569号
粤公网安备44030502008569号
腾讯云计算(北京)有限责任公司 京ICP证150476号 | 京ICP备11018762号