
如何实现背景运动效应(视差效应)
如何实现背景运动效应(视差效应)
提问于 2019-05-15 04:52:41
在大多数设备上,为壁纸启用运动效果是可能的,所以我的问题是,是否可以在ImageView上设置这个效果?如果是,我该怎么做?
运动效应在智能手机上,它只是一种与手机上的动作相一致的效果。如果你把手机向右倾斜,你会注意到壁纸会产生一种效果,使它看起来像在向右倾斜。
回答 2
Stack Overflow用户
回答已采纳
发布于 2019-05-25 11:09:06
根据视差ImageView安卓库,创建一个自定义ImageView:
import android.content.Context;
import android.hardware.Sensor;
import android.hardware.SensorEvent;
import android.hardware.SensorEventListener;
import android.hardware.SensorManager;
import android.support.v7.widget.AppCompatImageView;
import android.util.AttributeSet;
import android.widget.RelativeLayout;

public class ParallaxImageView extends AppCompatImageView implements SensorEventListener {
    float[] rotMat = new float[16];
    float[] vals = new float[3];
    //sensor parallax effect
    private SensorManager senSensorManager;
    private Sensor senAccelerometer;
    private int sideVerticalMargin, sideHorizontalMargin;
    private float verticalMultiplier=1, horizontalMultiplier=1;

    public ParallaxImageView(Context context, AttributeSet attrs) {
        super(context, attrs);

        senSensorManager = (SensorManager) context.getSystemService(Context.SENSOR_SERVICE);
        senAccelerometer = senSensorManager.getDefaultSensor(Sensor.TYPE_ROTATION_VECTOR);
        senSensorManager.registerListener(this, senAccelerometer , SensorManager.SENSOR_DELAY_FASTEST);

    }

    public ParallaxImageView(Context context) {
        super(context);
    }

    public void setMargins(int VM, int HM){
        this.sideVerticalMargin = -VM;
        this.sideHorizontalMargin = -HM;
        RelativeLayout.LayoutParams params = (RelativeLayout.LayoutParams)this.getLayoutParams();
        params.setMargins(-HM, -VM, -HM, -VM);
        this.setLayoutParams(params);
    }

    public void setMultipliers(float Vertical, float Horizontal){
        this.verticalMultiplier = Vertical;
        this.horizontalMultiplier = Horizontal;
    }

    @Override
    public void onSensorChanged(SensorEvent event) {
        Sensor mySensor = event.sensor;

        if (mySensor.getType() == Sensor.TYPE_ROTATION_VECTOR) {

            // Convert the rotation-vector to a 4x4 matrix.
            try {
                SensorManager.getRotationMatrixFromVector(rotMat, event.values);
            } catch (IllegalArgumentException e) {
                if (event.values.length > 3) {
                    // Note 3 bug
                    float[] newVector = new float[] {
                            event.values[0],
                            event.values[1],
                            event.values[2]
                    };
                    SensorManager.getRotationMatrixFromVector(rotMat, newVector);
                }
            }
            SensorManager.remapCoordinateSystem(rotMat,
                    SensorManager.AXIS_Y, SensorManager.AXIS_X,
                    rotMat);

            SensorManager.getOrientation(rotMat, vals);

            vals[0] = (float) Math.toDegrees(vals[0]);
            vals[1] = (float) Math.toDegrees(vals[1]);
            vals[2] = (float) Math.toDegrees(vals[2]);

            int leftfloat = (int) (this.sideHorizontalMargin-(vals[1]*this.horizontalMultiplier));

            int topfloat;

            if(vals[2]>0){
                topfloat=(int) (this.sideVerticalMargin+(vals[2]*this.verticalMultiplier));
            }else{
                topfloat=(int) (this.sideVerticalMargin-(vals[2]*this.verticalMultiplier));
            }

            this.setX(leftfloat);
            this.setY(topfloat);
        }

    }

    @Override
    public void onAccuracyChanged(Sensor sensor, int accuracy) {
        // TODO Auto-generated method stub

    }

    public void onPause() {
        senSensorManager.unregisterListener(this);
    }
    public void onResume() {
        senSensorManager.registerListener(this, senAccelerometer, SensorManager.SENSOR_DELAY_FASTEST);
    }
}
请按以下方式使用:
<RelativeLayout
    xmlns:android="http://schemas.android.com/apk/res/android"
    xmlns:tools="http://schemas.android.com/tools"
    android:layout_width="fill_parent"
    android:layout_height="fill_parent"
    android:layout_margin="0dip"
    tools:context="com.example.sensortest.MainActivity" >

    <ir.tcharter.testapp.ParallaxImageView
        android:id="@+id/iv_background"
        android:src="@drawable/background"
        android:layout_height="fill_parent"
        android:layout_width="fill_parent"
        android:scaleType="centerCrop"
        android:adjustViewBounds="true"/>

</RelativeLayout>
在活动中:
ParallaxImageView ivBackground = findViewById(R.id.iv_background);
ivBackground.setMargins(300, 200);
ivBackground.setMultipliers(1.5f, 1.7f);
别忘了给可绘图添加一个图像。这里添加了background.png。
Stack Overflow用户
发布于 2019-05-15 06:10:37
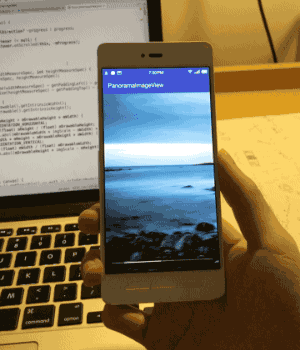
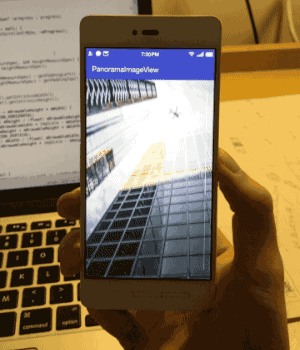
您可以通过在给定的库.下面使用
将此库添加到分级文件中。
implementation 'com.gjiazhe:PanoramaImageView:1.0'通过使用下面的PanoramaImageView而不是ImageView,您将得到解决方案。
<com.gjiazhe.panoramaimageview.PanoramaImageView
     android:id="@+id/panorama_image_view"
     android:layout_width="match_parent"
     android:layout_height="match_parent"
     android:src="@drawable/img"
     app:piv_enablePanoramaMode="true"
     app:piv_show_scrollbar="true"
app:piv_invertScrollDirection="false" />要获得更多理解,请访问我的站点。
例如:
页面原文内容由Stack Overflow提供。腾讯云小微IT领域专用引擎提供翻译支持
原文链接:
https://stackoverflow.com/questions/56141981
复制相关文章
相似问题
腾讯云开发者

Copyright © 2013 - 2026 Tencent Cloud. All Rights Reserved. 腾讯云 版权所有
深圳市腾讯计算机系统有限公司 ICP备案/许可证号:粤B2-20090059 ![]() 粤公网安备44030502008569号
粤公网安备44030502008569号
腾讯云计算(北京)有限责任公司 京ICP证150476号 | 京ICP备11018762号