
如何在Xamarin Android的应用程序购买中进行验证?
我使用的是来自https://www.nuget.org/packages/Plugin.InAppBilling的Xamarin和Plugin.InAppBilling。我已经成功地将插件集成到我的项目中,并且能够购买和消费测试产品。
现在我想核实一下购买情况。插件有这个文档https://jamesmontemagno.github.io/InAppBillingPlugin/SecuringPurchases.html
什么是DependencyService,如何获得signedData,如何将签名传递给InAppBillingSecurity.VerifyPurchase方法?这个问题说它不需要DependencyService https://github.com/jamesmontemagno/InAppBillingPlugin/issues/203
此外,在同一文档中还提到了在下面的行中放置play存储公钥。那么,我是否应该直接将密钥分成三个部分,然后粘贴以代替XOR_key1、XOR_key2和XOR_key3?
    const string key1 = @"XOR_key1";
    const string key2 = @"XOR_key2";
    const string key3 = @"XOR_key3";
我很困惑,没有找到任何实时的例子或一步一步的指南。有人能帮我理解这一点吗?
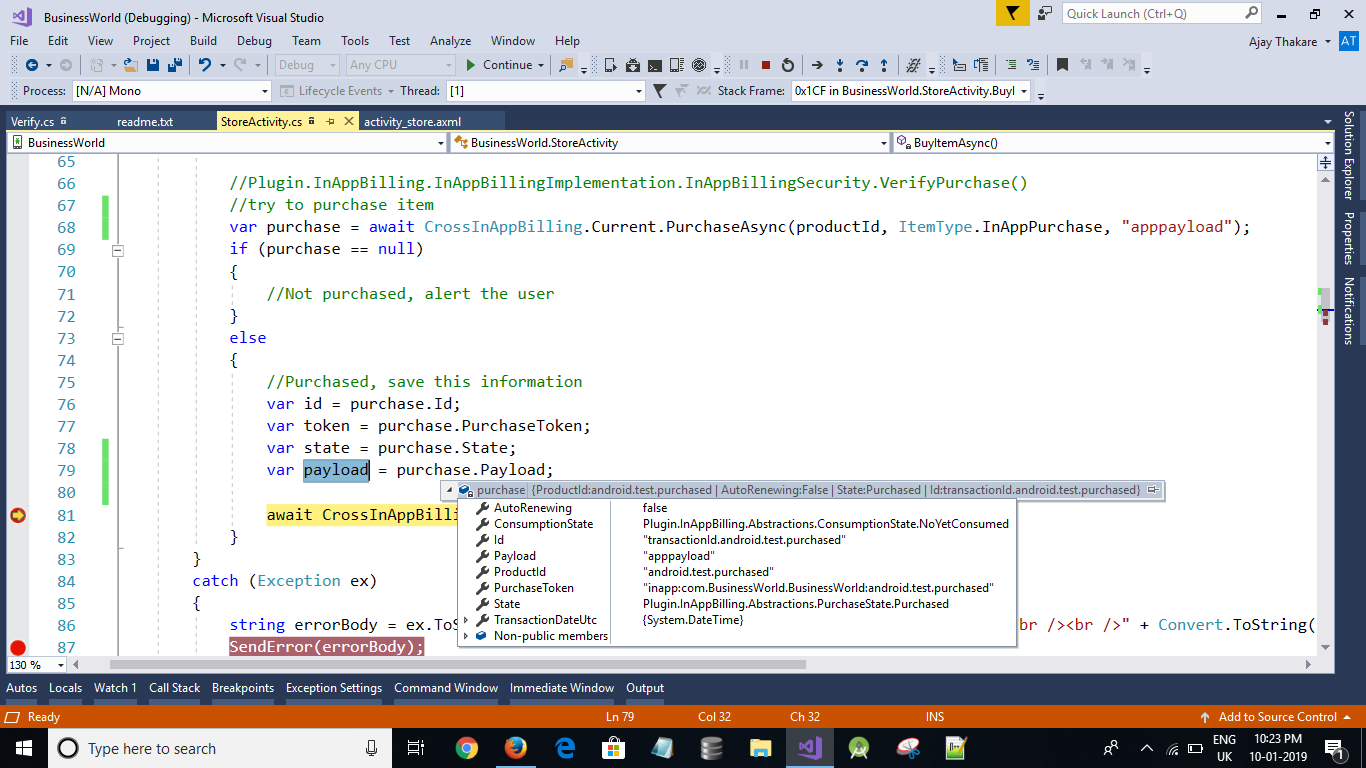
检查附在我的代码图像。购买后,它会返回这么多参数,但不返回signedData,签名
回答 1
Stack Overflow用户
发布于 2019-01-10 19:19:47
受扶养人处允许您从.NET标准共享项目调用特定于平台的代码。
Plugin.InAppBilling已经创建了要在每个平台上实现的接口,所以您所要做的就是在每个平台项目中实现IInAppBillingVerifyPurchase接口。接口中只有一种方法:
Task<bool> VerifyPurchase(string signedData, string signature, string productId = null, string transactionId = null);因此,在每个平台项目中,基本上都需要添加一个类文件,如下所示:
[assembly: Dependency (typeof (InAppBillingVerify))]
namespace YourPlatformProjectNameSpace
{
    public class InAppBillingVerify : IInAppBillingVerifyPurchase
    {
        const string key1 = @"XOR_key1";
        const string key2 = @"XOR_key2";
        const string key3 = @"XOR_key3";

        public Task<bool> VerifyPurchase(string signedData, string signature)
        {

#if __ANDROID__
            var key1Transform = Plugin.InAppBilling.InAppBillingImplementation.InAppBillingSecurity.TransformString(key1, 1);
            var key2Transform = Plugin.InAppBilling.InAppBillingImplementation.InAppBillingSecurity.TransformString(key2, 2);
            var key3Transform = Plugin.InAppBilling.InAppBillingImplementation.InAppBillingSecurity.TransformString(key3, 3);

            return Task.FromResult(Plugin.InAppBilling.InAppBillingImplementation.InAppBillingSecurity.VerifyPurchase(key1Transform + key2Transform + key3Transform, signedData, signature));
#else
            return Task.FromResult(true);
#endif
        }
    }

}以上是直接从你所链接的医生。您可以看到,区分三个部分的键只与Android相关,因此有编译器指令,使得键转换的代码只能在Android上运行(确保拥有用于Android项目的__ANDROID__ 在项目属性中定义的符号。对于iOS和UWP,它所做的就是返回true。对于UWP (见下文)来说,这是可以的,但是对于iOS,您可能需要解析signedData。检查苹果InAppPurchases上的文档,看看您验证时得到了什么。
如果我正在读取您正确链接的文档,那么插件应该调用VerifyPurchase方法。然后在插件中,VerifyPurchase方法的参数值是(来自您链接的文档):
iOS
    signedData: Full Receipt as a string in Base 64 Encoding
    signature: Always empty string
Android
    signedData: Purchase Data returned from Google
    signature: Data Signature returned from Google
UWP
    No additional authentication is provided.
因此,在iOS上,签名数据将是“Base 64编码中的字符串的完整收据”,而签名将为空。
在Android上,签名数据将是“从Google返回的购买数据”,而签名将是从Google返回的数据签名。
在UWP上,您可以不做任何事情,只从这个方法返回true,因为UWP不会将任何东西传递到这个方法中。
有关处理Android键的更多讨论,请参见这一讨论。
编辑:,因此您似乎需要将实现IInAppBillingVerifyPurchase的类传递给PurchaseAsync方法,以便调用VerifyPurchase方法,例如:
var verify = new Verify();
//try to purchase item
// Here is where you pass in the class that implements IInAppBillingVerifyPurchase.VerifyPurchase method
var purchase = await CrossInAppBilling.Current.PurchaseAsync(productId, ItemType.InAppPurchase, "apppayload", verify);
if(purchase == null)
{
    //Not purchased, may also throw excpetion to catch
}
else
{
    //Purchased!
}并添加Verify类:
public class Verify : IInAppBillingVerifyPurchase
{
    const string key1 = @"XOR_key1";
    const string key2 = @"XOR_key2";
    const string key3 = @"XOR_key3";

    public Task<bool> VerifyPurchase(string signedData, string signature)
    {

        var key1Transform = Plugin.InAppBilling.InAppBillingImplementation.InAppBillingSecurity.TransformString(key1, 1);
        var key2Transform = Plugin.InAppBilling.InAppBillingImplementation.InAppBillingSecurity.TransformString(key2, 2);
        var key3Transform = Plugin.InAppBilling.InAppBillingImplementation.InAppBillingSecurity.TransformString(key3, 3);

        return Task.FromResult(Plugin.InAppBilling.InAppBillingImplementation.InAppBillingSecurity.VerifyPurchase(key1Transform + key2Transform + key3Transform, signedData, signature));
    }
}https://stackoverflow.com/questions/54134858
复制相似问题
腾讯云开发者

Copyright © 2013 - 2026 Tencent Cloud. All Rights Reserved. 腾讯云 版权所有
深圳市腾讯计算机系统有限公司 ICP备案/许可证号:粤B2-20090059  粤公网安备44030502008569号
腾讯云计算(北京)有限责任公司 京ICP证150476号 | 京ICP备11018762号