
根据X/Y位置使用正交投影忽略深度缓冲区。
使用libgdx,我想使用深度缓冲区丢弃被遮挡的精灵。为此,我使用提供的Decal和DecalBatch和OrthographicCamera,并手动设置z位置。
根据我在x和y轴上的sprite位置,深度缓冲区是否能像预期的那样工作。
红色平方z= 98绿色平方z= 10
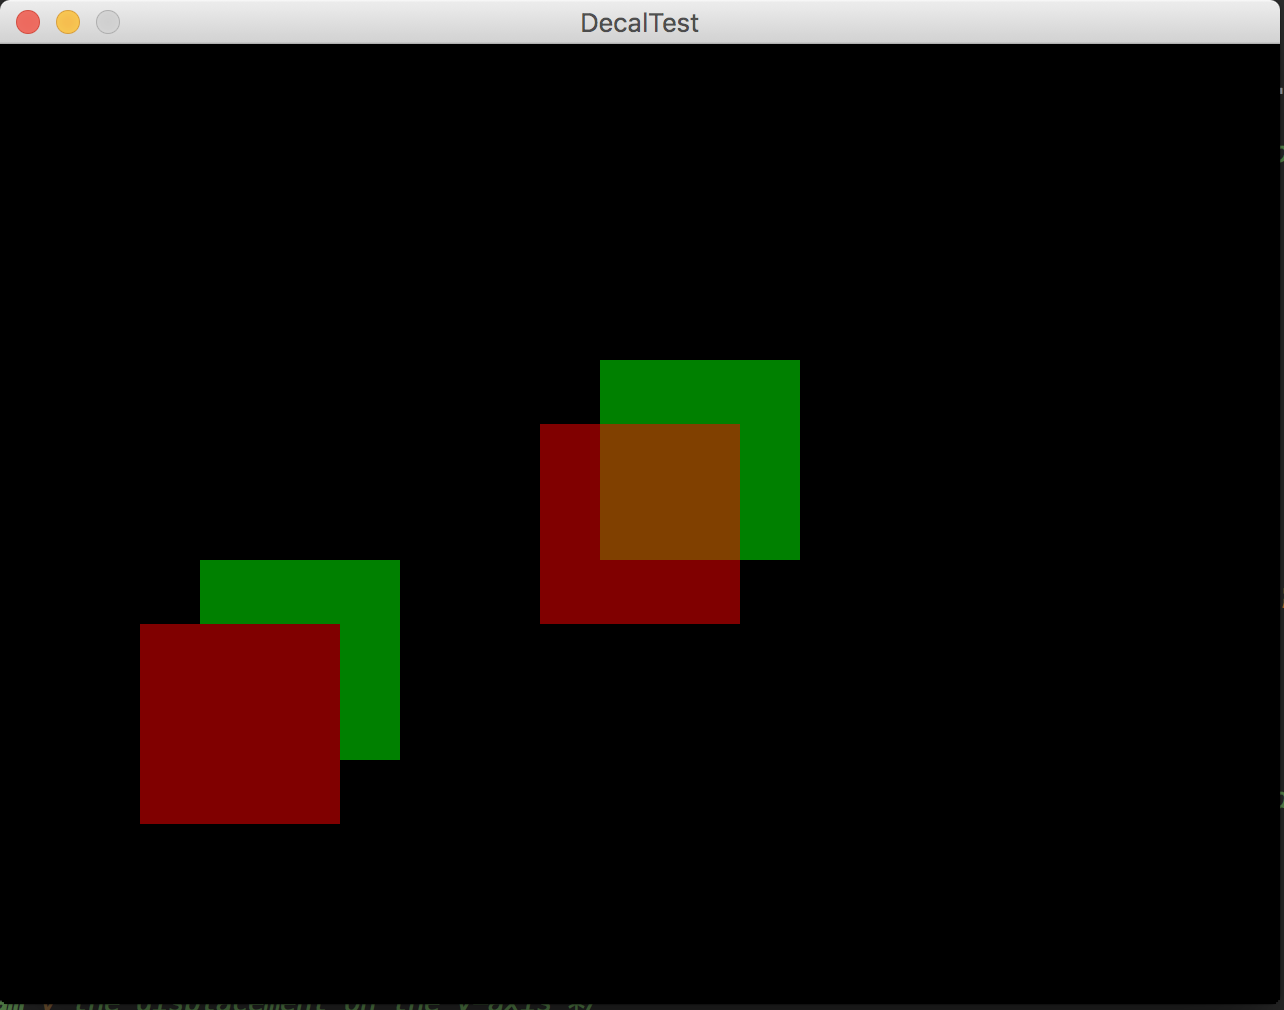
这个方块是50%透明的,所以我可以看到深度测试是否像预期的那样进行。
在这里,测试代码:
import com.badlogic.gdx.Gdx;
import com.badlogic.gdx.backends.lwjgl.LwjglApplication;
import com.badlogic.gdx.backends.lwjgl.LwjglApplicationConfiguration;
import com.badlogic.gdx.graphics.*;
import com.badlogic.gdx.graphics.g2d.TextureRegion;
import com.badlogic.gdx.graphics.g3d.decals.CameraGroupStrategy;
import com.badlogic.gdx.graphics.g3d.decals.Decal;
import com.badlogic.gdx.graphics.g3d.decals.DecalBatch;
import com.badlogic.gdx.math.Vector3;
import com.badlogic.gdx.utils.Array;
import fr.t4c.ui.GdxTest;

public class DecalTest extends GdxTest {
    DecalBatch batch;
    Array<Decal> decals = new Array<Decal>();
    OrthographicCamera camera;
    OrthoCamController controller;
    FPSLogger logger = new FPSLogger();

    Decal redDecal;
    Decal greenDecal;

    public void create() {

        camera = new OrthographicCamera(Gdx.graphics.getWidth(), Gdx.graphics.getHeight());
        //camera.near = 1;
        camera.position.set(600, 600, 100);
        camera.near = 1;
        camera.far = 100;

        controller = new OrthoCamController(camera);

        Gdx.input.setInputProcessor(controller);
        batch = new DecalBatch(new CameraGroupStrategy(camera));

        TextureRegion[] textures = {
                new TextureRegion(new Texture(Gdx.files.internal("src/test/resources/redsquare.png"))),
                new TextureRegion(new Texture(Gdx.files.internal("src/test/resources/greensquare.png")
                ))};

        redDecal = Decal.newDecal(textures[0], true);
        redDecal.setPosition(600, 600, 98f);
        decals.add(redDecal);

        greenDecal = Decal.newDecal(textures[1], true);
        greenDecal.setPosition(630, 632f, 10f);
        decals.add(greenDecal);

        Decal decal = Decal.newDecal(textures[0], true);
        decal.setPosition(400, 500, 98f);
        decals.add(decal);

        decal = Decal.newDecal(textures[1], true);
        decal.setPosition(430f, 532f, 10f);
        decals.add(decal);
    }

    public void render() {
        Gdx.gl.glClear(GL20.GL_COLOR_BUFFER_BIT | GL20.GL_DEPTH_BUFFER_BIT);
        Gdx.gl.glEnable(GL20.GL_DEPTH_TEST);
        Gdx.gl.glDepthFunc(GL20.GL_LEQUAL);

        camera.update();
        for (int i = 0; i < decals.size; i++) {
            Decal decal = decals.get(i);
            batch.add(decal);
        }
        batch.flush();
    }

    @Override
    public void dispose() {
        batch.dispose();
    }

    public static void main(String[] args) {
        LwjglApplicationConfiguration cfg = new LwjglApplicationConfiguration();
        cfg.useGL30 = false;
        cfg.width = 640;
        cfg.height = 480;
        cfg.resizable = false;
        cfg.foregroundFPS = 0; // Setting to 0 disables foreground fps
        // throttling
        cfg.backgroundFPS = 0; // Setting to 0 disables background fps
        new LwjglApplication(new DecalTest(), cfg);
    }
}
这是一个深度缓冲精度的问题,相机的方向扰乱了计算或其他什么?
编辑:我预计如果精灵在另一个后面,它们就会被阻挡。所以在我的例子中,红色的方块应该遮住他前面的绿色部分。左下方格有正确的行为,但右上角的方块没有。事物是红色方块有相同的Z值和绿色方块也有相同的Z值(当然不同于红色方块Z)。所以,唯一能让正方形夫妇与众不同的是他们的x和y位置,这不应该影响深度测试。
所以,我想要的是一个一致的深度测试行为,它排除了隐藏的纹理,因为我们看到的是左下角的方块,不管它们的x和y位置如何。根据评论,我添加了关于我期望的信息。
回答 1
Stack Overflow用户
发布于 2019-01-24 03:30:54
贴花和DecalBatch依靠GroupStrategy进行深度分选,而不是相机。此外,这些策略要么根据距离相机的距离排序深度,要么只按Z轴排序,这是透视相机所需要的,即较近的贴花,应该像Z所测量的那样封闭,也可能比离相机的距离更远。
即(x,y,z)照相机0,0,1。
标记A 1, 1,0 (Z距离1,向量距离1.73)
标牌B 0,0,-0.1 (Z距离1.1,矢量距离1.1)
您为上述标记选择的深度策略可以首先考虑A或B。
最常见的推荐GroupStrategy是CameraGroupStrategy,但这不是按Z排序,而是使用相机距离。如果您将DecalBatch改为SimpleOrthoGroupStrategy,那么深度将完全按照Z排序,这里是深度排序,您可以查看其他组策略,并查看其纯粹的绝对距离。
    class Comparator implements java.util.Comparator<Decal> {
        @Override
        public int compare (Decal a, Decal b) {
            if (a.getZ() == b.getZ()) return 0;
            return a.getZ() - b.getZ() < 0 ? -1 : 1;
        }
}https://stackoverflow.com/questions/53728348
复制相似问题
腾讯云开发者

Copyright © 2013 - 2026 Tencent Cloud. All Rights Reserved. 腾讯云 版权所有
深圳市腾讯计算机系统有限公司 ICP备案/许可证号:粤B2-20090059 ![]() 粤公网安备44030502008569号
粤公网安备44030502008569号
腾讯云计算(北京)有限责任公司 京ICP证150476号 | 京ICP备11018762号