
Python PIL.Image.convert没有用最近的调色板代替颜色。
这是来自:Convert image to specific palette using PIL without dithering的一种后续问题。
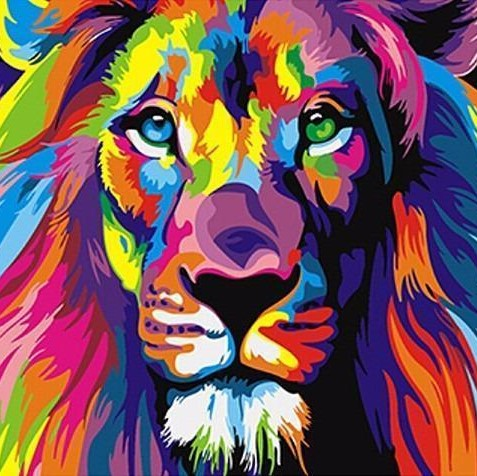
我也希望创建一个脚本,该脚本可以将图像转换为一组特定的颜色(),而无需抖动。
我已经实现了工作的“自定义量化”功能给出的问题的答案。除了一个大问题外,大多数脚本都运行良好。
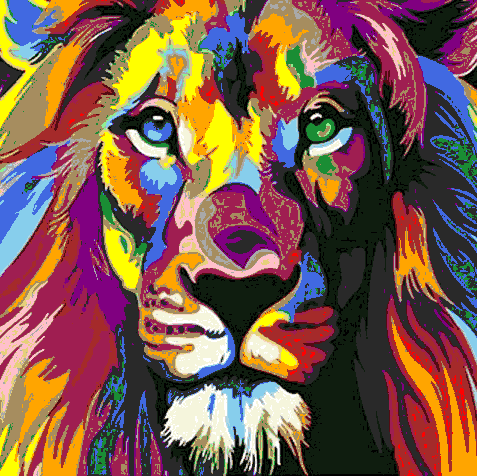
浅绿色RGB(130,190,40)被浅棕色RGB(166,141,95)所取代。(见鬃毛左上角的浅绿色。)
from PIL import Image

def customConvert(silf, palette, dither=False):
    ''' Convert an RGB or L mode image to use a given P image's palette.
        PIL.Image.quantize() forces dither = 1.
        This custom quantize function will force it to 0.
        https://stackoverflow.com/questions/29433243/convert-image-to-specific-palette-using-pil-without-dithering
    '''

    silf.load()

    # use palette from reference image made below
    palette.load()
    im = silf.im.convert("P", 0, palette.im)
    # the 0 above means turn OFF dithering making solid colors
    return silf._new(im)

palette = [
    0,0,0,
    0,0,255,
    15,29,15,
    26,141,52,
    41,41,41,
    65,105,225,
    85,11,18,
    128,0,128,
    135,206,236,
    144,238,144,
    159,30,81,
    165,42,42,
    166,141,95,
    169,169,169,
    173,216,230,
    211,211,211,
    230,208,122,
    245,245,220,
    247,214,193,
    255,0,0,
    255,165,0,
    255,192,203,
    255,255,0,
    255,255,255
    ] + [0,] * 232 * 3


# a palette image to use for quant
paletteImage = Image.new('P', (1, 1), 0)
paletteImage.putpalette(palette)


# open the source image
imageOrginal = Image.open('lion.png').convert('RGB')

# convert it using our palette image
imageCustomConvert = customConvert(imageOrginal, paletteImage, dither=False).convert('RGB')
CIE76 Delta-E:
目前: RGB(130,190,40) -> RGB(166,141,95) = 57.5522
预期: RGB(130,190,40) -> RGB(144,238,144) = 31.5623
有人能解释我是否写错了这段代码,或者建议如何让它工作。
回答 2
Stack Overflow用户
发布于 2018-11-26 14:51:15
如果速度是问题所在,ImageMagick可以更快地做到这一点。它安装在大多数Linux发行版上,可用于macOS和Windows。
基本上,您可以创建一个名为"map.png"的24x1图像,其中每个颜色在调色板上都有一个像素,并告诉ImageMagick将您的狮子图像重新映射到Lab颜色空间中的彩色地图上,而不会抖动。因此,终端/命令提示符中的命令是:
magick lion.png +dither -quantize Lab -remap map.png result.png在0.3秒内运行。如果您想从Python中执行此操作,您可以如下所示:
#!/usr/bin/env python3

import subprocess
import numpy as np
from PIL import Image

palette = [
    0,0,0,
    0,0,255,
    15,29,15,
    26,141,52,
    41,41,41,
    65,105,225,
    85,11,18,
    128,0,128,
    135,206,236,
    144,238,144,
    159,30,81,
    165,42,42,
    166,141,95,
    169,169,169,
    173,216,230,
    211,211,211,
    230,208,122,
    245,245,220,
    247,214,193,
    255,0,0,
    255,165,0,
    255,192,203,
    255,255,0,
    255,255,255
    ] + [0,] * 232 * 3


# Write "map.png" that is a 24x1 pixel image with one pixel for each colour
entries = 24
resnp   = np.arange(entries,dtype=np.uint8).reshape(24,1)
resim = Image.fromarray(resnp, mode='P')
resim.putpalette(palette)
resim.save('map.png')

# Use Imagemagick to remap to palette saved above in 'map.png'
# magick lion.png +dither -quantize Lab -remap map.png result.png
subprocess.run(['magick', 'lion.png', '+dither', '-quantize', 'Lab', '-remap', 'map.png', 'result.png'])
Stack Overflow用户
发布于 2018-11-26 13:26:10
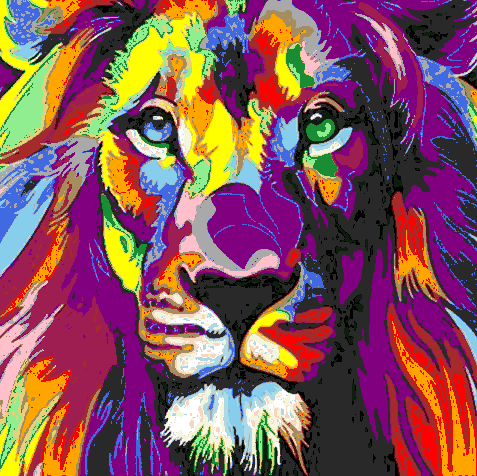
我试着计算每个像素的CIE76 Delta函数,以得到最近的颜色。Python不是我最好的语言,所以如果代码按您预期的方式工作,您可能想问另一个问题来优化代码。
我基本上把输入的图像和调色板转换成Lab空间,然后计算从每个像素到每个调色板条目的CIE76 Delta值,并取最近的一个。
#!/usr/bin/env python3

import numpy as np
from PIL import Image
from skimage import color

def CIE76DeltaE2(Lab1,Lab2):
    """Returns the square of the CIE76 Delta-E colour distance between 2 lab colours"""
    return (Lab2[0]-Lab1[0])*(Lab2[0]-Lab1[0]) + (Lab2[1]-Lab1[1])*(Lab2[1]-Lab1[1]) + (Lab2[2]-Lab1[2])*(Lab2[2]-Lab1[2])

def NearestPaletteIndex(Lab,palLab):
    """Return index of entry in palette that is nearest the given colour"""
    NearestIndex = 0
    NearestDist   = CIE76DeltaE2(Lab,palLab[0,0])
    for e in range(1,palLab.shape[0]):
        dist = CIE76DeltaE2(Lab,palLab[e,0])
        if dist < NearestDist:
            NearestDist = dist
            NearestIndex = e
    return NearestIndex

palette = [
    0,0,0,
    0,0,255,
    15,29,15,
    26,141,52,
    41,41,41,
    65,105,225,
    85,11,18,
    128,0,128,
    135,206,236,
    144,238,144,
    159,30,81,
    165,42,42,
    166,141,95,
    169,169,169,
    173,216,230,
    211,211,211,
    230,208,122,
    245,245,220,
    247,214,193,
    255,0,0,
    255,165,0,
    255,192,203,
    255,255,0,
    255,255,255
    ] + [0,] * 232 * 3


# Load the source image as numpy array and convert to Lab colorspace
imnp = np.array(Image.open('lion.png').convert('RGB'))
imLab = color.rgb2lab(imnp)
h,w = imLab.shape[:2]

# Load palette as numpy array, truncate unused palette entries, and convert to Lab colourspace
palnp = np.array(palette,dtype=np.uint8).reshape(256,1,3)[:24,:]
palLab = color.rgb2lab(palnp)

# Make numpy array for output image
resnp = np.empty((h,w), dtype=np.uint8)

# Iterate over pixels, replacing each with the nearest palette entry
for y in range(0, h):
    for x in range(0, w):
        resnp[y, x] = NearestPaletteIndex(imLab[y,x], palLab)

# Create output image from indices, whack a palette in and save
resim = Image.fromarray(resnp, mode='P')
resim.putpalette(palette)
resim.save('result.png')
我明白了:
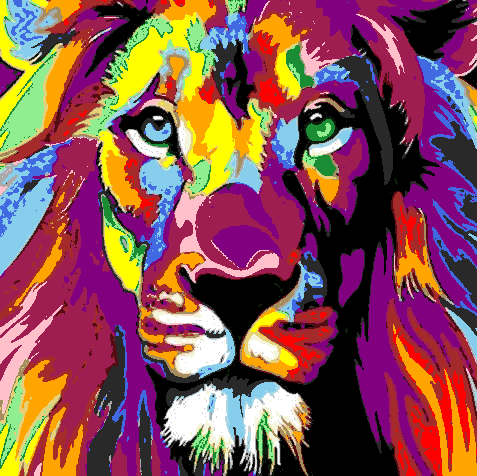
使用scipy.spatial.distance的cdist()函数似乎更快、更简洁:
#!/usr/bin/env python3

import numpy as np
from PIL import Image
from skimage import color
from scipy.spatial.distance import cdist

palette = [
    0,0,0,
    0,0,255,
    15,29,15,
    26,141,52,
    41,41,41,
    65,105,225,
    85,11,18,
    128,0,128,
    135,206,236,
    144,238,144,
    159,30,81,
    165,42,42,
    166,141,95,
    169,169,169,
    173,216,230,
    211,211,211,
    230,208,122,
    245,245,220,
    247,214,193,
    255,0,0,
    255,165,0,
    255,192,203,
    255,255,0,
    255,255,255
    ] + [0,] * 232 * 3


# Load the source image as numpy array and convert to Lab colorspace
imnp  = np.array(Image.open('lion.png').convert('RGB'))
h,w   = imnp.shape[:2]
imLab = color.rgb2lab(imnp).reshape((h*w,3))

# Load palette as numpy array, truncate unused palette entries, and convert to Lab colourspace
palnp = np.array(palette,dtype=np.uint8).reshape(256,1,3)[:24,:]
palLab = color.rgb2lab(palnp).reshape(24,3)

# Make numpy array for output image
resnp = np.empty(h*w, dtype=np.uint8)

# Iterate over pixels, replacing each with the nearest palette entry
x = 0
for L in imLab:
    resnp[x] = cdist(palLab, L.reshape(1,3), metric='seuclidean').argmin()
    x = x +1

# Create output image from indices, whack the palette in and save
resim = Image.fromarray(resnp.reshape(h,w), mode='P')
resim.putpalette(palette)
resim.save('result.png')https://stackoverflow.com/questions/53477624
复制相似问题
腾讯云开发者

Copyright © 2013 - 2026 Tencent Cloud. All Rights Reserved. 腾讯云 版权所有
深圳市腾讯计算机系统有限公司 ICP备案/许可证号:粤B2-20090059 ![]() 粤公网安备44030502008569号
粤公网安备44030502008569号
腾讯云计算(北京)有限责任公司 京ICP证150476号 | 京ICP备11018762号