
python中的二值图像去噪
在我的项目中,我试图用python中的openCV对图像进行二进制化。我使用来自openCV的自适应高斯阈值来转换图像,结果如下:
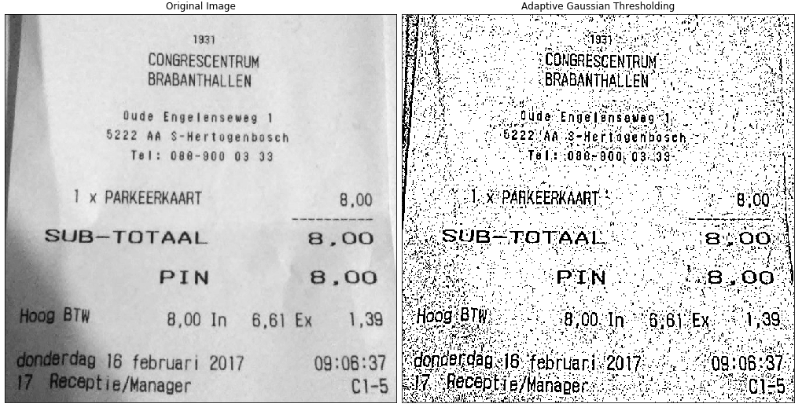
我想用二值图像作为OCR,但是太吵了。有没有办法从python中的二值图像中去除噪声?我已经尝试过来自openCV的openCV,但这并没有什么不同。
P.S .更好的二值化选择也受到欢迎
回答 3
Stack Overflow用户
发布于 2018-03-16 22:47:17
您应该首先将参数调整到自适应阈值,这样它就可以使用更大的区域。这样它就不会分割出噪音。每当输出图像有比输入图像更大的噪声时,您就知道自己做错了什么。
作为一个自适应阈值,我建议使用一个闭包(在输入的灰色值图像上),并使用一个足够大的结构元素来删除所有文本。这个结果和输入图像之间的区别就是所有的文本。然后,您可以对此差异应用一个常规阈值。
Stack Overflow用户
发布于 2018-03-16 13:34:07
也可以使用GraphCuts来完成这类任务。您需要安装最大流库才能运行代码。我很快地从他们的教程中复制了代码并对其进行了修改,这样您就可以更容易地运行它了。只需利用平滑参数来增加或降低图像的去噪效果。
import cv2
import numpy as np
import matplotlib.pyplot as plt
import maxflow

# Important parameter
# Higher values means making the image smoother
smoothing = 110

# Load the image and convert it to grayscale image
image_path = 'your_image.png'
img = cv2.imread('image_path')
img = cv2.cvtColor(img, cv2.COLOR_BGR2GRAY)
img = 255 * (img > 128).astype(np.uint8)

# Create the graph.
g = maxflow.Graph[int]()
# Add the nodes. nodeids has the identifiers of the nodes in the grid.
nodeids = g.add_grid_nodes(img.shape)
# Add non-terminal edges with the same capacity.
g.add_grid_edges(nodeids, smoothing)
# Add the terminal edges. The image pixels are the capacities
# of the edges from the source node. The inverted image pixels
# are the capacities of the edges to the sink node.
g.add_grid_tedges(nodeids, img, 255-img)

# Find the maximum flow.
g.maxflow()
# Get the segments of the nodes in the grid.
sgm = g.get_grid_segments(nodeids)

# The labels should be 1 where sgm is False and 0 otherwise.
img_denoised = np.logical_not(sgm).astype(np.uint8) * 255

# Show the result.
plt.subplot(121)
plt.imshow(img, cmap='gray')
plt.title('Binary image')
plt.subplot(122)
plt.title('Denoised binary image')
plt.imshow(img_denoised, cmap='gray')
plt.show()

# Save denoised image
cv2.imwrite('img_denoised.png', img_denoised)
Stack Overflow用户
发布于 2018-03-16 11:51:24
你可以尝试形态转变近,以消除小的“洞”。首先,使用numpy定义内核,您可能需要使用大小。选择内核的大小与您的噪音一样大。
kernel = np.ones((5,5),np.uint8)然后使用内核运行morphologyEx。
denoised = cv2.morphologyEx(image, cv2.MORPH_CLOSE, kernel)如果文本被删除,您可以尝试侵蚀图像,这将“增长”黑色像素。如果噪声和数据一样大,这种方法就不会有帮助。
erosion = cv2.erode(img,kernel,iterations = 1)https://stackoverflow.com/questions/49318622
复制相似问题
腾讯云开发者

Copyright © 2013 - 2026 Tencent Cloud. All Rights Reserved. 腾讯云 版权所有
深圳市腾讯计算机系统有限公司 ICP备案/许可证号:粤B2-20090059 ![]() 粤公网安备44030502008569号
粤公网安备44030502008569号
腾讯云计算(北京)有限责任公司 京ICP证150476号 | 京ICP备11018762号