
CAShapeLayer在使用iOS11视觉时翻转坐标
CAShapeLayer在使用iOS11视觉时翻转坐标
提问于 2018-01-03 19:01:54
我正在使用iOS 11视觉框架来检测面部特征,如鼻子、眼睛、嘴唇等。
视觉框架工作为所有面部特征提供非常准确的归一化点。现在,我试图用bezier路径在右眼上方画一条红线,下面是我用来绘制的代码。
1) addFaceLandmarksToImage()方法是通过视觉框架只对右眼进行检测,得到所有的归一化点。上下文被创建并用于绘制一条直线。
2)定义了addNewPathToImage()方法,在所检测到的右眼上添加shapelayer,这样我就可以将其裁剪成下一个形状。
func addFaceLandmarksToImage(_ face: VNFaceObservation) {

    UIGraphicsBeginImageContextWithOptions(image.size, false, 1.0)
    let context = UIGraphicsGetCurrentContext()

    image.draw(in: CGRect(x: 0, y: 0, width: image.size.width, height: image.size.height))

    context?.translateBy(x: 0, y: image.size.height)
    context?.scaleBy(x: 1.0, y: -1.0)

    // draw the face rect
    let w = face.boundingBox.size.width * image.size.width
    let imgViewWidth = face.boundingBox.size.width * imageView.frame.size.width
    let h = face.boundingBox.size.height * image.size.height
    let imgViewHeight = face.boundingBox.size.height * imageView.frame.size.height
    let x = face.boundingBox.origin.x * image.size.width
    let imgViewX = face.boundingBox.origin.x * imageView.frame.size.width
    let y = face.boundingBox.origin.y * image.size.height
    let imgViewY = face.boundingBox.origin.y * imageView.frame.size.height
    let faceRect = CGRect(x: x, y: y, width: w, height: h)
    context?.saveGState()
    context?.setStrokeColor(UIColor.red.cgColor)
    context?.setLineWidth(5.0)
    context?.addRect(faceRect)
    context?.drawPath(using: .stroke)
    context?.restoreGState()


    // right eye
    context?.saveGState()
    context?.setStrokeColor(UIColor.red.cgColor)

    if let landmark = face.landmarks?.rightEye {
        for i in 0...landmark.pointCount - 1 {
            let point = landmark.normalizedPoints[i]
            if i == 0 {
                eyePath.move(to: CGPoint(x: imgViewX + CGFloat(point.x) * imgViewWidth, y: imgViewY + CGFloat(point.y) * imgViewHeight))
                context?.move(to: CGPoint(x: x + CGFloat(point.x) * w, y: y + CGFloat(point.y) * h))
            } else {
                eyePath.addLine(to: CGPoint(x: imgViewX + CGFloat(point.x) * imgViewWidth, y: imgViewY + CGFloat(point.y) * imgViewHeight))
                context?.addLine(to: CGPoint(x: x + CGFloat(point.x) * w, y: y + CGFloat(point.y) * h))
                addNewPathToImage(path: eyePath)
            }
        }
    }

    addNewPathToImage(path: eyePath)
    eyePath.close()

    context?.closePath()
    context?.setLineWidth(2.0)
    context?.drawPath(using: .stroke)
    context?.saveGState()

    let finalImage = UIGraphicsGetImageFromCurrentImageContext()
    UIGraphicsEndImageContext()
    imageView.image = finalImage

}

func addNewPathToImage(path: UIBezierPath){

    shapeLayer.path = path.cgPath
    shapeLayer.strokeColor = UIColor.blue.cgColor
    shapeLayer.fillColor = UIColor.red.cgColor
    shapeLayer.lineWidth = 1.0
    imageView.layer.addSublayer(shapeLayer)
}
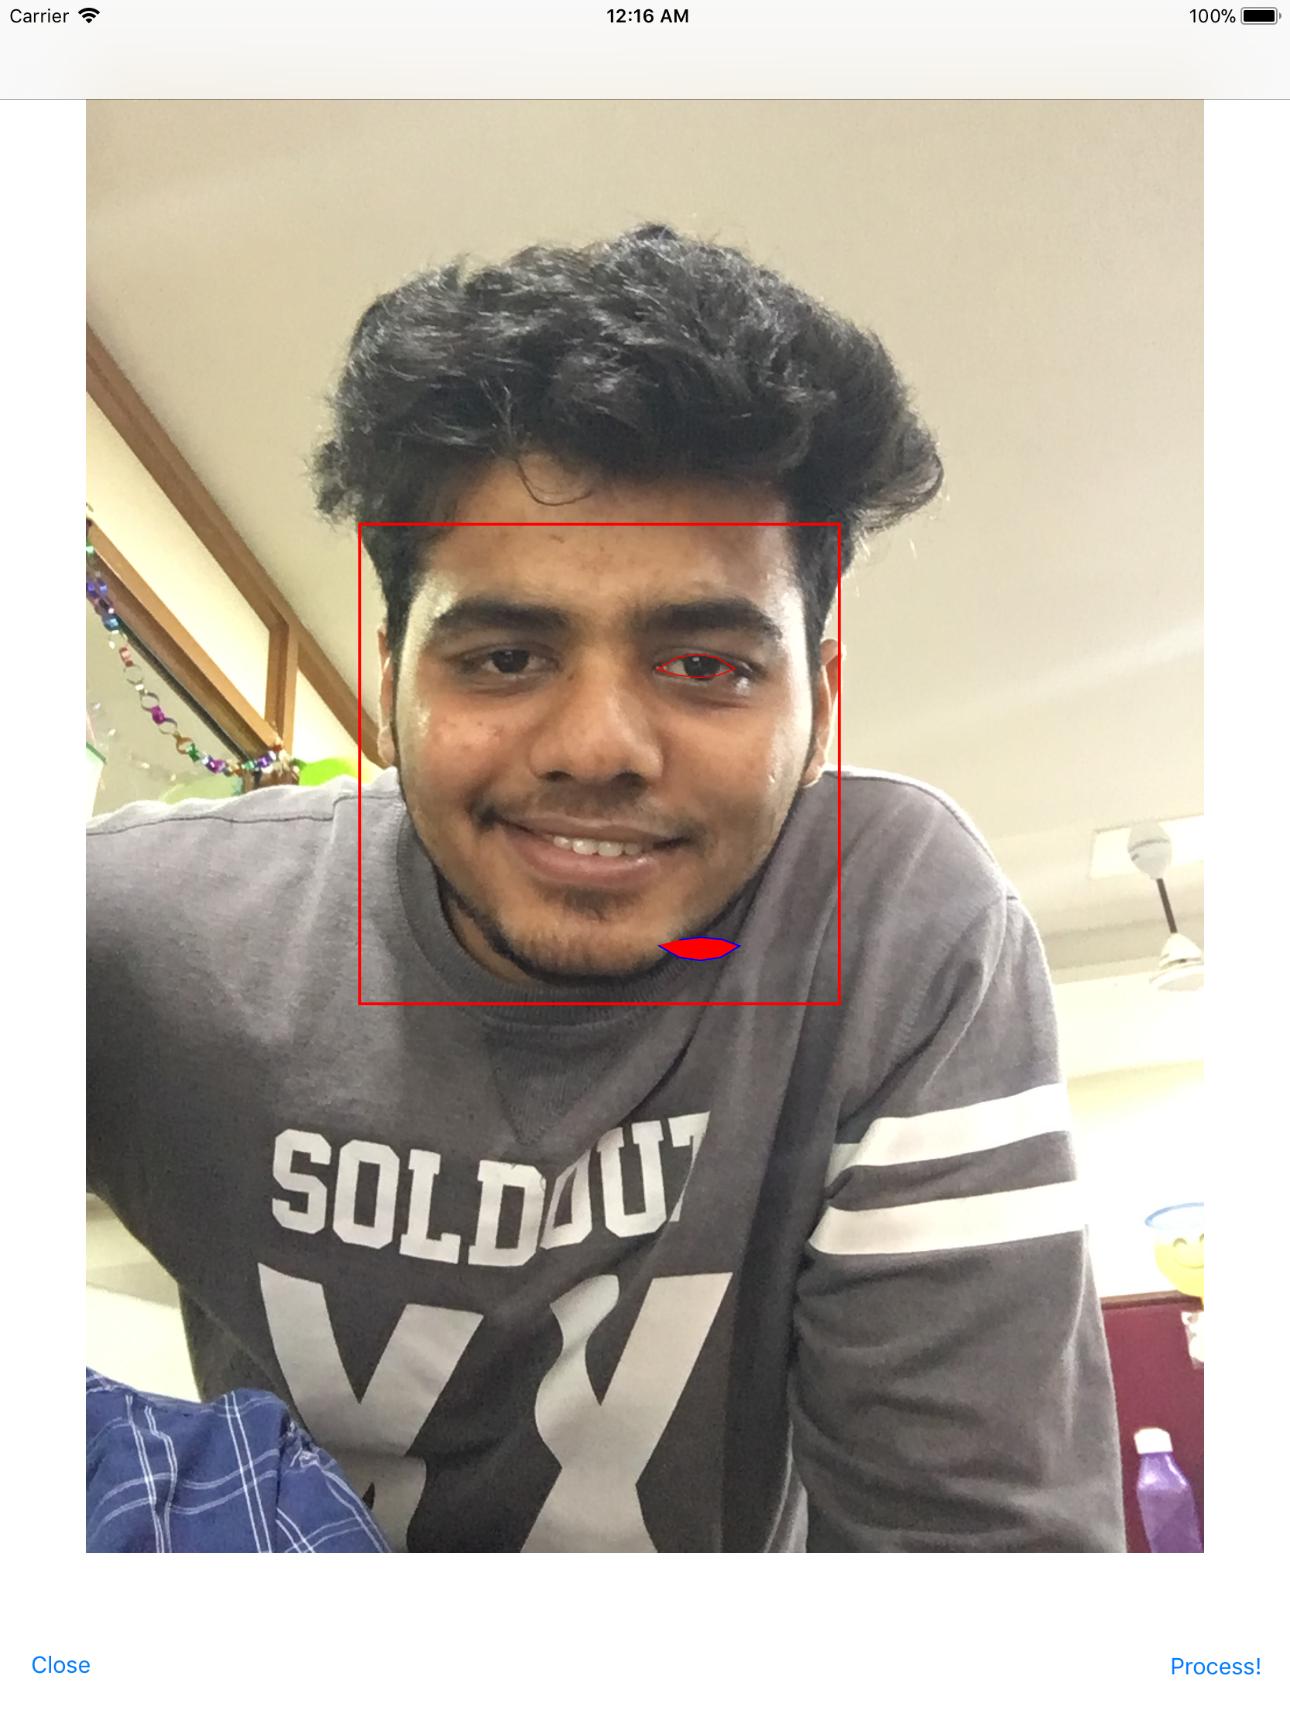
现在,正如你所看到的,我能够通过当前图像视图上的上下文精确地绘制右眼。我已经在上下文中应用了翻译和缩放属性。
但是,我试图在shapeLayer ()的帮助下添加的addNewPathToImage是翻转的。我知道UIkit使用的是ULO (左上角原点),而核心图形是基于LLO (下左原点)系统的。
,我需要在这个过程中应用什么转换,才能准确地将shapeLayer放在右眼上.
注意:我已经尝试过在shapeLayer上进行下面的转换,但没有成功。
shapeLayer.setAffineTransform(CGAffineTransform(translationX: 0, y: image.size.height))
shapeLayer.setAffineTransform(CGAffineTransform(scaleX: 1, y: -1))回答 1
Stack Overflow用户
发布于 2018-06-13 07:07:03
页面原文内容由Stack Overflow提供。腾讯云小微IT领域专用引擎提供翻译支持
原文链接:
https://stackoverflow.com/questions/48083581
复制相关文章
相似问题
腾讯云开发者

Copyright © 2013 - 2026 Tencent Cloud. All Rights Reserved. 腾讯云 版权所有
深圳市腾讯计算机系统有限公司 ICP备案/许可证号:粤B2-20090059 ![]() 粤公网安备44030502008569号
粤公网安备44030502008569号
腾讯云计算(北京)有限责任公司 京ICP证150476号 | 京ICP备11018762号