
如何为网页创建色差?
我目前正在开发一个网络用户界面
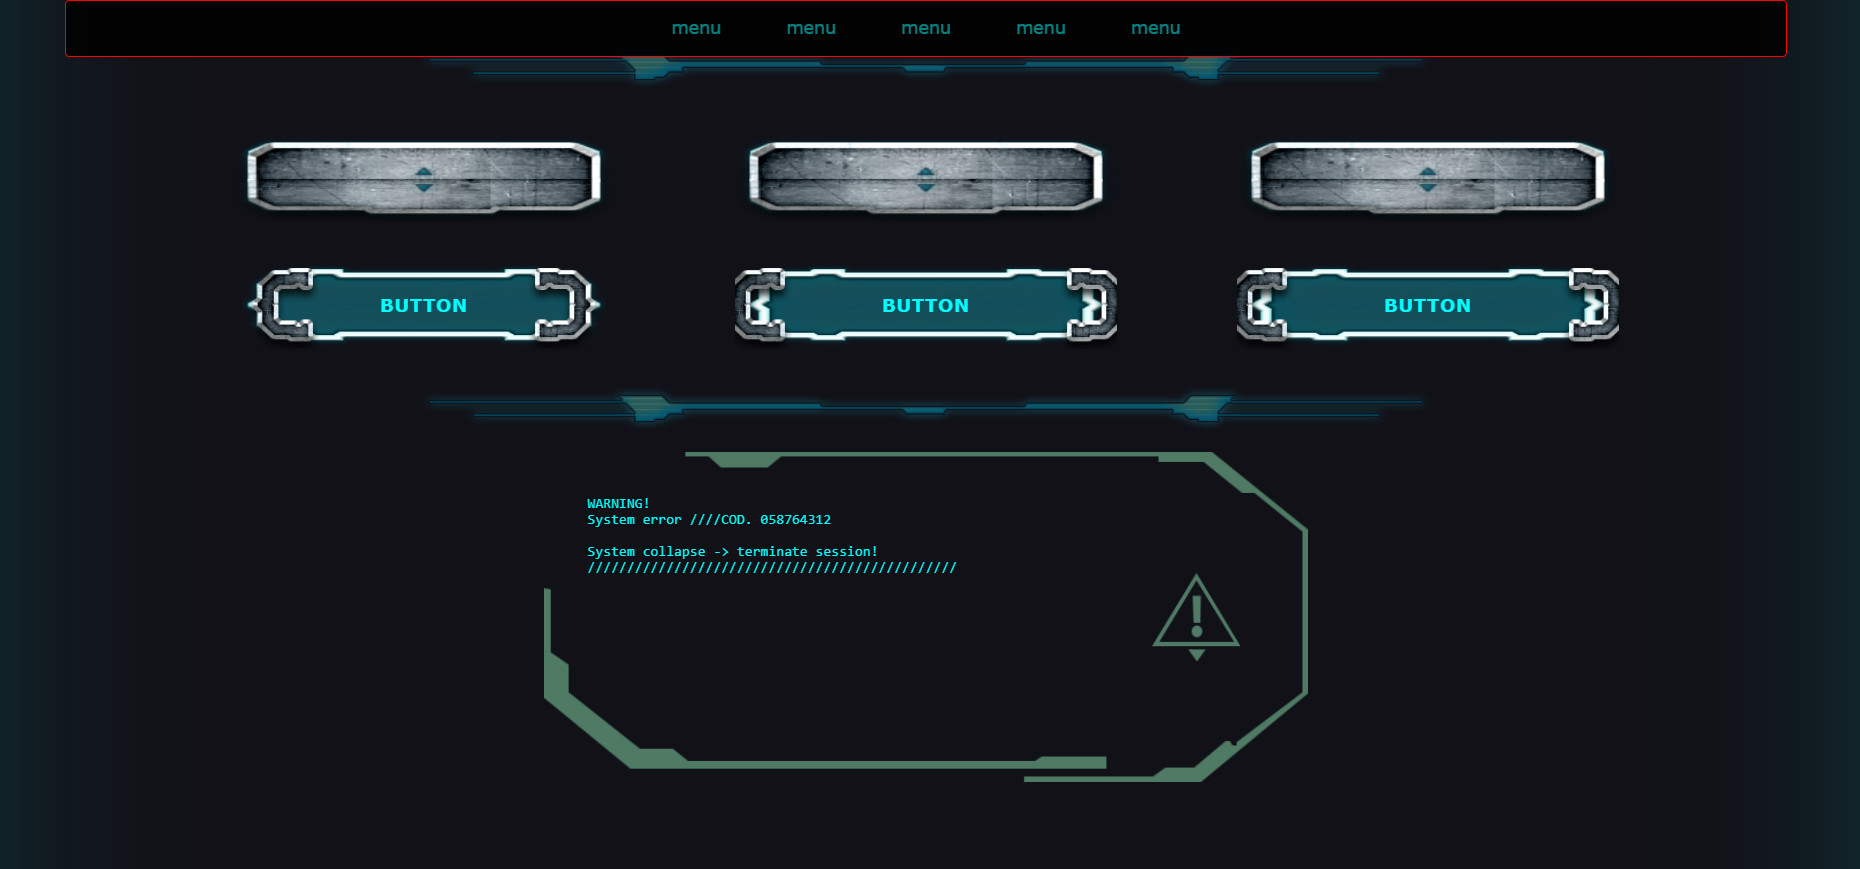
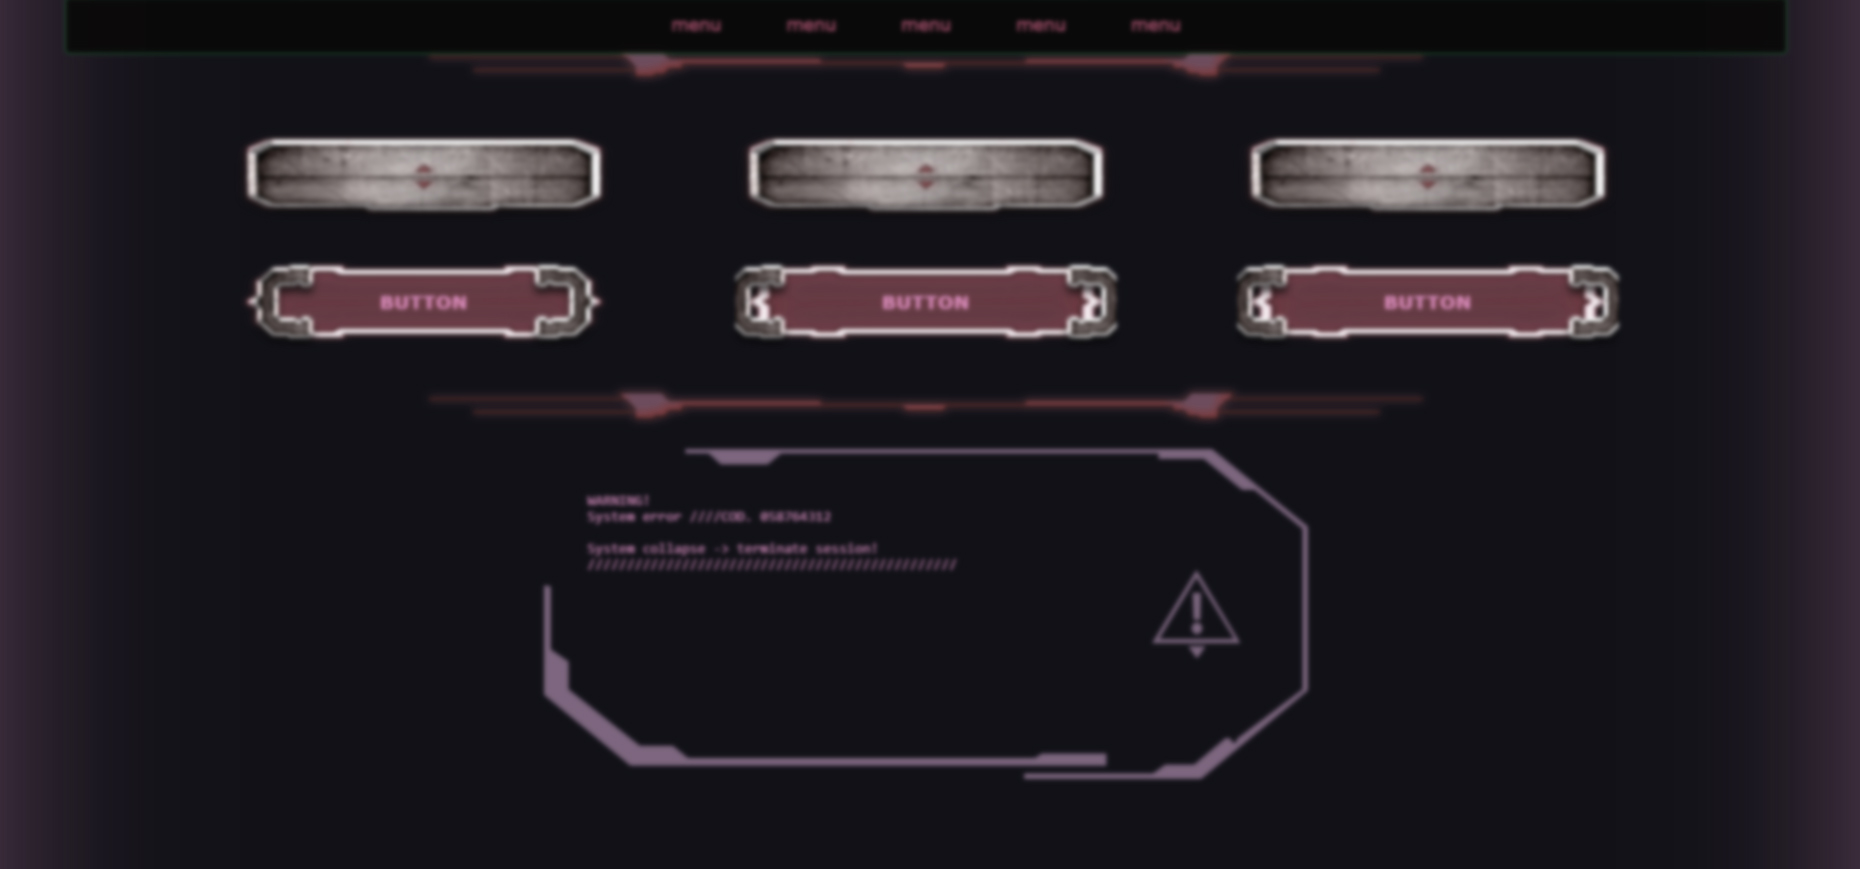
最近,我增加了一个功能,通过改变一些过滤css,比如色调旋转,灰度,倒置和模糊,来改变一些范围滑块的整体效果。
现在:
做些截图我随机做了这个!很酷!
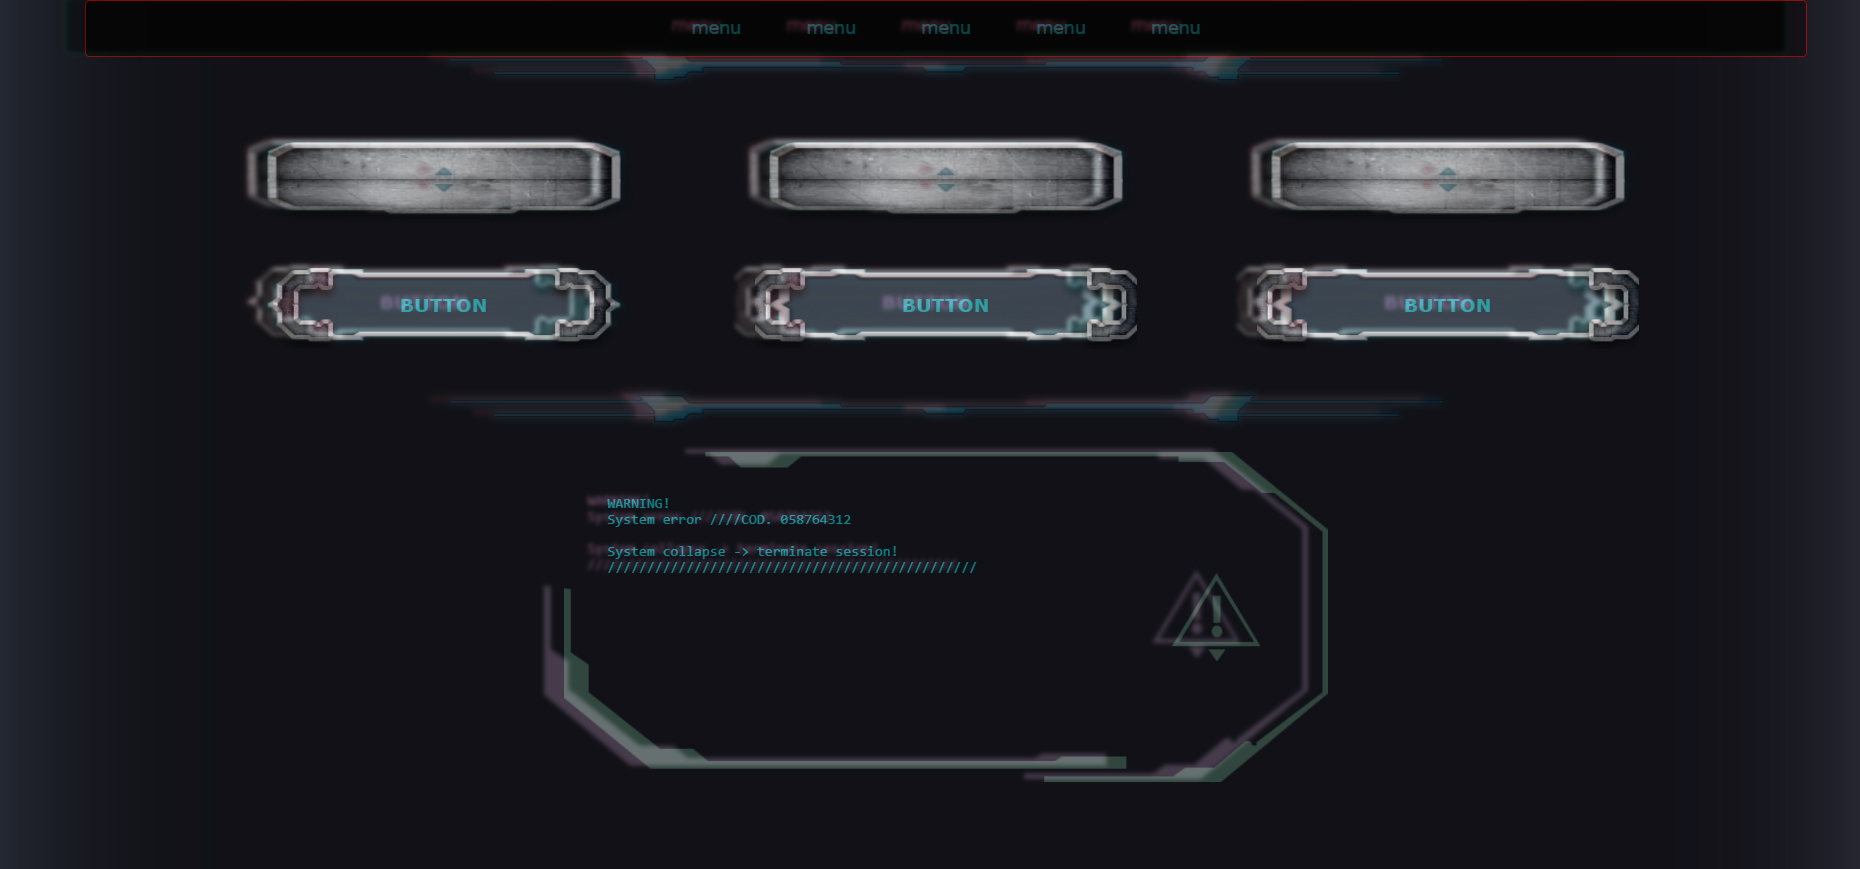
我只是试着通过降低一个的不透明度,把两个放在photoshop里。
以前我想通过使用开放式gl着色器语言来达到这样的效果(我一直想这样做,因为你可以获得更好的效果和更动态的效果),但是现在,就像我说的,在photoshop中这样做,我想出了一个小的解决方案,只需要做色差。
在加载所有css之后,
$( window ).load(function() {
  //chroma aberration
});
通过一个事件(或另一个范围滑块),我可以克隆所有html,降低前面的不透明度,并将后面的一个移动。
这样我就能达到这样的效果
你有什么想法吗??你觉得这有可能吗?你认为我是对的吗?还是你认为有更好的解决方案?
在这里我有一些问题,我想:
- 克隆副本不应该是可点击的
- 克隆的拷贝在有一个悬停,过渡,动画的时候应该像原来的一样.
- 克隆的副本不应该展开页面的方框大小,移动自身(可能使用位置:绝对和溢出:隐藏)。
我试过这样做,但不起作用
$( window ).load(function() {
  //Chromatic Aberration
  //clone all the body
  $('body')
    .children()
    .wrap( "<div class='original'></div>" )
    .clone()
    .insertAfter('.original')
    .addClass('cloned')
    .css('-webkit-filter',
         'hue-rotate(180deg)',
         'blur(3px)',
         'grayscale(50%)',
         'invert(5%)')
    .css('position','absolute')
    .css('left','10%')
    .css('z-index','-500');
  //(hue180,blur3,grayscale25,invert5)
  //lower opacity of the original
  $('body.original').css('opacity','0.5');
});回答 1
Stack Overflow用户
发布于 2017-10-08 22:30:52
这是可能的,但这是一个困难和javascript繁重的任务。首先,让css依赖于javascript控制的属性,而不是本地css属性:
而不是:
.button:hover {
    /* fancy hover effects */
}
.button:active {
    /* fancy activation effects */
}
切换到
.button.hover {  /* Note: no longer using the :hover pseudo-class */
    /* fancy hover effects */
}
.button.active {
    /* fancy activation effects */
}
这是个开始。它将允许您通过自定义逻辑而不是本地CSS来响应DOM操作。这是必要的,因为将没有办法激活本机CSS效果在您的模糊层。
现在您需要手动添加和删除这些自定义.hover、.active类:
var buttons = document.getElementsByTagName('button');
for (var i = 0; i < buttons.length; i++) {
    // Add `.hover` class on hover start
    buttons[i].onmouseover = function(button) {
        this.classList.add('hover');
    }.bind(buttons[i]);

    // Remove `.hover` class on hover end
    buttons[i].onmouseout = function(button) {
        this.classList.remove('hover');
    }.bind(buttons[i]);

    // Add `.active` class on mouse down
    buttons[i].onmousedown = function(button) {
        this.classList.add('active');
    }.bind(buttons[i]);

    // Remove `.active` class on mouse up
    buttons[i].onmouseup = function() {
        this.classList.remove('active');
    }.bind(buttons[i]);
}
好的,这足以使您的原始层通过自定义事件来控制。但现在我们需要增加模糊层。我们可以实现一些定制的深度克隆。我们希望这是自定义的,因为在克隆时,我们希望能够采取自定义操作(添加事件)。
var customCloneNode = function(node) {

    var cloned = node.cloneNode(false); /* DON'T clone children; we'll do it manually */

    // In a moment we'll do some custom logic with `cloned`

    var childNodes = node.childNodes;
    for (var i = 0; i < childNodes.length; i++)
        cloned.appendChild(customCloneNode(childNodes[i]));

    return cloned;

};
因此,我们知道如何模拟css事件,并克隆html节点。现在,我们需要将这两者结合起来,以便当原始的、相应的元素获得/丢失时,克隆的子元素获得并丢失自定义css类:
var cloneNodeWithLinkedEvents = function(node) {

    var cloned = node.cloneNode(false); /* DON'T clone children */

    // Here's the custom logic:
    node.onmouseover = function(parallelNode) {
        // Add a "hover" class to the original node AND the cloned one!
        this.classList.add('hover');
        parallelNode.classList.add('hover');
    }.bind(node, cloned);

    node.onmouseout = function(parallelNode) {
        this.classList.remove('hover');
        parallelNode.classList.remove('hover');
    }.bind(node, cloned);

    // Note: For brevity I've only added the hover event here.
    // It will be important to add the active event, as well as
    // any value changes in input elements, etc.

    var childNodes = node.childNodes;
    for (var i = 0; i < childNodes.length; i++)
        cloned.appendChild(cloneNodeWithLinkedEvents(childNodes[i]));

    return cloned;

};
现在,我们可以从原始元素中创建一个重复元素:
var originalElem = document.getElementByClassName('ui')[0];
var parallelElem = cloneNodeWithLinkedEvents(originalElem);

// Add the cloned node to the same parent which is holding `originalElem`
originalElem.parentNode.appendChild(parallelElem);

// Give the parallel node a unique class so we can style it:
parallelElem.classList.add('duplicate');
现在执行重复元素的样式设置:
.ui.duplicate {
    left: -10px;
    top: -5px;
    opacity: 0.3;
    z-index: 2; /* Or whatever value is necessary to make it appear on top */
}
工作实例:
window.onload = function() {
  var cloneNodeWithLinkedEvents = function(node) {

      var cloned = node.cloneNode(false); /* DON'T clone children */

      if (node.classList && node.classList.contains('button')) {

          // Here's the custom logic for buttons:
          node.onmouseover = function(parallelNode) {
              this.classList.add('hover');
              parallelNode.classList.add('hover');
          }.bind(node, cloned);

          node.onmouseout = function(parallelNode) {
              this.classList.remove('hover');
              parallelNode.classList.remove('hover');
          }.bind(node, cloned);

      }

      if (node.nodeName === 'INPUT') {

          var changeFunc = function(parallelNode) {
              parallelNode.value = this.value;
          }.bind(node, cloned);
          node.addEventListener('input', changeFunc);
          node.addEventListener('keyup', changeFunc);
          node.addEventListener('keydown', changeFunc);

      }

      // Note: For brevity I've only added the hover event here.
      // It will be important to add the active event, as well as
      // any value changes in input elements, etc.

      var childNodes = node.childNodes;
      for (var i = 0; i < childNodes .length; i++) {
          cloned.appendChild(cloneNodeWithLinkedEvents(childNodes[i]));
      }
      return cloned;

  };

  var originalElem = document.getElementsByClassName('ui')[0];
  var parallelElem = cloneNodeWithLinkedEvents(originalElem);

  originalElem.parentNode.appendChild(parallelElem);
  parallelElem.classList.add('duplicate');

};.ui {
position: absolute;
left: 0; top: 0;
width: 100%; height: 100%;
background-color: rgba(0, 0, 0, 0.5);
box-shadow: inset 0 0 0 3px #000000;
}
.ui .button {
position: absolute;
width: 100px;
height: 30px; line-height: 30px;
margin-left: -51px; margin-top: -16px;
text-align: center;
background-color: #ffffff;
font-family: monospace;
border: 2px dotted #ff0000;
background-color: #800000;
color: #ffffff;
transition: background-color 300ms linear;
}
.ui .button.hover {
background-color: #808080;
}
.ui .button1 { left: 20%; top: 20%; }
.ui .button2 { left: 50%; top: 20%; }
.ui .button3 { left: 80%; top: 20%; }
.ui .decoration {
position: absolute;
left: 30%; top: 30%;
width: 40%; height: 5%;
background-color: #5050ff;
}
.ui .text {
position: absolute;
left: 5%; top: 38%;
width: 90%;
color: #6060df;
}
.ui input {
position: absolute;
width: 200px; height: 30px; line-height: 30px;
left: 10%; top: 70%;
color: #00ff00;
}
.ui {
opacity: 1;
z-index: 1;
}
.ui.duplicate {
left: -10px; top: -5px;
pointer-events: none !important;
opacity: 0.7;
z-index: 2;
filter: hue-rotate(60deg);
}<div class="ui">
<div class="button button1">BUTTON1</div>
<div class="button button2">BUTTON2</div>
<div class="button button3">BUTTON3</div>
<div class="decoration"></div>
<div class="text">
Some text haha wheeee yayyy<br/>
Some text haha wheeee yayyy<br/>
Some text haha wheeee yayyy<br/>
</div>
<input type="text"/>
</div>
请注意,在复制层上悬停不会激活任何悬停效果,而在原始激活层上的悬停则会对这两种效果产生影响!另外,请注意,在input元素中键入值会将值更改事件链接到副本。
https://stackoverflow.com/questions/46635965
复制相似问题
腾讯云开发者

Copyright © 2013 - 2026 Tencent Cloud. All Rights Reserved. 腾讯云 版权所有
深圳市腾讯计算机系统有限公司 ICP备案/许可证号:粤B2-20090059 ![]() 粤公网安备44030502008569号
粤公网安备44030502008569号
腾讯云计算(北京)有限责任公司 京ICP证150476号 | 京ICP备11018762号