
使用vision api在脸上用可绘图/画图拍照
我在尝试什么?
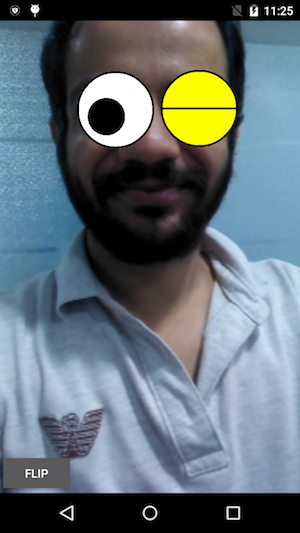
我正试着在脸上画一张可画的画,但是,我不能把这两张都画在同一张照片上。
我试过什么?
我试过使用CameraSource.takePicture,但我只是得到了脸,没有任何可绘图/油漆。
mCameraSource.takePicture(shutterCallback, new CameraSource.PictureCallback() {
            @Override
            public void onPictureTaken(byte[] bytes) {
                try {
                    String mainpath = getExternalStorageDirectory() + separator + "TestXyz" + separator + "images" + separator;
                    File basePath = new File(mainpath);
                    if (!basePath.exists())
                        Log.d("CAPTURE_BASE_PATH", basePath.mkdirs() ? "Success": "Failed");
                    String path = mainpath + "photo_" + getPhotoTime() + ".jpg";
                    File captureFile = new File(path);
                    captureFile.createNewFile();
                    if (!captureFile.exists())
                        Log.d("CAPTURE_FILE_PATH", captureFile.createNewFile() ? "Success": "Failed");
                    FileOutputStream stream = new FileOutputStream(captureFile);
                    stream.write(bytes);
                    stream.flush();
                    stream.close();
                } catch (IOException e) {
                    e.printStackTrace();
                }
            }
        });
我还试着使用:
mPreview.setDrawingCacheEnabled(true);
        Bitmap drawingCache = mPreview.getDrawingCache();
        try {
            String mainpath = getExternalStorageDirectory() + separator + "TestXyz" + separator + "images" + separator;
            File basePath = new File(mainpath);
            if (!basePath.exists())
                Log.d("CAPTURE_BASE_PATH", basePath.mkdirs() ? "Success": "Failed");
            String path = mainpath + "photo_" + getPhotoTime() + ".jpg";
            File captureFile = new File(path);
            captureFile.createNewFile();
            if (!captureFile.exists())
                Log.d("CAPTURE_FILE_PATH", captureFile.createNewFile() ? "Success": "Failed");
            FileOutputStream stream = new FileOutputStream(captureFile);
            drawingCache.compress(Bitmap.CompressFormat.PNG, 100, stream);
            stream.flush();
            stream.close();
        } catch (IOException e) {
            e.printStackTrace();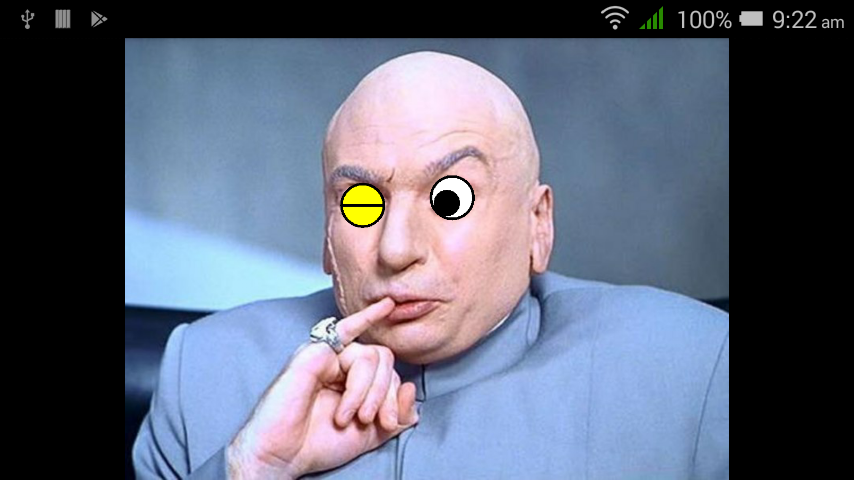
}在这种情况下,我只得到我在脸上画的东西。在这里,mPreview是CameraSourcePreview。
刚添加了捕获按钮,并添加了上面的代码在这谷歌的例子。
回答 3
Stack Overflow用户
发布于 2017-08-08 08:27:39
我可以通过下面的解决方案来捕捉具有可绘制/可绘制的图像:
private void captureImage() {
        mPreview.setDrawingCacheEnabled(true);
        Bitmap drawingCache = mPreview.getDrawingCache();

        mCameraSource.takePicture(shutterCallback, new CameraSource.PictureCallback() {
            @Override
            public void onPictureTaken(byte[] bytes) {
                int orientation = Exif.getOrientation(bytes);
                Bitmap temp = BitmapFactory.decodeByteArray(bytes, 0, bytes.length);
                Bitmap picture = rotateImage(temp,orientation);
                Bitmap overlay = Bitmap.createBitmap(mGraphicOverlay.getWidth(),mGraphicOverlay.getHeight(),picture.getConfig());
                Canvas canvas = new Canvas(overlay);

                Matrix matrix = new Matrix();

                matrix.setScale((float)overlay.getWidth()/(float)picture.getWidth(),(float)overlay.getHeight()/(float)picture.getHeight());

                // mirror by inverting scale and translating
                matrix.preScale(-1, 1);
                matrix.postTranslate(canvas.getWidth(), 0);

                Paint paint = new Paint();
                canvas.drawBitmap(picture,matrix,paint);
                canvas.drawBitmap(drawingCache,0,0,paint);

                try {
                    String mainpath = getExternalStorageDirectory() + separator + "MaskIt" + separator + "images" + separator;
                    File basePath = new File(mainpath);
                    if (!basePath.exists())
                        Log.d("CAPTURE_BASE_PATH", basePath.mkdirs() ? "Success": "Failed");
                    String path = mainpath + "photo_" + getPhotoTime() + ".jpg";
                    File captureFile = new File(path);
                    captureFile.createNewFile();
                    if (!captureFile.exists())
                        Log.d("CAPTURE_FILE_PATH", captureFile.createNewFile() ? "Success": "Failed");
                    FileOutputStream stream = new FileOutputStream(captureFile);
                    overlay.compress(Bitmap.CompressFormat.PNG, 100, stream);
                    stream.flush();
                    stream.close();
                    picture.recycle();
                    drawingCache.recycle();
                    mPreview.setDrawingCacheEnabled(false);
                } catch (IOException e) {
                    e.printStackTrace();
                }
            }
        });
}有时,定位问题也会发生在一些设备上。为此,我使用了Exif类和rotateImage()函数。
Exif类(来自这里的引用) :
public class Exif {
    private static final String TAG = "CameraExif";

    // Returns the degrees in clockwise. Values are 0, 90, 180, or 270.
    public static int getOrientation(byte[] jpeg) {
        if (jpeg == null) {
            return 0;
        }

        int offset = 0;
        int length = 0;

        // ISO/IEC 10918-1:1993(E)
        while (offset + 3 < jpeg.length && (jpeg[offset++] & 0xFF) == 0xFF) {
            int marker = jpeg[offset] & 0xFF;

            // Check if the marker is a padding.
            if (marker == 0xFF) {
                continue;
            }
            offset++;

            // Check if the marker is SOI or TEM.
            if (marker == 0xD8 || marker == 0x01) {
                continue;
            }
            // Check if the marker is EOI or SOS.
            if (marker == 0xD9 || marker == 0xDA) {
                break;
            }

            // Get the length and check if it is reasonable.
            length = pack(jpeg, offset, 2, false);
            if (length < 2 || offset + length > jpeg.length) {
                Log.e(TAG, "Invalid length");
                return 0;
            }

            // Break if the marker is EXIF in APP1.
            if (marker == 0xE1 && length >= 8 &&
                    pack(jpeg, offset + 2, 4, false) == 0x45786966 &&
                    pack(jpeg, offset + 6, 2, false) == 0) {
                offset += 8;
                length -= 8;
                break;
            }

            // Skip other markers.
            offset += length;
            length = 0;
        }

        // JEITA CP-3451 Exif Version 2.2
        if (length > 8) {
            // Identify the byte order.
            int tag = pack(jpeg, offset, 4, false);
            if (tag != 0x49492A00 && tag != 0x4D4D002A) {
                Log.e(TAG, "Invalid byte order");
                return 0;
            }
            boolean littleEndian = (tag == 0x49492A00);

            // Get the offset and check if it is reasonable.
            int count = pack(jpeg, offset + 4, 4, littleEndian) + 2;
            if (count < 10 || count > length) {
                Log.e(TAG, "Invalid offset");
                return 0;
            }
            offset += count;
            length -= count;

            // Get the count and go through all the elements.
            count = pack(jpeg, offset - 2, 2, littleEndian);
            while (count-- > 0 && length >= 12) {
                // Get the tag and check if it is orientation.
                tag = pack(jpeg, offset, 2, littleEndian);
                if (tag == 0x0112) {
                    // We do not really care about type and count, do we?
                    int orientation = pack(jpeg, offset + 8, 2, littleEndian);
                    switch (orientation) {
                        case 1:
                            return 0;
                        case 3:
                            return 3;
                        case 6:
                            return 6;
                        case 8:
                            return 8;
                    }
                    Log.i(TAG, "Unsupported orientation");
                    return 0;
                }
                offset += 12;
                length -= 12;
            }
        }

        Log.i(TAG, "Orientation not found");
        return 0;
    }

    private static int pack(byte[] bytes, int offset, int length,
            boolean littleEndian) {
        int step = 1;
        if (littleEndian) {
            offset += length - 1;
            step = -1;
        }

        int value = 0;
        while (length-- > 0) {
            value = (value << 8) | (bytes[offset] & 0xFF);
            offset += step;
        }
        return value;
    }
}
rotateImage函数:
    private Bitmap rotateImage(Bitmap bm, int i) {
        Matrix matrix = new Matrix();
        switch (i) {
            case ExifInterface.ORIENTATION_NORMAL:
                return bm;
            case ExifInterface.ORIENTATION_FLIP_HORIZONTAL:
                matrix.setScale(-1, 1);
                break;
            case ExifInterface.ORIENTATION_ROTATE_180:
                matrix.setRotate(180);
                break;
            case ExifInterface.ORIENTATION_FLIP_VERTICAL:
                matrix.setRotate(180);
                matrix.postScale(-1, 1);
                break;
            case ExifInterface.ORIENTATION_TRANSPOSE:
                matrix.setRotate(90);
                matrix.postScale(-1, 1);
                break;
            case ExifInterface.ORIENTATION_ROTATE_90:
                matrix.setRotate(90);
                break;
            case ExifInterface.ORIENTATION_TRANSVERSE:
                matrix.setRotate(-90);
                matrix.postScale(-1, 1);
                break;
            case ExifInterface.ORIENTATION_ROTATE_270:
                matrix.setRotate(-90);
                break;
            default:
                return bm;
        }
        try {
            Bitmap bmRotated = Bitmap.createBitmap(bm, 0, 0, bm.getWidth(), bm.getHeight(), matrix, true);
            bm.recycle();
            return bmRotated;
        } catch (OutOfMemoryError e) {
            e.printStackTrace();
            return null;
        }
}Stack Overflow用户
发布于 2017-08-06 08:59:07
你非常接近于达到你所需要的目标:)
你有:
- 来自面部照相机的图像(第一段代码片段)
- 眼睛覆盖的画布上的图像(第二段代码片段)
你需要的是:
- 一种在上面有眼睛覆盖的脸的图像--一个合并的图像。
如何合并?
要合并2个图像,只需使用画布,如下所示:
public Bitmap mergeBitmaps(Bitmap face, Bitmap overlay) {
    // Create a new image with target size
    int width = face.getWidth();
    int height = face.getHeight();
    Bitmap newBitmap = Bitmap.createBitmap(width, height, Bitmap.Config.ARGB_8888);

    Rect faceRect = new Rect(0,0,width,height);
    Rect overlayRect = new Rect(0,0,overlay.getWidth(),overlay.getHeight());

    // Draw face and then overlay (Make sure rects are as needed)
    Canvas canvas = new Canvas(newBitmap);
    canvas.drawBitmap(face, faceRect, faceRect, null);
    canvas.drawBitmap(overlay, overlayRect, faceRect, null);
    return newBitmap
}
然后您可以保存新的图像,就像您现在所做的一样。
完整代码如下所示:
mCameraSource.takePicture(shutterCallback, new
CameraSource.PictureCallback() {
        @Override
        public void onPictureTaken(byte[] bytes) {
            // Generate the Face Bitmap
            BitmapFactory.Options options = new BitmapFactory.Options();
            Bitmap face = BitmapFactory.decodeByteArray(bytes, 0, bytes.length, options);

            // Generate the Eyes Overlay Bitmap
            mPreview.setDrawingCacheEnabled(true);
            Bitmap overlay = mPreview.getDrawingCache();

            // Generate the final merged image
            Bitmap result = mergeBitmaps(face, overlay);

            // Save result image to file
            try {
                String mainpath = getExternalStorageDirectory() + separator + "TestXyz" + separator + "images" + separator;
                File basePath = new File(mainpath);
                if (!basePath.exists())
                    Log.d("CAPTURE_BASE_PATH", basePath.mkdirs() ? "Success": "Failed");
                String path = mainpath + "photo_" + getPhotoTime() + ".jpg";
                File captureFile = new File(path);
                captureFile.createNewFile();
                if (!captureFile.exists())
                    Log.d("CAPTURE_FILE_PATH", captureFile.createNewFile() ? "Success": "Failed");
                FileOutputStream stream = new FileOutputStream(captureFile);
                result.compress(Bitmap.CompressFormat.PNG, 100, stream);
                stream.flush();
                stream.close();
            } catch (IOException e) {
                e.printStackTrace();
            }
        }
    });
请注意,以上只是一个示例代码。您可能应该将合并和保存移动到一个文件到后台线程。
Stack Overflow用户
发布于 2017-08-03 23:53:38
你可以通过把它分解成更小的步骤来达到你想要的效果。
- 拍这张照片
- 将位图发送到,以检测面部的“地标”和每只眼睛睁开的概率
- 在你的形象上画上合适的“眼睛”
当使用的FaceDetector时,您将得到一个face对象的SparseArray (它可能包含多个脸,也可能是空的)。所以你需要处理这些案子。但是您可以遍历SparseArray并找到要使用的Face对象。
static Bitmap processFaces(Context context, Bitmap picture) {
    // Create a "face detector" object, using the builder pattern
    FaceDetector detector = new FaceDetector.Builder(context)
            .setTrackingEnabled(false) // disable tracking to improve performance
            .setClassificationType(FaceDetector.ALL_CLASSIFICATIONS)
            .build();

    // create a "Frame" object, again using a builder pattern (and passing in our picture)
    Frame frame = new Frame.Builder().setBitmap(picture).build(); // build frame

    // get a sparse array of face objects
    SparseArray<Face> faces = detector.detect(frame); // detect the faces

    // This example just deals with a single face for the sake of simplicity,
    // but you can change this to deal with multiple faces.
    if (faces.size() != 1) return picture;

    // make a mutable copy of the background image that we can modify
    Bitmap bmOverlay = Bitmap.createBitmap(picture.getWidth(), picture.getHeight(), picture.getConfig());
    Canvas canvas = new Canvas(bmOverlay);
    canvas.drawBitmap(picture, 0, 0, null);
    // get the Face object that we want to manipulate, and process it
    Face face = faces.valueAt(0);
    processFace(face, canvas);
    detector.release();
    return bmOverlay;
}
一旦您有了一个Face对象,您就可以找到您感兴趣的特性
private static void processFace(Face face, Canvas canvas) {
    // The Face object can tell you the probability that each eye is open.
    // I'm comparing this probability to an arbitrary threshold of 0.6 here,
    // but you can vary it between 0 and 1 as you please.
    boolean leftEyeClosed = face.getIsLeftEyeOpenProbability() < .6;
    boolean rightEyeClosed = face.getIsRightEyeOpenProbability() < .6;
    // Loop through the face's "landmarks" (eyes, nose, etc) to find the eyes.
    // landmark.getPosition() gives you the (x,y) coordinates of each feature.
    for (Landmark landmark : face.getLandmarks()) {
        if (landmark.getType() == Landmark.LEFT_EYE)
            overlayEyeBitmap(canvas, leftEyeClosed, landmark.getPosition().x, landmark.getPosition().y);
        if (landmark.getType() == Landmark.RIGHT_EYE)
            overlayEyeBitmap(canvas, rightEyeClosed, landmark.getPosition().x, landmark.getPosition().y);
    }
}
然后你可以添加你的油漆!
private static void overlayEyeBitmap(Canvas canvas, boolean eyeClosed, float cx, float cy) {
    float radius = 40;

    // draw the eye's background circle with appropriate color
    Paint paintFill = new Paint();
    paintFill.setStyle(Paint.Style.FILL);
    if (eyeClosed)
        paintFill.setColor(Color.YELLOW);
    else
        paintFill.setColor(Color.WHITE);
    canvas.drawCircle(cx, cy, radius, paintFill);

    // draw a black border around the eye
    Paint paintStroke = new Paint();
    paintStroke.setColor(Color.BLACK);
    paintStroke.setStyle(Paint.Style.STROKE);
    paintStroke.setStrokeWidth(5);
    canvas.drawCircle(cx, cy, radius, paintStroke);

    if (eyeClosed)
        // draw horizontal line across closed eye
        canvas.drawLine(cx - radius, cy, cx + radius, cy, paintStroke);
    else {
        // draw big off-center pupil on open eye
        paintFill.setColor(Color.BLACK);
        float cxPupil = cx - 10;
        float cyPupil = cy + 10;
        canvas.drawCircle(cxPupil, cyPupil, 25, paintFill);
    }
}在上面的片段中,我对眼睛半径进行了硬编码,以显示概念的证明。您可能希望进行一些更灵活的缩放,使用一定百分比的face.getWidth()来确定适当的值。但这是图像处理所能做的:
有关Mobile的更多细节是这里,Udacity目前的高级Android课程对这些内容有一个很好的演练(拍摄一张照片,发送给Mobile,并在上面添加一个位图)。这门课程是免费的,或者你可以看看他们做了什么,论吉乌布。
https://stackoverflow.com/questions/45407964
复制相似问题
腾讯云开发者

Copyright © 2013 - 2026 Tencent Cloud. All Rights Reserved. 腾讯云 版权所有
深圳市腾讯计算机系统有限公司 ICP备案/许可证号:粤B2-20090059 ![]() 粤公网安备44030502008569号
粤公网安备44030502008569号
腾讯云计算(北京)有限责任公司 京ICP证150476号 | 京ICP备11018762号