
Python布局管理
Python布局管理
提问于 2017-07-19 08:35:57
下面我附加了两张图片,显示我目前正在获得的布局和我想要的在图形用户界面的顶部框架中的布局,忽略了的中间框架和底部框架。为了尽可能地保持代码的简洁性,我还没有将其余的代码包含在其中。
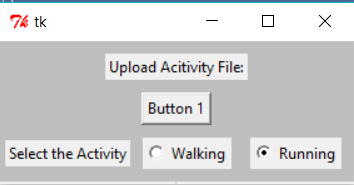
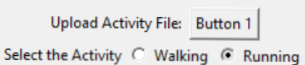
图片上的Left=布局,我得到。右边的图片=我需要的布局
from Tkinter import *

root= Tk()
topFrame = Frame(root,bg="grey")
topFrame.pack()
midFrame = Frame(root,bg="lightblue",borderwidth=2,relief=GROOVE)
midFrame.pack()
bottomFrame= Frame(root,bg="lightgreen")
bottomFrame.pack(side=BOTTOM)

label1 = Label(topFrame, text="Upload Acitivity File:")
label1.pack(padx=5, pady=10)
first_button=Button(topFrame,text="Button 1")
first_button.pack()


label2 = Label(topFrame, text="Select the Activity")
label2.pack(padx=5,pady=10,side=LEFT)

b1 = Radiobutton(topFrame, text="Walking",value=1)
b1.pack(padx=5, pady=10,side=LEFT)
b2 = Radiobutton(topFrame, text="Running",value=2)
b2.pack(padx=10, pady=10)

root.mainloop()回答 1
Stack Overflow用户
回答已采纳
发布于 2017-07-19 11:44:34
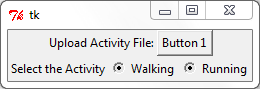
通过将GUI划分为有意义的部分并为每个部分创建一个框架,可以使tkinter中的小部件对齐变得更加容易。您可以重复这个操作multiple times,直到在每个子帧中对齐是直接的。
import Tkinter as tk

root = tk.Tk()

# Create two frames on top of each other (bg color can help debugging)
frame1 = tk.Frame(root, bg="yellow")
frame2 = tk.Frame(root, bg="blue")
frame1.pack(side=tk.TOP)
frame2.pack(side=tk.TOP)

# Place label1 and button1 side-by-side in frame1
label1 = tk.Label(frame1, text="Upload Activity File:")
label1.pack(side=tk.LEFT)
button1 = tk.Button(frame1,text="Button 1")
button1.pack(side=tk.LEFT)

# Place label2, b1 and b2 side-by-side in frame2
label2 = tk.Label(frame2, text="Select the Activity")
label2.pack(side=tk.LEFT)
b1 = tk.Radiobutton(frame2, text="Walking", value=1)
b1.pack(side=tk.LEFT)
b2 = tk.Radiobutton(frame2, text="Running", value=2)
b2.pack(side=tk.LEFT)

root.mainloop()
页面原文内容由Stack Overflow提供。腾讯云小微IT领域专用引擎提供翻译支持
原文链接:
https://stackoverflow.com/questions/45185164
复制相关文章
相似问题
腾讯云开发者

Copyright © 2013 - 2026 Tencent Cloud. All Rights Reserved. 腾讯云 版权所有
深圳市腾讯计算机系统有限公司 ICP备案/许可证号:粤B2-20090059 ![]() 粤公网安备44030502008569号
粤公网安备44030502008569号
腾讯云计算(北京)有限责任公司 京ICP证150476号 | 京ICP备11018762号