
Android:动态创建一个掩码
在我的android应用程序中,我有一辆汽车,用户可以在其中点击并选择不同的面板。图像相对比较复杂(相对于这里粘贴的图像),因此很难在正确的点上叠加按钮。此外,还有很多不同的图像。我想尝试的解决办法是:
- 按照以下建议,使用彩色掩膜检测选择了哪个面板:https://blahti.wordpress.com/2012/06/26/images-with-clickable-areas/
- 根据选择的面板(在我的示例中,蓝色和绿色)生成一个掩码。
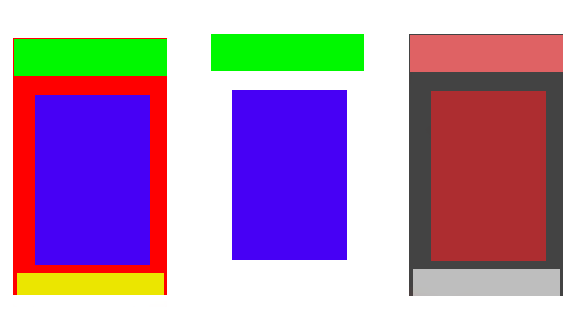
- 取决于面具,有一个红色的覆盖在汽车上-只是一个颜色过滤器将很好。
(第一个图像表示用于确定单击哪个面板的颜色,第二个图像表示生成的掩码,最后一个图像表示“结果”)。
我面临的唯一问题是:如何动态创建掩码?我想使用一个洪水类型的方法来创建一个新的帆布与‘面具’选定的面板。但是,我担心它在计算上可能太重。有更简单的建议吗?
更新:好的,我已经走得很远了。正如预期的那样,创建掩码的时间太长了(对于一个小图像,2-4秒)。但是,后来我发现了RenderScripts!!我想我还是能让这件事成功的。我现在唯一的小障碍是:我该如何传递被压过的颜色?
我的当前代码如下:
// create a bitmap for the mask.
ImageView img = (ImageView) findViewById (mask);
img.setDrawingCacheEnabled(true);
Bitmap bitmap = Bitmap.createBitmap(img.getDrawingCache());

// Create a tiny bitmap to store the colours of the panels that are
//'selected'
Bitmap.Config conf = Bitmap.Config.ARGB_8888; // see other conf types
Bitmap myBitmap = Bitmap.createBitmap(pickedPanels.size(), 1, conf);
int [] myInts = new int[pickedPanels.size()];
for (int i = 0; i<pickedPanels.size(); i++){
    myInts[i] = pickedPanels.get(i).intValue();
}
myBitmap.setPixels(myInts, 0, myBitmap.getWidth(), 0, 0,
myBitmap.getWidth(),0);

//Run thescript and set the output
final RenderScript rs = RenderScript.create(this);
final Allocation input = Allocation.createFromBitmap(rs, bitmap,
Allocation.MipmapControl.MIPMAP_NONE,Allocation.USAGE_SCRIPT);
final Allocation output = Allocation.createTyped(rs, input.getType());
        final ScriptC_singlesource script = new
ScriptC_singlesource(rs);
script.set_image(Allocation.createFromBitmap(rs, myBitmap,
Allocation.MipmapControl.MIPMAP_NONE,Allocation.USAGE_SCRIPT));
script.set_imgWidth(pickedPanels.size());
script.forEach_root(input, output);
output.copyTo(bitmap);
img.setImageBitmap(bitmap);

ImageView destim = (ImageView) findViewById (dest);
destim.setDrawingCacheEnabled(true);
destim.setImageBitmap(bitmap);
这就是剧本:
#pragma version(1)
#pragma rs java_package_name(za.co.overtake)

rs_allocation image;
int imgWidth;

uchar4 RS_KERNEL root(uchar4 in, uint32_t x, uint32_t y) {

for(int col = 0; col < imgWidth; col++){
    const uchar4 colour = *(const uchar4*)rsGetElementAt(image, col,0);
     if (in.r == colour.r && in.g == colour.g && in.b == colour.b){
        in.r = 255;
        in.g = 0;
        in.b = 0;
        break;
    } else {
       in.r = 0;
       in.g = 255;
       in.b = 0;
       rsDebug("HELLLLLP>>", colour);
    }

}
return in;
}
但是,当我尝试从myBitmap (或脚本中的图像)读取像素值时,RGB总是0。
(很抱歉命名错误,等等,我一直在疯狂地想办法解决这个问题)
回答 1
Stack Overflow用户
发布于 2017-06-27 12:22:36
好吧,终于弄明白了。在我的renderscript代码中有:
#pragma version(1)
#pragma rs java_package_name(za.co.overtake)

int*reds;
int*greens;
int*blues;
int imgWidth;

uchar4 RS_KERNEL root(uchar4 in, uint32_t x, uint32_t y) {
   bool colourme = false;
   for(int col = 0; col < imgWidth; col++){

        const int red = reds[col];
        const int green = greens[col];
        const int blue = blues[col];

         if (in.r == red && in.g == green && in.b == blue){
            colourme = true;
        }
    }
     if (colourme) {
        in.r = 255;
        in.g = 0;
        in.b = 0;
        in.a = 50;
     } else {
         in.r = 0;
         in.g = 0;
         in.b = 0;
         in.a = 0;
     }
    return in;
}
然后用Java
public void showDamagedPanels(int dest, int mask) {

    int noOfColours = pickedPanels.size();
    if (noOfColours > 0) {
        ImageView img = (ImageView) findViewById (mask);
        img.setDrawingCacheEnabled(true);
        Bitmap bitmap = Bitmap.createBitmap(img.getDrawingCache());
        img.setDrawingCacheEnabled(false);

        int [] reds = new int[noOfColours];
        int [] greens = new int[noOfColours];
        int [] blues = new int[noOfColours];

        for (int i = 0; i< noOfColours; i++){
            int colour = pickedPanels.get(i);
            reds[i] = (colour >> 16) & 0xFF;
            greens[i] = (colour >> 8) & 0xFF;
            blues[i] = (colour >> 0) & 0xFF;
        }

        final RenderScript rs = RenderScript.create(this);
        final Allocation input = Allocation.createFromBitmap(rs, bitmap, Allocation.MipmapControl.MIPMAP_NONE,
                Allocation.USAGE_SCRIPT);
        final Allocation output = Allocation.createTyped(rs, input.getType());
        final ScriptC_singlesource script = new ScriptC_singlesource(rs);

        Allocation red = Allocation.createSized(rs, Element.I32(rs), reds.length);
        red.copyFrom(reds);
        script.bind_reds(red);

        Allocation green = Allocation.createSized(rs, Element.I32(rs), greens.length);
        green.copyFrom(greens);
        script.bind_greens(green);

        Allocation blue = Allocation.createSized(rs, Element.I32(rs), blues.length);
        blue.copyFrom(blues);
        script.bind_blues(blue);

        script.set_imgWidth(pickedPanels.size());
        script.forEach_root(input, output);
        output.copyTo(bitmap);

        ImageView destim = (ImageView) findViewById (dest);
        destim.setDrawingCacheEnabled(true);
        destim.setImageBitmap(bitmap);
    } else {
        ImageView destim = (ImageView) findViewById (dest);
        destim.setImageBitmap(null);
    }


}
其中dest是覆盖图像和图像中充当掩码的掩码。因此,基本上,当一个面板被点击-把它的颜色放在pickedPanels中。然后调用showPanels方法,该方法调用脚本。脚本检查颜色并设置结果为红色或清晰的图像。
更新:对于任何试图使用它的人来说,但是有一些问题:没有renderscript代码是可以这样做的,但是它的运行速度确实要慢一些--尽管在我的例子中,对于小图像来说是可以的。
private Bitmap changeColor(Bitmap src, Set<Integer> pickedPanelsList) {
        int fine = getResources().getColor(R.color.colorAccent);

        int width = src.getWidth();
        int height = src.getHeight();
        int[] pixels = new int[width * height];
        // get pixel array from source
        src.getPixels(pixels, 0, width, 0, 0, width, height);

        Bitmap bmOut = Bitmap.createBitmap(width, height, src.getConfig());

        int AGood = 100, RGood = Color.red(fine), GGood = Color.green(fine), BGood = Color.blue(fine);
        int ABad = 100, RBad = Color.red(Color.RED), GBad = Color.green(Color.RED), BBad = Color.blue(Color.RED);
        int pixel;

        // iteration through pixels
        for (int y = 0; y < height; ++y) {
            for (int x = 0; x < width; ++x) {
                // get current index in 2D-matrix
                int index = y * width + x;
                pixel = pixels[index];
                if(pickedPanelsList.contains(pixel)){
                    pixels[index] = Color.argb(ABad, RBad, GBad, BBad);
                } else if (Color.alpha(pixel) > 0){
                    pixels[index] = Color.argb(AGood, RGood, GGood, BGood);
                }
            }
        }
        bmOut.setPixels(pixels, 0, width, 0, 0, width, height);
        return bmOut;
    }
在这里,选中的面板集合是所有的颜色应该是红色(或选择)和位图是掩码(如果我记得正确,我做了一段时间前)。我还发现,对结果做一个轻微的模糊,使图像看起来更好-因为它显然将是较少的锯齿。
https://stackoverflow.com/questions/44720877
复制相似问题
腾讯云开发者

Copyright © 2013 - 2026 Tencent Cloud. All Rights Reserved. 腾讯云 版权所有
深圳市腾讯计算机系统有限公司 ICP备案/许可证号:粤B2-20090059 ![]() 粤公网安备44030502008569号
粤公网安备44030502008569号
腾讯云计算(北京)有限责任公司 京ICP证150476号 | 京ICP备11018762号