
在使用google电子表格创建电子表格时,向电子表格添加标题
在使用google电子表格创建电子表格时,向电子表格添加标题
提问于 2017-04-18 07:10:48
我使用谷歌电子表格API创建电子表格使用node.js。我想在创建电子表格时添加一个标题(有三列h1、h2和h3)。我能够创建电子表格,但我不能添加标题。有什么办法吗?
回答 1
Stack Overflow用户
回答已采纳
发布于 2017-04-18 07:44:08
下面的气体样本怎么样?如果你想跑,除了汽油,请告诉我。
为了使用这一点,首先请启用高级谷歌服务和Google控制台的v4。
如何使用它如下所示。
- 在脚本编辑器中,选择Resources >
- 在出现的对话框中,单击的on/off开关。
- 在对话框的底部,单击Google控制台的链接。
- 在控制台中,单击filter框并键入API名称的一部分“”,然后在看到名称后单击它。
- 在下一个屏幕上,单击Enable。
- 关闭开发人员控制台并返回到脚本编辑器。在对话框中单击OK。您启用的高级服务现在可以在“自动完成”中使用。
详细信息是https://developers.google.com/apps-script/guides/services/advanced。
脚本:
Sheets.Spreadsheets.create({
  "properties":
  {
    "title": "filename" // filename
  },
  "sheets":
  [
    {
      "data":
      [
        {
          "startRow": 0, // 1st row
          "startColumn": 7, // column h
          "rowData":
          [
            {
              "values":
              [
                {
                  "userEnteredValue":
                  {
                    "stringValue": "sample text h1"
                  }
                }
              ]
            },
            {
              "values":
              [
                {
                  "userEnteredValue":
                  {
                    "stringValue": "sample text h2"
                  }
                }
              ]
            },
            {
              "values":
              [
                {
                  "userEnteredValue":
                  {
                    "stringValue": "sample text h3"
                  }
                }
              ]
            }
          ]
        }
      ]
    }
  ]
});
结果:
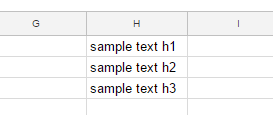
很抱歉,我的JSON数据很长。请更改示例文本。如果要为单元格使用数字,请使用"numberValue"而不是"stringValue"。
如果我误解了你的问题,我很抱歉。
添加1 :
var sheet = SpreadsheetApp.getActiveSpreadsheet().getActiveSheet();
var range = sheet.getRange('h1:h3');
var protection = range.protect().setDescription('protected');
var me = Session.getEffectiveUser();
protection.addEditor(me);
protection.removeEditors(protection.getEditors());
if (protection.canDomainEdit()) {
  protection.setDomainEdit(false);
}上面的脚本保护h1:h3。所有者可以编辑所有单元格,但其他用户不能只编辑h1:h3。
添加2 :
Sheets.Spreadsheets.create({
  "properties":
  {
    "title": "filename"
  },
  "sheets":
  [
    {
      "protectedRanges":
      [
        {
          "range":
          {
            "startColumnIndex": 7,
            "endColumnIndex": 8,
            "startRowIndex": 0,
            "endRowIndex": 3,
            "sheetId": 0
          },
          "description": "protected",
          "editors":
          {
            "users":
            ["your e-mail address"
            ]
          }
        }
      ],
      "data":
      [
        {
          "startColumn": 7,
          "startRow": 0,
          "rowData":
          [
            {
              "values":
              [
                {
                  "userEnteredValue":
                  {
                    "stringValue": "sample text h1"
                  }
                }
              ]
            },
            {
              "values":
              [
                {
                  "userEnteredValue":
                  {
                    "stringValue": "sample text h2"
                  }
                }
              ]
            },
            {
              "values":
              [
                {
                  "userEnteredValue":
                  {
                    "stringValue": "sample text h3"
                  }
                }
              ]
            }
          ]
        }
      ],
      "properties":
      {
        "sheetId": 0
      }
    }
  ]
});
此脚本创建新的电子表格。当时,它将数据添加到'h1:h3‘中,并保护它们。请添加您的电子邮件地址作为编辑.这是使用的v4。
页面原文内容由Stack Overflow提供。腾讯云小微IT领域专用引擎提供翻译支持
原文链接:
https://stackoverflow.com/questions/43465826
复制相关文章
相似问题
腾讯云开发者

Copyright © 2013 - 2026 Tencent Cloud. All Rights Reserved. 腾讯云 版权所有
深圳市腾讯计算机系统有限公司 ICP备案/许可证号:粤B2-20090059 ![]() 粤公网安备44030502008569号
粤公网安备44030502008569号
腾讯云计算(北京)有限责任公司 京ICP证150476号 | 京ICP备11018762号