
PIL移除不同像素
我正在做一个图像处理程序,在那里它(某种程度上)创建了一个流行的图像。问题是,我得到了一些“入侵者”像素,其中一个蓝色区域有一些绿色像素到处。我想让这些像素消失,但我似乎找不到这样的方法。如果你也有另一种方法来制作流行音乐形象,请随意提出建议。这是我的剧本:
from tkinter import*
import tkinter as Tkinter
from tkinter import filedialog, DISABLED
import os
import ntpath
from PIL import Image

def EchelleDeGris():
    Ima2=Image.new("RGB",(z[0],z[1]))
    px=Ima1.load()
    px1=Ima2.load()
    for x in range(z[0]):
        for y in range(z[1]):
            p=px[x,y]
            o=int((p[0]+p[1]+p[2])/3)
            px1[x,y]=(o,o,o)
    Ima2.save("ImageMod.png")
    im2 = PhotoImage(file="ImageMod.png")
    main.image = im2
    I2 = Tkinter.Label(main, image=im2)
    I2.grid(row=0, column=3, rowspan =6)

def SupprimerImage():
    I2 = Tkinter.Label(main, image=imt)
    I2.grid(row=0, column=3, rowspan =6)

def Luminosite():
    Ima2=Image.new("RGB",(z[0],z[1]))
    px=Ima1.load()
    px1=Ima2.load()
    for x in range(z[0]):
        for y in range(z[1]):
            p=px[x,y]
            px1[x,y]=(p[0]+S1.get(),p[1]+S1.get(),p[2]+S1.get())
    Ima2.save("ImageMod.png")
    im2 = PhotoImage(file="ImageMod.png")
    main.image = im2
    I2 = Tkinter.Label(main, image=im2)
    I2.grid(row=0, column=3, rowspan =6)

def AnnulerModifications():
    I2 = Tkinter.Label(main, image=im1)
    I2.grid(row=0, column=3, rowspan =6)

def PopArt():
    Ima2=Image.new("RGB",(z[0],z[1]))
    px=Ima1.load()
    px1=Ima2.load()
    for x in range(z[0]):
        for y in range(z[1]):
            p=px[x,y]
            if type(p)==int:
                p=(p,p,p)
            o=int((p[0]+p[1]+p[2])/3)
            if o<85:
                px1[x,y]=(0,0,255)
            elif 85<o<170:
                px1[x,y]=(0,255,0)
            elif o>170:
                px1[x,y]=(255,0,0)
    Ima2.save("ImageMod.png")
    im2 = PhotoImage(file="ImageMod.png")
    main.image = im2
    I2 = Tkinter.Label(main, image=im2)
    I2.grid(row=0, column=3, rowspan =6)


main=Tk()

main.withdraw()
currdir = os.getcwd()
a = filedialog.askopenfilename()
main.deiconify()

main.configure(background="#a1dbcd")
main.title("Photoshop Version.Megzari")

Ima1=Image.open(a)
z=Ima1.size
nux=Image.new("RGB",(z[0],z[1]))
nuxy=nux.load()
for x in range(z[0]):
    for y in range(z[1]):
        nuxy[x,y]=(255,255,255)
nux.save("Blank.png")


if z>(400,400):
    im2 = Tkinter.PhotoImage(file="ImageBlank.png")
    main.image = im2
    I2 = Tkinter.Label(main, image=im2)
    I2.grid(padx=20, pady=20, row=0, column=1, rowspan =6)
    T1 = Tkinter.Label(main, image=im2)
    T1.grid(padx=20, pady=20, row=0, column=3, rowspan =6)
    B1 = Tkinter.Button(main, text ="Echelle de gris", command = EchelleDeGris, fg="#a1dbcd", bg="#383a39", state=DISABLED)
    B1.grid(padx=20, pady=20, row=0, column=2)
    B3 = Tkinter.Button(main, text ="Appliquer Luminosité", command = Luminosite, fg="#a1dbcd", bg="#383a39", state=DISABLED)
    B3.grid(padx=20, pady=20, row=2, column=2)
    S1 = Scale(main, from_=0, to=254, orient=HORIZONTAL, fg="#a1dbcd", bg="#383a39", state=DISABLED, length = 200)
    S1.grid(row=1, column=2)
    B2 = Tkinter.Button(main, text ="Supprimer Image", command = SupprimerImage, fg="#a1dbcd", bg="#383a39", state=DISABLED)
    B2.grid(padx=20, pady=20, row=4, column=2)
    B3 = Tkinter.Button(main, text ="Annuler Modifications", command = AnnulerModifications, fg="#a1dbcd", bg="#383a39", state=DISABLED)
    B3.grid(padx=20, pady=20, row=3, column=2)
    B4 = Tkinter.Button(main, text ="Pop Art", command = PopArt, fg="#a1dbcd", bg="#383a39", state=DISABLED)
    B4.grid(padx=20, pady=20, row=5, column=2)
elif z<(400,400):
    im1 = Tkinter.PhotoImage(file=a)
    I1 = Tkinter.Label(main, image=im1)
    I1.grid(padx=20, pady=20, row=0, column=1, rowspan =6)
    imt = Tkinter.PhotoImage(file="Blank.png")
    T1 = Tkinter.Label(main, image=imt)
    T1.grid(padx=20, pady=20, row=0, column=3, rowspan =6)
    B1 = Tkinter.Button(main, text ="Echelle de gris", command = EchelleDeGris, fg="#a1dbcd", bg="#383a39", state=NORMAL)
    B1.grid(padx=20, pady=20, row=0, column=2)
    B3 = Tkinter.Button(main, text ="Appliquer Luminosité", command = Luminosite, fg="#a1dbcd", bg="#383a39")
    B3.grid(padx=20, pady=20, row=2, column=2)
    S1 = Scale(main, from_=0, to=254, orient=HORIZONTAL, fg="#a1dbcd", bg="#383a39", length = 200)
    S1.grid(row=1, column=2)
    B2 = Tkinter.Button(main, text ="Supprimer Image", command = SupprimerImage, fg="#a1dbcd", bg="#383a39")
    B2.grid(padx=20, pady=20, row=4, column=2)
    B3 = Tkinter.Button(main, text ="Annuler Modifications", command = AnnulerModifications, fg="#a1dbcd", bg="#383a39")
    B3.grid(padx=20, pady=20, row=3, column=2)
    B4 = Tkinter.Button(main, text ="Pop Art", command = PopArt, fg="#a1dbcd", bg="#383a39")
    B4.grid(padx=20, pady=20, row=5, column=2)

s=S1.get()


main.mainloop()
为了提供帮助,下面是制作流行音乐形象的程序的一部分:
def PopArt():
Ima2=Image.new("RGB",(z[0],z[1]))
px=Ima1.load()
px1=Ima2.load()
for x in range(z[0]):
for y in range(z[1]):
p=px[x,y]
if type(p)==int:
p=(p,p,p)
o=int((p[0]+p[1]+p[2])/3)
if o<85:
px1[x,y]=(0,0,255)
elif 85<o<170:
px1[x,y]=(0,255,0)
elif o>170:
px1[x,y]=(255,0,0)
Ima2.save("ImageMod.png")
im2 = PhotoImage(file="ImageMod.png")
main.image = im2
I2 = Tkinter.Label(main, image=im2)
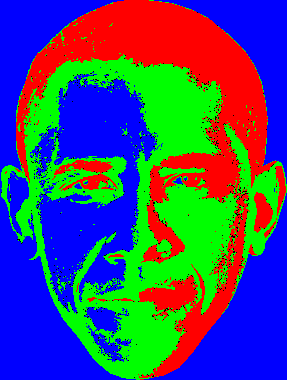
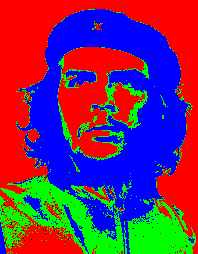
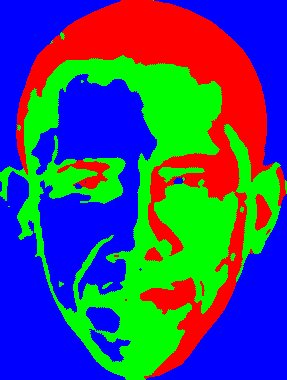
I2.grid(row=0, column=3, rowspan =6)下面是图片和结果:

如果需要什么,就问问我随时都有空
编辑:这里是我在注释中提到的代码的快照,您只需在Popart函数的末尾对其进行快照:
n=0
j=0
q=0

for x in range(1,z[0]):
    for y in range(1,z[1]):
        for t in range(-1,1):    #These two loops change the pixel "coordinates"
            for w in range(-1,1):
                v=px1[x+t,y+w]
                if v[0]==255:
                    n=n+1
                elif v[1]==255:  #These are the counters
                    j=j+1
                elif v[2]==255:
                    q=q+1

        Max=n        #And this checks the dominant color
        if j>Max:
            Max=j
        elif q>Max:
            Max=q
        elif j>q:
            Max=j

        if n==Max:
            px2[x,y]=(255,0,0)   #And here I assign the color depending on the surrounding colors
        elif j==Max:
            px2[x,y]=(0,255,0)
        elif q==Max:
            px2[x,y]=(0,0,255)
        n=0
        j=0
        q=0
Ima3.save("ImageMod.png")
我得到的是:
我知道当我开始使用简单的名称变量z时犯了一个错误,我应该使用像Original_Image这样的东西。这个程序现在有太多的变量来改变它们,但是在我将来的项目中,我不会犯这个错误。
回答 1
Stack Overflow用户
发布于 2017-01-26 15:47:57
一开始,我认为你的程序中有无益的命名。它不仅涉及法语函数名,更多的是关于像"z“这样的短变量名称。
但是如果我是正确的,我看到你知道如何读取和编写二维矩阵中每个像素的RGB代码。所以你只需要分析你的每个像素的八个邻居--如果一个像素有超过一半不同颜色的邻居--将它相应地涂成最受欢迎的邻居颜色。重复,直到所有像素都有相同颜色的最受欢迎的邻居。
当然,这只是一个简单的逻辑,可能会得到改进,但我希望,我已经展示了这个想法。
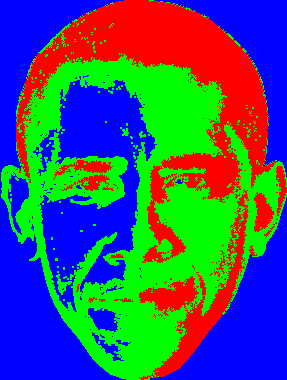
Upd:
我写了一些代码来实现我的想法。工作非常缓慢,但结果似乎是正确的。
from PIL import Image
from collections import Counter


def get_pixel(pixels, x, y):
    try:
        return pixels[x, y]
    except IndexError:
        return None


def get_neighbors(pixels, x, ):
    neighbors = list()
    neighbors.append(get_pixel(pixels, x, y - 1))
    neighbors.append(get_pixel(pixels, x, y + 1))
    neighbors.append(get_pixel(pixels, x - 1, y))
    neighbors.append(get_pixel(pixels, x + 1, y))
    neighbors.append(get_pixel(pixels, x - 1, y - 1))
    neighbors.append(get_pixel(pixels, x - 1, y + 1))
    neighbors.append(get_pixel(pixels, x + 1, y - 1))
    neighbors.append(get_pixel(pixels, x + 1, y + 1))
    return neighbors


def filter_art(pixels, size):
    indexes = dict()
    for x in range(size[0]):
        for y in range(size[1]):
            color = get_pixel(pixels, x, y)
            neighbors = get_neighbors(pixels, x, y)
            new_color = Counter(neighbors).most_common()[0][0]
            if new_color is not None:
                indexes[x, y] = new_color
    for x, y in indexes:
        pixels[x, y] = indexes[x, y]


def pop_art(path_orig, path_mod, coef):  # coef is integer value, meant how deep filtering would be (for example, coef=4)
    image_orig = Image.open(path_orig)
    size = image_orig.size
    image_mod = Image.new("RGB",(size[0],size[1]))
    pixels_orig = image_orig.load()
    pixels_mod = image_mod.load()
    for x in range(size[0]):
        for y in range(size[1]):
            p = pixels_orig[x, y]
            if isinstance(p, int): # this should be done using PIL palletes and converting to exact pallete at first,
                # but now I omit this for my quick test
                rgb = (p,p,p)
            elif isinstance(p, tuple) and len(p) in (3, 4):
                rgb = p[:3]
            else:
                raise TypeError('Unknown pallete')
            average_color = sum(rgb) / 3
            if average_color <= 85:
                pixels_mod[x, y] = (255, 0, 0)  # you also need care about guarantee correct PIL pallete format here (omitted)
            elif 85 < average_color <= 170:
                pixels_mod[x, y] = (0, 255, 0)
            elif pixels_mod[x, y] > 170:
                pixels_mod[x, y] = (0, 0, 255)
    for _ in range(coef):
        filter_art(pixels_mod, size)
    image_mod.save(path_mod)


if __name__ == '__main__':
    pop_art('obama.png', 'result.png', coef=4)
https://stackoverflow.com/questions/41875068
复制相似问题
腾讯云开发者

Copyright © 2013 - 2026 Tencent Cloud. All Rights Reserved. 腾讯云 版权所有
深圳市腾讯计算机系统有限公司 ICP备案/许可证号:粤B2-20090059 ![]() 粤公网安备44030502008569号
粤公网安备44030502008569号
腾讯云计算(北京)有限责任公司 京ICP证150476号 | 京ICP备11018762号