
OpenNI深度图像交换深度显示
我已经找到/创建了一些允许我从启用OpenNI的摄像机打开深度和颜色流的代码(这是一个Orbbec,具体而言)。除了与标准的OpenNI查看器不同,我的流显示最接近的点是最暗的,更远的点显示为较浅的颜色。
我怎样才能改变这一点,使最近的点显示为较轻(白色),更远的地方显示为黑暗?
#include "stdafx.h"
#include "OpenNI.h"
#include <iostream>
#include <iomanip>
#include <fstream>
#include <string>
#include <array>
// OpenCV Header
#include <opencv2/core/core.hpp>
#include <opencv2/imgproc/imgproc.hpp>
#include <opencv2/highgui/highgui.hpp>
#include <opencv2/calib3d/calib3d.hpp>
using namespace std;
using namespace cv;
using namespace openni;
//Recorder
int main(int argc, char** argv)
{
Device device;
VideoStream DepthStream,ColorStream;
VideoFrameRef DepthFrameRead,ColorFrameRead;
const char* deviceURI = openni::ANY_DEVICE;
if (argc > 1)
{
deviceURI = argv[1];
}
Status result = STATUS_OK;
result = OpenNI::initialize();
result = device.open(deviceURI);
result = DepthStream.create(device, openni::SENSOR_DEPTH);
result = DepthStream.start();
result = ColorStream.create(device, openni::SENSOR_COLOR);
result = ColorStream.start();
device.setImageRegistrationMode(ImageRegistrationMode::IMAGE_REGISTRATION_DEPTH_TO_COLOR);
int framenum = 0;
Mat frame;
while (true)
{
if (DepthStream.readFrame(&DepthFrameRead) == STATUS_OK)
{
cv::Mat cDepthImg(DepthFrameRead.getHeight(), DepthFrameRead.getWidth(),
CV_16UC1, (void*)DepthFrameRead.getData());
cv::Mat c8BitDepth;
cDepthImg.convertTo(c8BitDepth, CV_8U, 255.0 / (8000));
cv::imshow("Orbbec", c8BitDepth);
}
if (ColorStream.readFrame(&ColorFrameRead) == STATUS_OK)
{
ColorStream.readFrame(&ColorFrameRead);
const openni::RGB888Pixel* imageBuffer = (const openni::RGB888Pixel*)ColorFrameRead.getData();
frame.create(ColorFrameRead.getHeight(), ColorFrameRead.getWidth(), CV_8UC3);
memcpy(frame.data, imageBuffer, 3 * ColorFrameRead.getHeight()*ColorFrameRead.getWidth() * sizeof(uint8_t));
cv::cvtColor(frame, frame, CV_BGR2RGB); //this will put colors right
cv::imshow("frame", frame);
framenum++;
}
if (cvWaitKey(30) >= 0)
{
break;
}
}
DepthStream.destroy();
ColorStream.destroy();
device.close();
OpenNI::shutdown();
return 0;
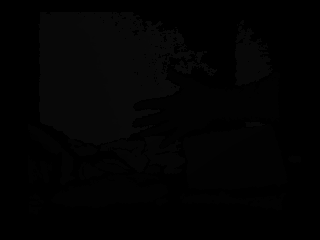
}这些图像最初是以16位图像的形式读取的,如下所示(注意它有多暗):
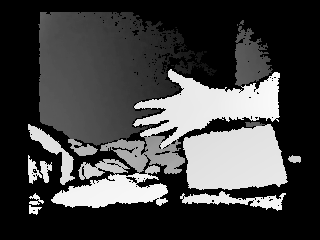
但是在转换成8位图像之后,它们看起来如下:

回答 1
Stack Overflow用户
发布于 2016-10-10 18:35:57
您所附的图像显示,传感器正在捕获数据,直接编码的距离(毫米)的物体在深度。对于这样的深度相机来说,这是很正常的。我们希望显示的是更接近传感器的对象的更高值(这与深度图像编码完全相反,但对于显示非常有用)。
如果传感器的工作范围已知,可以设计一个简单的深度调整函数。对于阿斯特拉S,操作范围是从0.35m至2.5m。所以我们现在想要的是一个转换0.35m -> 2.5m和2.5m -> 0.35m的函数。
这非常简单,唯一的警告是您必须自己处理无效的深度像素(深度== 0)。下面是执行此操作的代码:
#include "include\opencv\cv.h"
#include "include\opencv\highgui.h"


cv::Mat adjustDepth(const cv::Mat& inImage)
{
    // from https://orbbec3d.com/product-astra/
    // Astra S has a depth in the range 0.35m to 2.5m
    int maxDepth = 2500;
    int minDepth = 350; // in mm

    cv::Mat retImage = inImage;

    for(int j = 0; j < retImage.rows; j++)
        for(int i = 0; i < retImage.cols; i++)
        {
            if(retImage.at<ushort>(j, i))
                retImage.at<ushort>(j, i) = maxDepth - (retImage.at<ushort>(j, i) - minDepth);
        }

        return retImage;
}


int main ()
{
    cv::Mat inImage;
    inImage = cv::imread("testImage.png", CV_LOAD_IMAGE_UNCHANGED);

    cv::Mat adjustedDepth = adjustDepth(inImage);
    cv::Mat dispImage;
    adjustedDepth.convertTo(dispImage, CV_8UC1, 255.0f/2500.0f);
    cv::imshow(" ", dispImage);

    //cv::imwrite("testImageAdjusted.png", adjustedDepth);
    //cv::imwrite("savedImage.png", dispImage);

    cv::waitKey(0);
    return 0;
}
以下是输出的重规范化深度图像:
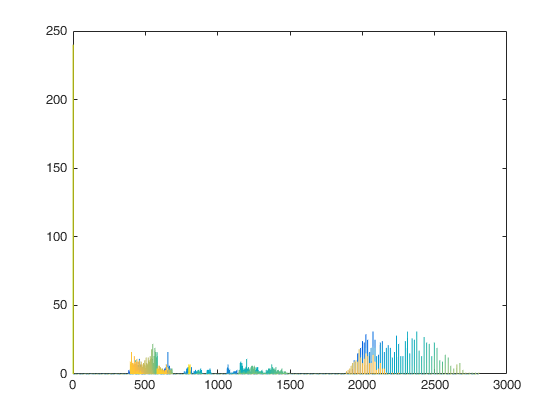
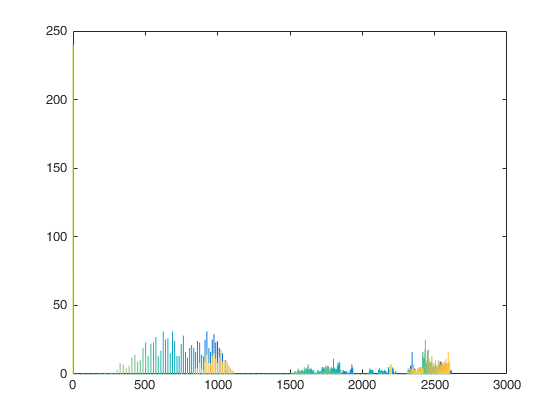
如果要进一步探讨这种调整功能会发生什么,可以看一看调整前后的图像直方图。
输入深度图像(D)的直方图:
负输入深度图像(-D)直方图:
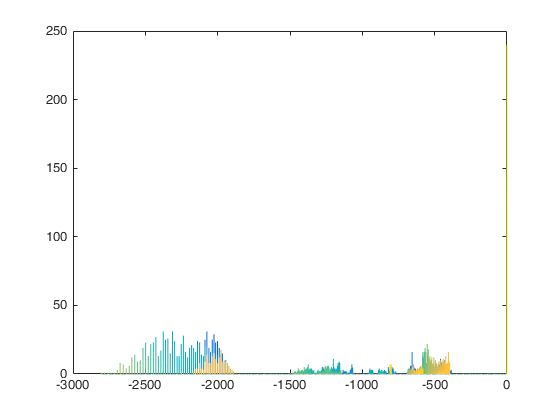
(maxVal-(D))的直方图:
希望这能回答你的问题。
https://stackoverflow.com/questions/39913585
复制相似问题
腾讯云开发者

Copyright © 2013 - 2026 Tencent Cloud. All Rights Reserved. 腾讯云 版权所有
深圳市腾讯计算机系统有限公司 ICP备案/许可证号:粤B2-20090059 ![]() 粤公网安备44030502008569号
粤公网安备44030502008569号
腾讯云计算(北京)有限责任公司 京ICP证150476号 | 京ICP备11018762号