
Python -微软认知验证API (params)
我试图在python2.7:https://dev.projectoxford.ai/docs/services/563879b61984550e40cbbe8d/operations/563879b61984550f3039523a中使用Microsoft认知验证API
守则是:
import httplib, urllib, base64

headers = {
    # Request headers
    'Content-Type': 'application/json',
    'Ocp-Apim-Subscription-Key': 'my key',
}

params = '{\'faceId1\': \'URL.jpg\',\'faceId2\': \'URL.jpg.jpg\'}'

try:
    conn = httplib.HTTPSConnection('api.projectoxford.ai')
    conn.request("POST", "/face/v1.0/verify?%s" % params, "{body}", headers)
    response = conn.getresponse()
    data = response.read()
    print(data)
    conn.close()
except Exception as e:
    print("[Errno {0}] {1}".format(e.errno, e.strerror))
我试着让conn.request这样的线条:
conn.request("POST", "/face/v1.0/verify?%s" % params, "", headers)错误是:
<!DOCTYPE HTML PUBLIC "-//W3C//DTD HTML 4.01//EN""http://www.w3.org/TR/html4/strict.dtd">
<HTML><HEAD><TITLE>Bad Request</TITLE>
<META HTTP-EQUIV="Content-Type" Content="text/html; charset=us-ascii"></HEAD>
<BODY><h2>Bad Request</h2>
<hr><p>HTTP Error 400. The request is badly formed.</p>
</BODY></HTML>
我一直在努力遵循并使下列代码生效:
- https://github.com/Microsoft/Cognitive-Emotion-Python/blob/master/Jupyter%20Notebook/Emotion%20Analysis%20Example.ipynb
- Using Project Oxford's Emotion API
不过,我就是不能让这件事成功。我想这场对立面或身体上的争论有问题吧。任何帮助都是非常感谢的。
回答 3
Stack Overflow用户
发布于 2016-12-09 10:19:45
您可以参考this question。
很明显你不懂密码。"{body}"意味着您应该用包含您的请求url的身体来替换它,就像网站上说的那样:
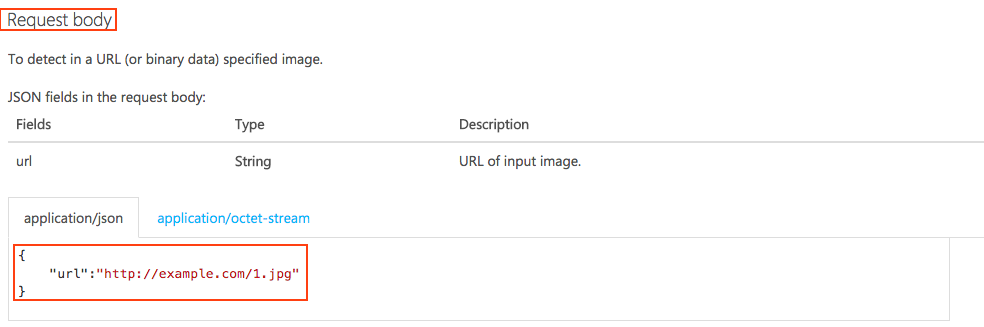
所以您可以这样使用这个api:
body = {
            "url": "http://example.com/1.jpg"
       }
…………

conn = httplib.HTTPSConnection('api.projectoxford.ai')
conn.request("POST", "/face/v1.0/detect?%s" % params, str(body), headers)Stack Overflow用户
发布于 2016-08-12 01:32:55
Dawid的评论看起来应该修复它(双引用),尝试一下python 2.7:
import requests

url = "https://api.projectoxford.ai/face/v1.0/verify"

payload = "{\n    \"faceId1\":\"A Face ID\",\n    \"faceId2\":\"A Face ID\"\n}"
headers = {
    'ocp-apim-subscription-key': "KEY_HERE",
    'content-type': "application/json"
    }

response = requests.request("POST", url, data=payload, headers=headers)

print(response.text)
对于python 3:
import http.client

conn = http.client.HTTPSConnection("api.projectoxford.ai")

payload = "{\n\"faceId1\": \"A Face ID\",\n\"faceId2\": \"Another Face ID\"\n}"

headers = {
    'ocp-apim-subscription-key': "keyHere",
    'content-type': "application/json"
    }

conn.request("POST", "/face/v1.0/verify", payload, headers)

res = conn.getresponse()
data = res.read()Stack Overflow用户
发布于 2018-11-02 03:23:25
您的脚本有几个问题:
- 必须将face而不是URL或文件对象传递给REST。
- 您必须正确地表述HTTP请求。
但是,您可能会发现使用Python更容易,而不是REST。例如,一旦您拥有了face,您就可以只运行result = CF.face.verify(faceid1, another_face_id=faceid2),而不必担心设置正确的POST请求。
您可能需要在cognitive_face中安装pip。我使用这个API来获得一些额外的指令的脸I。
为了简化这一点,让我们假设磁盘上有img1.jpg和img2.jpg。
下面是一个使用REST的示例:
import cognitive_face as CF
from io import BytesIO
import json
import http.client

# Setup
KEY = "your subscription key"


# Get Face Ids
def get_face_id(img_file):
    f = open(img_file, 'rb')
    data = f.read()
    f.close()
    faces = CF.face.detect(BytesIO(data))

    if len(faces) != 1:
        raise RuntimeError('Too many faces!')

    face_id = faces[0]['faceId']
    return face_id


# Initialize API
CF.Key.set(KEY)

faceId1 = get_face_id('img1.jpg')
faceId2 = get_face_id('img2.jpg')


# Now that we have face ids, we can setup our request
headers = {
    # Request headers
    'Content-Type': 'application/json',
    'Ocp-Apim-Subscription-Key': KEY
}

params = {
    'faceId1': faceId1,
    'faceId2': faceId2
}

# The Content-Type in the header specifies that the body will
# be json so convert params to json
json_body = json.dumps(params)

try:
    conn = httplib.HTTPSConnection('https://eastus.api.cognitive.microsoft.com')
    conn.request("POST", "/face/v1.0/verify", body=json_body, headers=headers)
    response = conn.getresponse()
    data = response.read()
    data = json.loads(data)
    print(data)
    conn.close()
except Exception as e:
print("[Errno {0}] {1}".format(e.errno, e.strerror))https://stackoverflow.com/questions/38890807
复制相似问题
腾讯云开发者

Copyright © 2013 - 2026 Tencent Cloud. All Rights Reserved. 腾讯云 版权所有
深圳市腾讯计算机系统有限公司 ICP备案/许可证号:粤B2-20090059  粤公网安备44030502008569号
腾讯云计算(北京)有限责任公司 京ICP证150476号 | 京ICP备11018762号