
以数字的形式布局图像
以数字的形式布局图像
提问于 2016-04-07 14:39:44
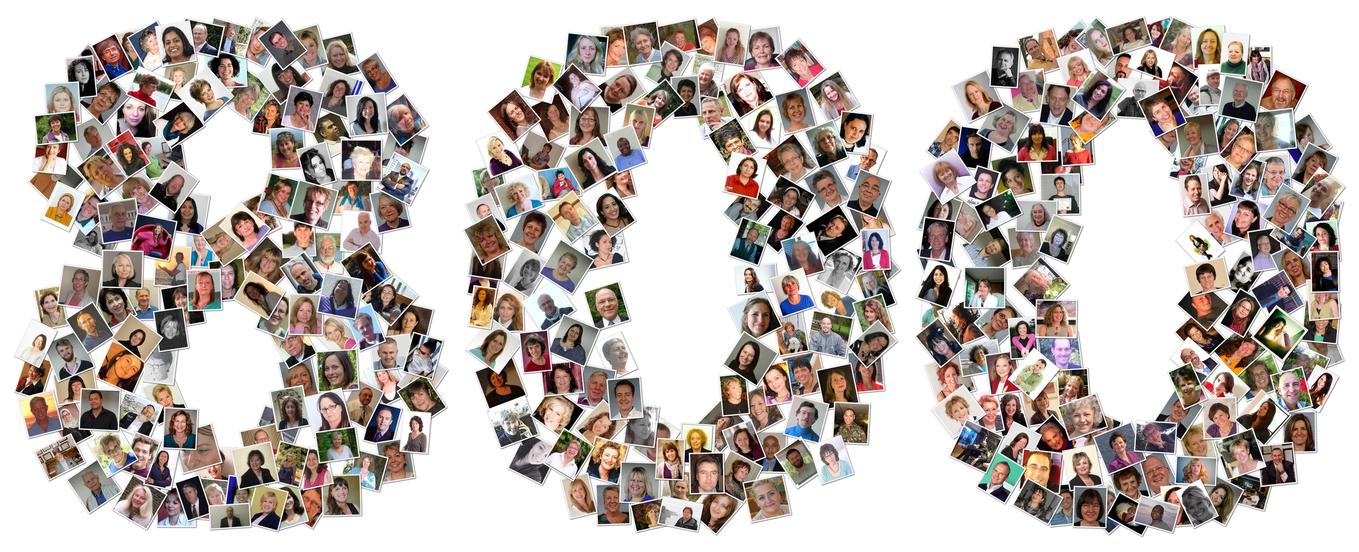
我有一个文件夹,里面有一些小图片(Facebook的个人资料图片)。我想制作一个新的类似马赛克的图片,其中所有的小图片都是以数字的形式排列的,如这个例子(来源)。
是否有一个软件程序可以做到这一点(并且运行在Windows 7上)?否则,我也愿意编写一个小脚本来做同样的事情。我知道如何用PIL/Pillow在图像中添加白色边框,但是我对如何布局图像的搜索却没有结果。
谁能给我指明正确的方向?
回答 1
Stack Overflow用户
回答已采纳
发布于 2016-04-07 15:12:00
jsheperd如何将文本转换为ASCII艺术。您可以稍微修改代码,以获得一个字形掩码-1在字体是黑色,0在有背景。然后,我们可以使用PIL随机旋转和粘贴的脸,无论面具是1。
下面我使用matplotlib只是为了获得( Ada )的映像,假设您已经安装了matplotlib。您可以删除matplotlib依赖项,只需将faces重新定义为PIL图像序列。
from PIL import Image
from PIL import ImageDraw
from PIL import ImageFont
import itertools as IT
import numpy as np
import matplotlib.cbook as cbook

def text_to_pixels(text, path='arialbd.ttf', fontsize=14):
    """
    https://stackoverflow.com/a/27753869/190597 (jsheperd)
    https://stackoverflow.com/a/36386628/190597 (unutbu)
    """
    font = ImageFont.truetype(path, fontsize)
    w, h = font.getsize(text)
    h *= 2
    image = Image.new('L', (w, h), 1)
    draw = ImageDraw.Draw(image)
    draw.text((0, 0), text, font=font)
    arr = np.asarray(image)
    arr = np.where(arr, 0, 1)
    arr = arr[(arr != 0).any(axis=1)]
    return arr

def get_image():
    fn = cbook.get_sample_data("ada.png")
    face_img = Image.open(fn).convert('RGBA')
    face_img = face_img.resize((30, 40), Image.ANTIALIAS)
    # give image a white background
    img = Image.new('RGBA', size=(36, 46), color=(255, 255, 255))
    img.paste(face_img, (3, 3))
    return img

def sqdist(a, b):
    return ((a -b)**2).sum()

def pics_in_text(text, faces, img_width=600, img_height=250, path='arialbd.ttf',
                 fontsize=20, minsep=1000):
    arr = text_to_pixels(text, path=path, fontsize=fontsize)
    yx = np.column_stack(np.where(arr)).astype(float)
    yx /= arr.shape
    yx *= (0.75, 0.90)
    yx += 0.05
    yx *= (img_height, img_width)
    yx = yx.astype('int')
    np.random.shuffle(yx)
    keep = []
    for coord in yx:
        if all(sqdist(item, coord) > minsep for item in keep):
            keep.append(coord)
    yx = IT.cycle(keep)

    img = Image.new('RGBA', size=(img_width, img_height), color=(255, 255, 255, 255))
    seen = list()
    for face, coord in zip(faces, yx):
        deg = np.random.uniform(-45, 45)
        face = face.rotate(deg, resample=Image.BICUBIC, expand=False)
        img.paste(face, tuple(coord[::-1]), mask=face)
    return img

def get_image():
    import matplotlib.cbook as cbook
    fn = cbook.get_sample_data("ada.png")
    face_img = Image.open(fn).convert('RGBA')
    face_img = face_img.resize((30, 40), Image.ANTIALIAS)
    # give image a white background
    img = Image.new('RGBA', size=(36, 46), color=(255, 255, 255))
    img.paste(face_img, (3, 3))
    return img

num_faces = 650
faces = IT.islice(IT.cycle([get_image()]), num_faces)
img = pics_in_text('800', faces, img_width=1200, img_height=500,
             path='/usr/share/fonts/truetype/msttcorefonts/Comic_Sans_MS.ttf',
             fontsize=40, minsep=375)
img.save('/tmp/out.png', 'PNG')
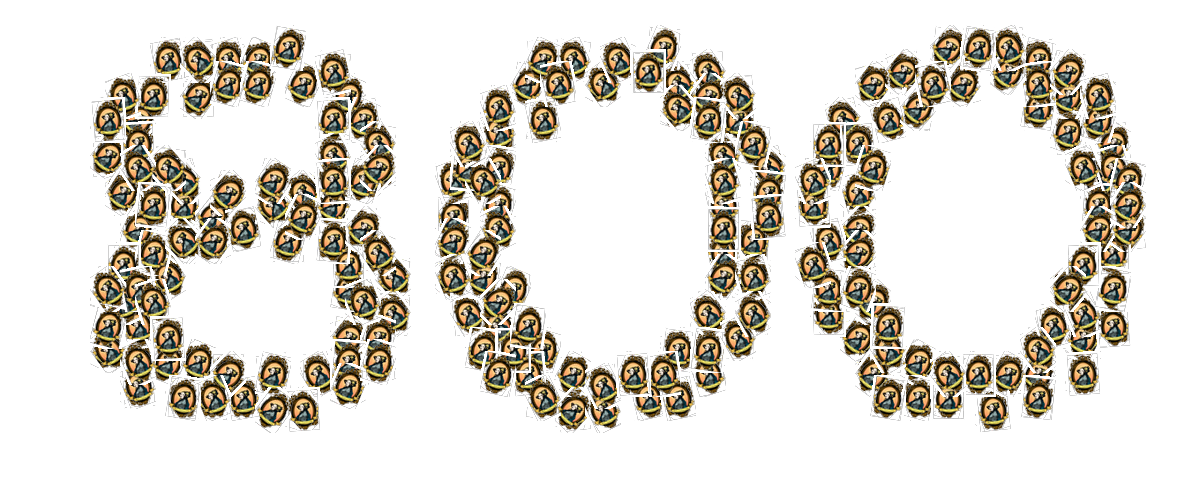
min_sep是人脸图像之间的最小平方距离。如果增加min_sep参数,则两面将间隔得更远。如果你减少min_sep,那么这些面孔可能会更加密集地重叠。
页面原文内容由Stack Overflow提供。腾讯云小微IT领域专用引擎提供翻译支持
原文链接:
https://stackoverflow.com/questions/36479510
复制相关文章
相似问题
腾讯云开发者

Copyright © 2013 - 2026 Tencent Cloud. All Rights Reserved. 腾讯云 版权所有
深圳市腾讯计算机系统有限公司 ICP备案/许可证号:粤B2-20090059 ![]() 粤公网安备44030502008569号
粤公网安备44030502008569号
腾讯云计算(北京)有限责任公司 京ICP证150476号 | 京ICP备11018762号