
光流忽略稀疏运动
我们实际上正在做一个图像分析项目,在这个项目中,我们需要识别消失/出现在场景中的物体。这里有两张照片,一张是在外科医生做手术之前拍摄的,另一张是事后拍摄的。
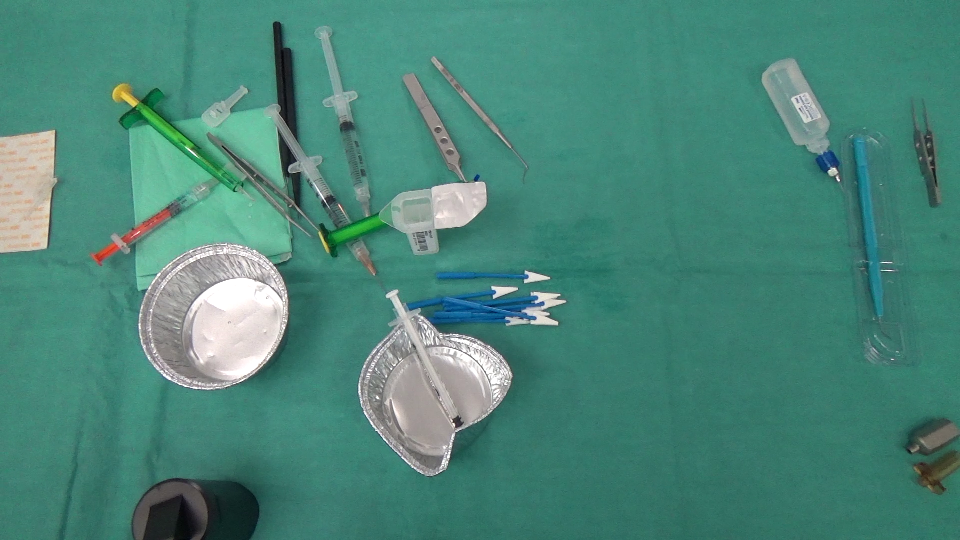
在此之前:
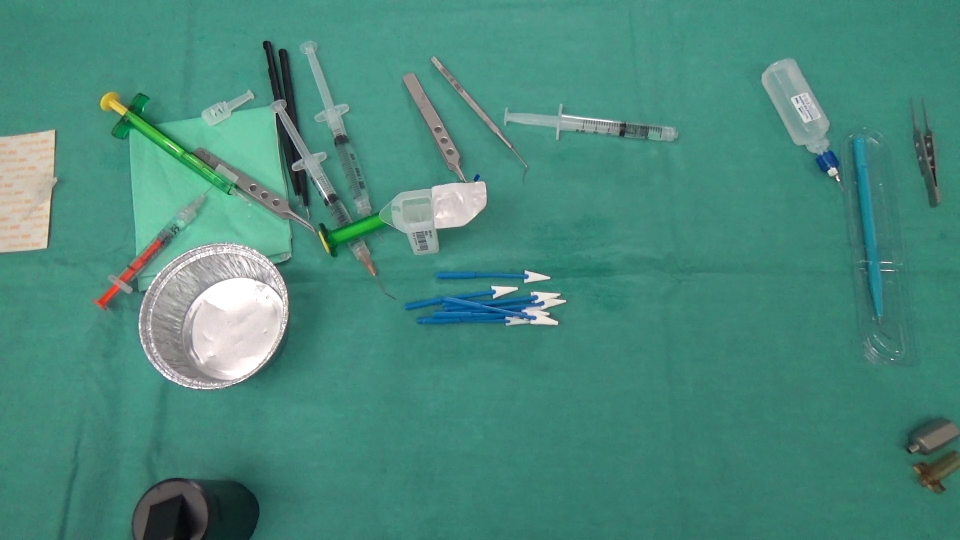
之后:
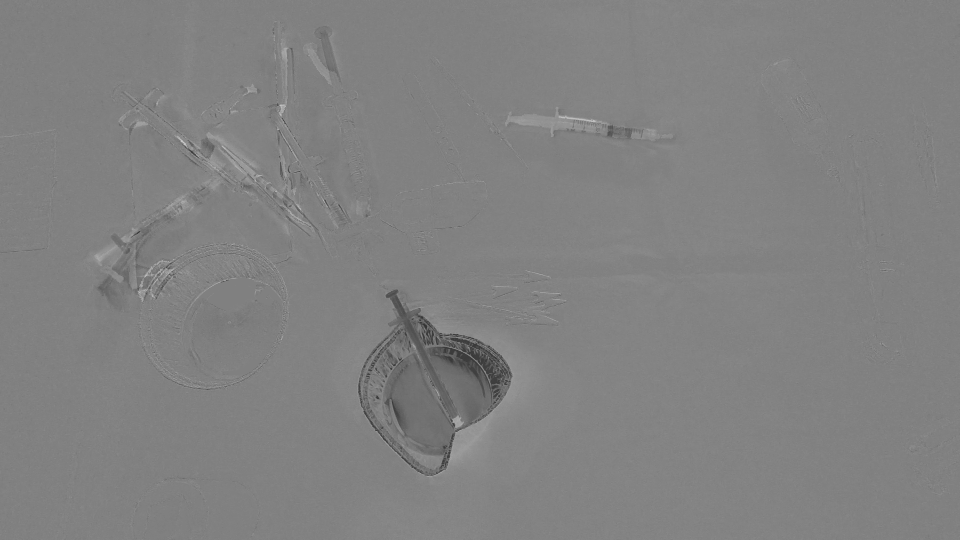
首先,我们计算了这两个图像之间的差异,下面是结果(注意,我在结果Mat中添加了128个,只是为了获得一个更好的图像):
(前后)+ 128
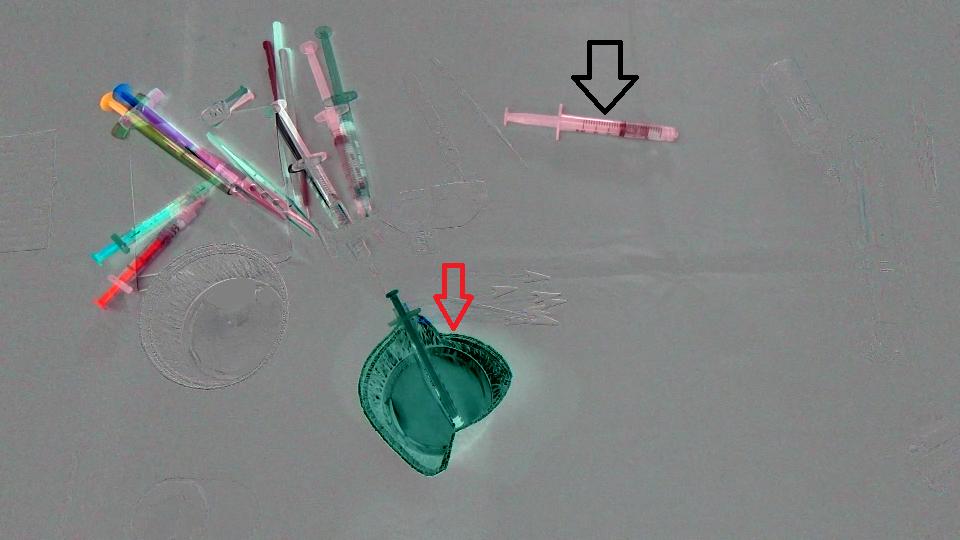
目标是检测杯子(红色箭头)已经从场景中消失,注射器(黑色箭头)已经进入场景,换句话说,我们应该只检测与场景中留下/进入的物体对应的区域。而且,很明显,场景左上角的物体与最初的位置有一点不同。我想到了Optical flow,所以我使用OpenCV C++来计算Farneback的一个,以查看它是否足以满足我们的情况,下面是我们得到的结果,然后是我们编写的代码:
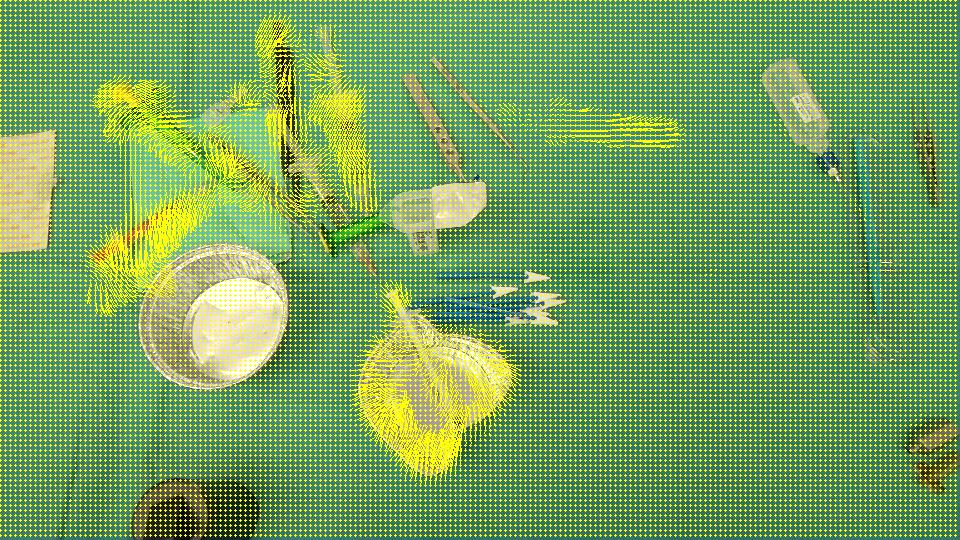
流动:
void drawOptFlowMap(const Mat& flow, Mat& cflowmap, int step, double, const Scalar& color)
{
    cout << flow.channels() << " / " << flow.rows << " / " << flow.cols << endl;
    for(int y = 0; y < cflowmap.rows; y += step)
        for(int x = 0; x < cflowmap.cols; x += step)
        {
            const Point2f& fxy = flow.at<Point2f>(y, x);
            line(cflowmap, Point(x,y), Point(cvRound(x+fxy.x), cvRound(y+fxy.y)), color);
            circle(cflowmap, Point(x,y), 1, color, -1);
        }
}

void MainProcessorTrackingObjects::diffBetweenImagesToTestTrackObject(string pathOfImageCaptured, string pathOfImagesAfterOneAction, string pathOfResultsFolder)
{
    //Preprocessing step...

    string pathOfImageBefore = StringUtils::concat(pathOfImageCaptured, imageCapturedFileName);
    string pathOfImageAfter = StringUtils::concat(pathOfImagesAfterOneAction, *it);

    Mat imageBefore = imread(pathOfImageBefore);
    Mat imageAfter = imread(pathOfImageAfter);

    Mat imageResult = (imageAfter - imageBefore) + 128;
    //            absdiff(imageAfter, imageBefore, imageResult);
    string imageResultPath = StringUtils::stringFormat("%s%s-color.png",pathOfResultsFolder.c_str(), fileNameWithoutFrameIndex.c_str());
    imwrite(imageResultPath, imageResult);

    Mat imageBeforeGray, imageAfterGray;
    cvtColor( imageBefore, imageBeforeGray, CV_RGB2GRAY );
    cvtColor( imageAfter, imageAfterGray, CV_RGB2GRAY );

    Mat imageResultGray = (imageAfterGray - imageBeforeGray) + 128;
    //            absdiff(imageAfterGray, imageBeforeGray, imageResultGray);
    string imageResultGrayPath = StringUtils::stringFormat("%s%s-gray.png",pathOfResultsFolder.c_str(), fileNameWithoutFrameIndex.c_str());
    imwrite(imageResultGrayPath, imageResultGray);


    //*** Compute FarneBack optical flow
    Mat opticalFlow;
    calcOpticalFlowFarneback(imageBeforeGray, imageAfterGray, opticalFlow, 0.5, 3, 15, 3, 5, 1.2, 0);

    drawOptFlowMap(opticalFlow, imageBefore, 5, 1.5, Scalar(0, 255, 255));
    string flowPath = StringUtils::stringFormat("%s%s-flow.png",pathOfResultsFolder.c_str(), fileNameWithoutFrameIndex.c_str());
    imwrite(flowPath, imageBefore);

    break;
}
为了知道光流有多精确,我编写了一小块代码来计算(IMAGEAFTER + FLOW) - IMAGEBEFORE:
//Reference method just to see the accuracy of the optical flow calculation
Mat accuracy = Mat::zeros(imageBeforeGray.rows, imageBeforeGray.cols, imageBeforeGray.type());

strinfor(int y = 0; y < imageAfter.rows; y ++)
for(int x = 0; x < imageAfter.cols; x ++)
{
     Point2f& fxy = opticalFlow.at<Point2f>(y, x);
     uchar intensityPointCalculated = imageAfterGray.at<uchar>(cvRound(y+fxy.y), cvRound(x+fxy.x));
     uchar intensityPointBefore = imageBeforeGray.at<uchar>(y,x);
     uchar intensityResult = ((intensityPointCalculated - intensityPointBefore) / 2) + 128;
     accuracy.at<uchar>(y, x) = intensityResult;
}
validationPixelBased = StringUtils::stringFormat("%s%s-validationPixelBased.png",pathOfResultsFolder.c_str(), fileNameWithoutFrameIndex.c_str());
imwrite(validationPixelBased, accuracy);拥有这个((intensityPointCalculated - intensityPointBefore) / 2) + 128;的目的只是为了有一个可理解的图像。
图像结果:
由于它检测到了所有被移动/进入/离开场景的区域,我们认为OpticalFlow不足以检测仅代表消失/出现在场景中的对象的区域。有没有办法忽略opticalFlow检测到的稀疏运动?或者有没有其他方法来探测我们需要的东西?
回答 3
Stack Overflow用户
发布于 2016-01-20 06:28:45
假设这里的目标是识别那些区域的出现/消失的物体,而不是那些在这两张图片中,但只是移动的位置。
光流应该是一个很好的方法,就像你已经做的那样。然而,问题是如何评估结果。相对于显示对旋转/缩放变化没有容忍度的像素对像素差异,您可以进行特征匹配(SIFT等. 请在这里查看opencv可以使用的内容。)。
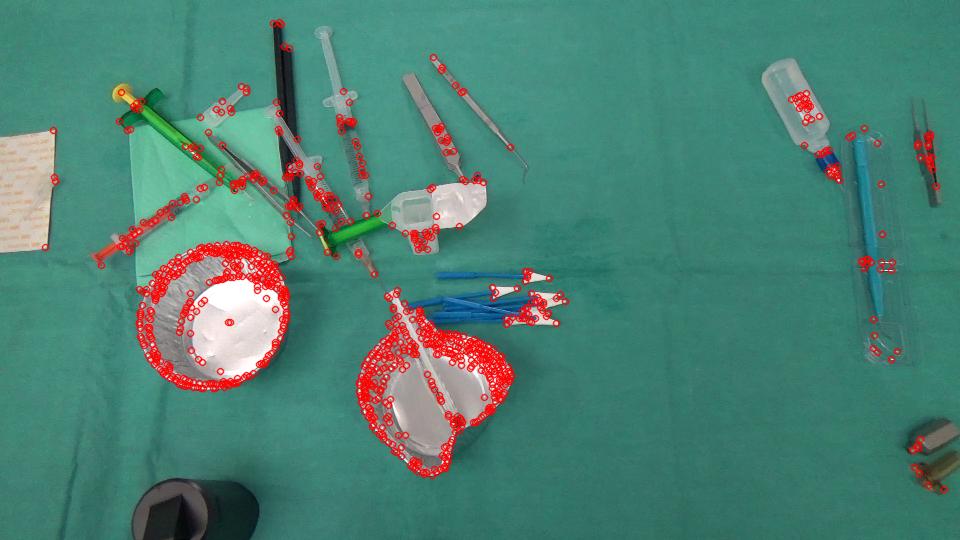
这是我得到的好的特点,从你以前的形象跟踪。
GoodFeaturesToTrackDetector detector;
vector<KeyPoint> keyPoints;
vector<Point2f> kpBefore, kpAfter;
detector.detect(imageBefore, keyPoints);
而不是密集的光流,你可以使用稀疏流,只跟踪特征,
vector<uchar> featuresFound;
vector<float> err;
calcOpticalFlowPyrLK(imageBeforeGray, imageAfterGray, keyPointsBefore, keyPointsAfter, featuresFound, err, Size(PATCH_SIZE , PATCH_SIZE ));
输出包括FeaturesFound和错误值。我只是在这里使用一个阈值来区分移动特征和无与伦比的消失特征。
vector<KeyPoint> kpNotMatched;
for (int i = 0; i < kpBefore.size(); i++) {
    if (!featuresFound[i] || err[i] > ERROR_THRESHOLD) {
        kpNotMatched.push_back(KeyPoint(kpBefore[i], 1));
    }
}
Mat output;
drawKeypoints(imageBefore, kpNotMatched, output, Scalar(0, 0, 255));
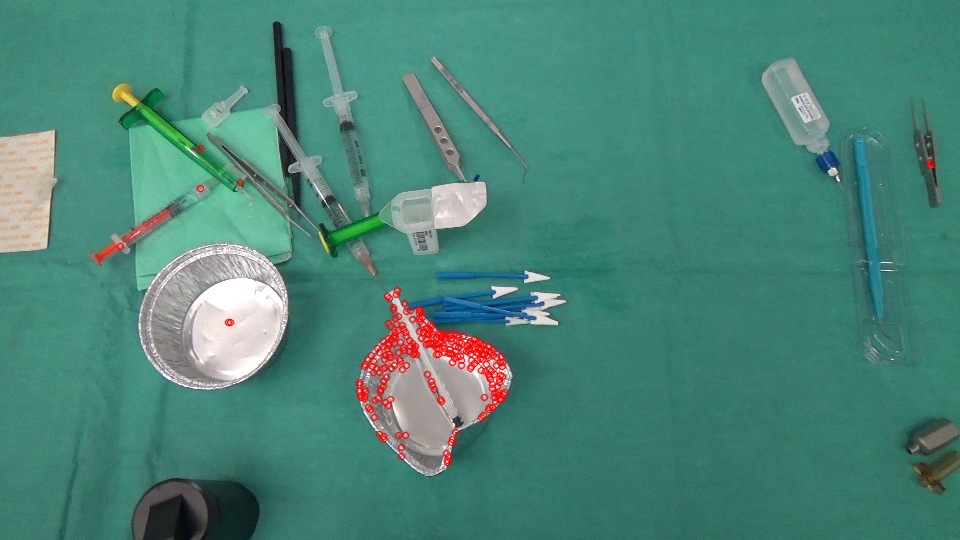
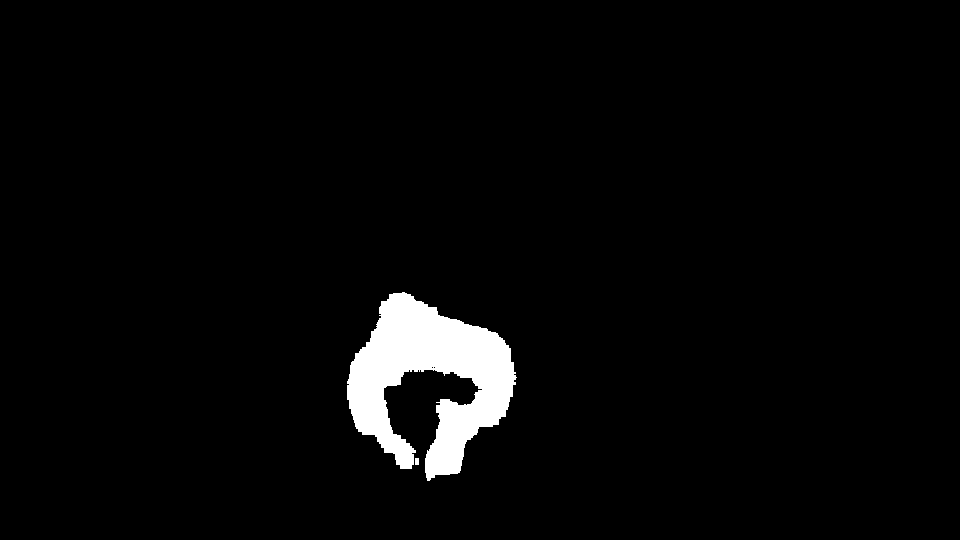
剩余的不正确匹配的功能可以被过滤掉。在这里,我使用简单的均值滤波加阈值来获得新出现的区域的掩码。
Mat mask = Mat::zeros(imageBefore.rows, imageBefore.cols, CV_8UC1);
for (int i = 0; i < kpNotMatched.size(); i++) {
    mask.at<uchar>(kpNotMatched[i].pt) = 255;
}
blur(mask, mask, Size(BLUR_SIZE, BLUR_SIZE));
threshold(mask, mask, MASK_THRESHOLD, 255, THRESH_BINARY);
然后找出它的凸包,在原始图像中显示区域(黄色)。
vector<vector<Point> > contours;
vector<Vec4i> hierarchy;
findContours( mask, contours, hierarchy, CV_RETR_TREE, CV_CHAIN_APPROX_SIMPLE, Point(0, 0) );

vector<vector<Point> >hull( contours.size() );
for( int i = 0; i < contours.size(); i++ ) {
    convexHull(Mat(contours[i]), hull[i], false);
}
for( int i = 0; i < contours.size(); i++ ) {
    drawContours( output, hull, i, Scalar(0, 255, 255), 3, 8, vector<Vec4i>(), 0, Point() );
}
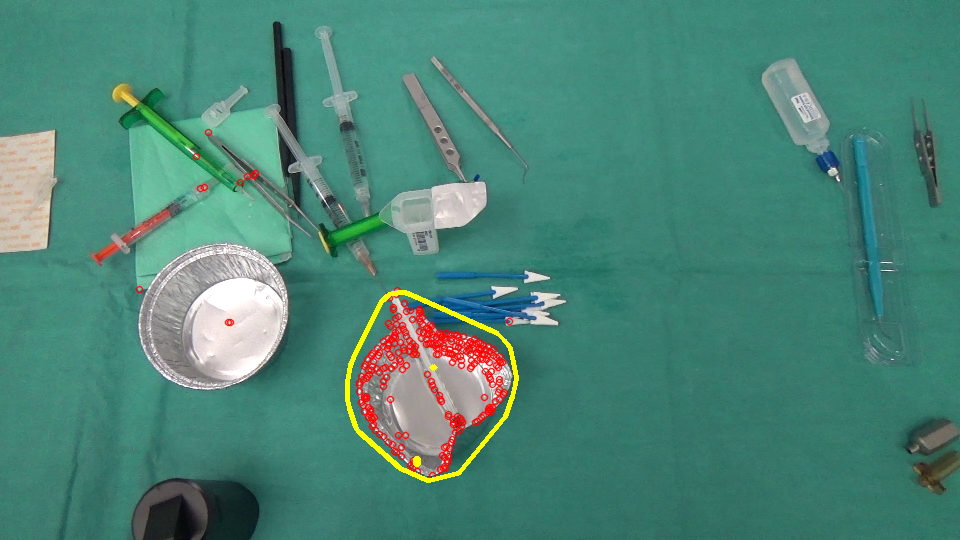
然后用相反的方式(从imageAfter到imageBefore进行匹配)来实现区域的出现。:)
Stack Overflow用户
发布于 2016-01-20 14:38:02
以下是我尝试过的;
- 检测发生变化的区域。对于这一点,我使用简单的帧差分,阈值,形态运算和凸包。
- 在这两个图像中找到这些区域的特征点,并查看它们是否匹配。在一个地区的良好匹配表明它没有经历一个重大的变化。糟糕的比赛意味着这两个地区现在是不同的。为此,我使用弓和Bhattacharyya距离。
参数可能需要调整。我使用了两个示例图像的值。作为特征检测器/描述符,我使用了SIFT (非自由)。您可以尝试其他检测器和描述符。
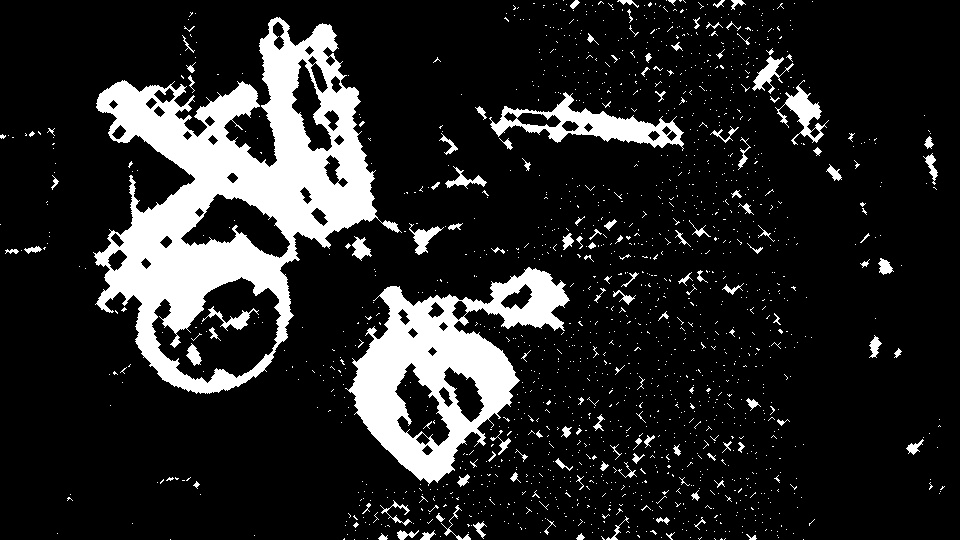
差异图像:
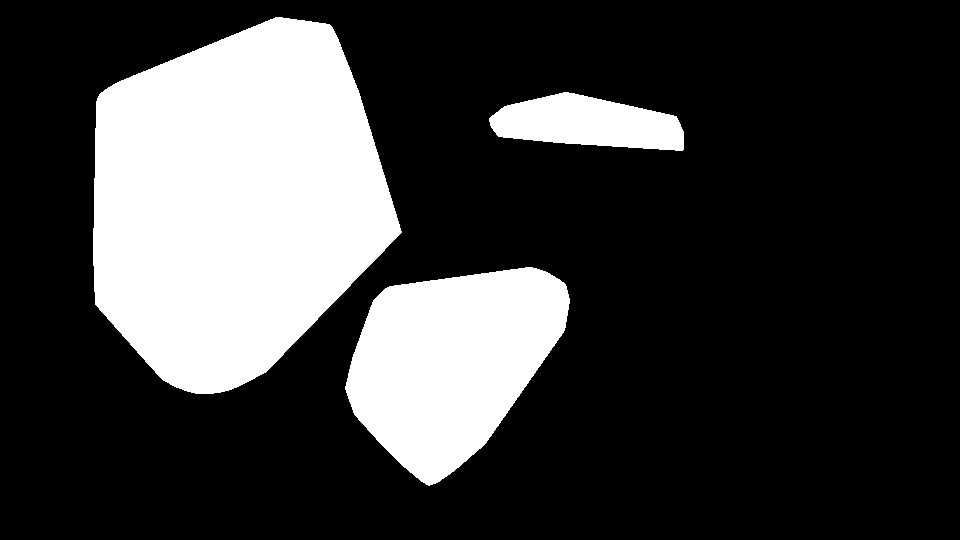
区域:
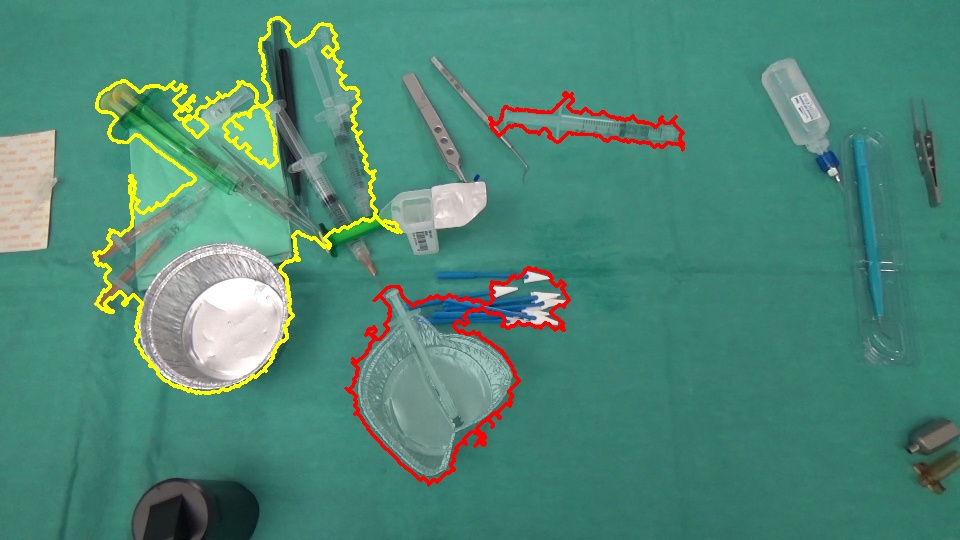
更改(红色:插入/删除,黄色:稀疏运动):
// for non-free modules SIFT/SURF
cv::initModule_nonfree();

Mat im1 = imread("1.png");
Mat im2 = imread("2.png");

// downsample
/*pyrDown(im1, im1);
pyrDown(im2, im2);*/

Mat disp = im1.clone() * .5 + im2.clone() * .5;
Mat regions = Mat::zeros(im1.rows, im1.cols, CV_8U);

// gray scale
Mat gr1, gr2;
cvtColor(im1, gr1, CV_BGR2GRAY);
cvtColor(im2, gr2, CV_BGR2GRAY);
// simple frame differencing
Mat diff;
absdiff(gr1, gr2, diff);
// threshold the difference to obtain the regions having a change
Mat bw;
adaptiveThreshold(diff, bw, 255, CV_ADAPTIVE_THRESH_GAUSSIAN_C, CV_THRESH_BINARY_INV, 15, 5);
// some post processing
Mat kernel = getStructuringElement(MORPH_ELLIPSE, Size(3, 3));
morphologyEx(bw, bw, MORPH_CLOSE, kernel, Point(-1, -1), 4);
// find contours in the change image
Mat cont = bw.clone();
vector<vector<Point> > contours;
vector<Vec4i> hierarchy;
findContours(cont, contours, hierarchy, CV_RETR_EXTERNAL, CV_CHAIN_APPROX_NONE, Point(0, 0));
// feature detector, descriptor and matcher
Ptr<FeatureDetector> featureDetector = FeatureDetector::create("SIFT");
Ptr<DescriptorExtractor> descExtractor = DescriptorExtractor::create("SIFT");
Ptr<DescriptorMatcher> descMatcher = DescriptorMatcher::create("FlannBased");

if( featureDetector.empty() || descExtractor.empty() || descMatcher.empty() )
{
    cout << "featureDetector or descExtractor or descMatcher was not created" << endl;
    exit(0);
}
// BOW
Ptr<BOWImgDescriptorExtractor> bowExtractor = new BOWImgDescriptorExtractor(descExtractor, descMatcher);

int vocabSize = 10;
TermCriteria terminate_criterion;
terminate_criterion.epsilon = FLT_EPSILON;
BOWKMeansTrainer bowTrainer( vocabSize, terminate_criterion, 3, KMEANS_PP_CENTERS );

Mat mask(bw.rows, bw.cols, CV_8U);
for(size_t j = 0; j < contours.size(); j++)
{
    // discard regions that a below a specific threshold
    Rect rect = boundingRect(contours[j]);
    if ((double)(rect.width * rect.height) / (bw.rows * bw.cols) < .01)
    {
        continue; // skip this region as it's too small
    }
    // prepare a mask for each region
    mask.setTo(0);
    vector<Point> hull;
    convexHull(contours[j], hull);
    fillConvexPoly(mask, hull, Scalar::all(255), 8, 0);

    fillConvexPoly(regions, hull, Scalar::all(255), 8, 0);

    // extract keypoints from the region
    vector<KeyPoint> im1Keypoints, im2Keypoints;
    featureDetector->detect(im1, im1Keypoints, mask);
    featureDetector->detect(im2, im2Keypoints, mask);
    // get their descriptors
    Mat im1Descriptors, im2Descriptors;
    descExtractor->compute(im1, im1Keypoints, im1Descriptors);
    descExtractor->compute(im2, im2Keypoints, im2Descriptors);

    if ((0 == im1Keypoints.size()) || (0 == im2Keypoints.size()))
    {
        // mark this contour as object arrival/removal region
        drawContours(disp, contours, j, Scalar(0, 0, 255), 2);
        continue;
    }

    // bag-of-visual-words
    Mat vocabulary = bowTrainer.cluster(im1Descriptors);
    bowExtractor->setVocabulary( vocabulary );
    // get the distribution of visual words in the region for both images
    vector<vector<int>> idx1, idx2;
    bowExtractor->compute(im1, im1Keypoints, im1Descriptors, &idx1);
    bowExtractor->compute(im2, im2Keypoints, im2Descriptors, &idx2);
    // compare the distributions
    Mat hist1 = Mat::zeros(vocabSize, 1, CV_32F);
    Mat hist2 = Mat::zeros(vocabSize, 1, CV_32F);

    for (int i = 0; i < vocabSize; i++)
    {
        hist1.at<float>(i) = (float)idx1[i].size();
        hist2.at<float>(i) = (float)idx2[i].size();
    }
    normalize(hist1, hist1);
    normalize(hist2, hist2);
    double comp = compareHist(hist1, hist2, CV_COMP_BHATTACHARYYA);

    cout << comp << endl;
    // low BHATTACHARYYA distance means a good match of features in the two regions
    if ( comp < .2 )
    {
        // mark this contour as a region having sparse motion
        drawContours(disp, contours, j, Scalar(0, 255, 255), 2);
    }
    else
    {
        // mark this contour as object arrival/removal region
        drawContours(disp, contours, j, Scalar(0, 0, 255), 2);
    }
}Stack Overflow用户
发布于 2016-01-15 08:51:10
你可以尝试一种双管齐下的方法让我印象深刻的是,如果您能够在使用该方法之前删除已移动的对象,它将得到很大的改进。
有一种很好的OpenCV方法来检测这里,它在图像中找到感兴趣的点,用于检测物体的平移。我想你可以用下面的方法实现你想要的-
1将图像与OpenCV代码进行比较,并突出显示两幅图像中的移动对象
2检测到的具有背景的物体的颜色,另一幅图像位于同一组像素(或类似的东西)上,以减少因运动图像而引起的图像差异。
3找出图像的差异,现在应该有较大的主要对象和较小的文物遗留下来的运动图像。
在图像差分中检测到一定尺寸的物体的4个阈值
5编制一份可能的候选人名单
还有其他可供选择的对象跟踪方法,所以可能有更多您喜欢的代码,但是我认为这个过程对于您正在做的事情应该是可以的。
https://stackoverflow.com/questions/34750415
复制相似问题
腾讯云开发者

Copyright © 2013 - 2026 Tencent Cloud. All Rights Reserved. 腾讯云 版权所有
深圳市腾讯计算机系统有限公司 ICP备案/许可证号:粤B2-20090059 ![]() 粤公网安备44030502008569号
粤公网安备44030502008569号
腾讯云计算(北京)有限责任公司 京ICP证150476号 | 京ICP备11018762号