
深度缓冲器(对纹理)输出错误?
对于SSAO效果,我必须生成两个纹理:法线(在视图空间中)和深度。
根据Microsoft教程 (阅读深度模板缓冲区作为纹理章节),我决定使用深度缓冲区作为纹理。
不幸的是,在呈现之后,我没有从深度缓冲区(较低的图像)获得任何信息:
我想这不对。奇怪的是,深度缓冲似乎起作用了(我得到了正确的面部顺序等等)。
深度缓冲码:
//create depth stencil texture (depth buffer)
D3D11_TEXTURE2D_DESC descDepth;
ZeroMemory(&descDepth, sizeof(descDepth));
descDepth.Width = width;
descDepth.Height = height;
descDepth.MipLevels = 1;
descDepth.ArraySize = 1;
descDepth.Format = DXGI_FORMAT_R24G8_TYPELESS;
descDepth.SampleDesc.Count = antiAliasing.getCount();
descDepth.SampleDesc.Quality = antiAliasing.getQuality();
descDepth.Usage = D3D11_USAGE_DEFAULT;
descDepth.BindFlags = D3D11_BIND_DEPTH_STENCIL | D3D11_BIND_SHADER_RESOURCE;
descDepth.CPUAccessFlags = 0;
descDepth.MiscFlags = 0;

ID3D11Texture2D* depthStencil = NULL;
result = device->CreateTexture2D(&descDepth, NULL, &depthStencil);
ERROR_HANDLE(SUCCEEDED(result), L"Could not create depth stencil texture.", MOD_GRAPHIC);

D3D11_SHADER_RESOURCE_VIEW_DESC shaderResourceViewDesc;
//setup the description of the shader resource view
shaderResourceViewDesc.Format = DXGI_FORMAT_R24_UNORM_X8_TYPELESS;
shaderResourceViewDesc.ViewDimension = antiAliasing.isOn() ? D3D11_SRV_DIMENSION_TEXTURE2DMS : D3D11_SRV_DIMENSION_TEXTURE2D;
shaderResourceViewDesc.Texture2D.MostDetailedMip = 0;
shaderResourceViewDesc.Texture2D.MipLevels = 1;

//create the shader resource view.
ERROR_HANDLE(SUCCEEDED(device->CreateShaderResourceView(depthStencil, &shaderResourceViewDesc, &depthStencilShaderResourceView)),
    L"Could not create shader resource view for depth buffer.", MOD_GRAPHIC);

createDepthStencilStates();
//set the depth stencil state.
context->OMSetDepthStencilState(depthStencilState3D, 1);

D3D11_DEPTH_STENCIL_VIEW_DESC depthStencilViewDesc;
// Initialize the depth stencil view.
ZeroMemory(&depthStencilViewDesc, sizeof(depthStencilViewDesc));

// Set up the depth stencil view description.
depthStencilViewDesc.Format = DXGI_FORMAT_D24_UNORM_S8_UINT;
depthStencilViewDesc.ViewDimension = antiAliasing.isOn() ? D3D11_DSV_DIMENSION_TEXTURE2DMS : D3D11_DSV_DIMENSION_TEXTURE2D;
depthStencilViewDesc.Texture2D.MipSlice = 0;
//depthStencilViewDesc.Flags = D3D11_DSV_READ_ONLY_DEPTH;

// Create the depth stencil view.
result = device->CreateDepthStencilView(depthStencil, &depthStencilViewDesc, &depthStencilView);
ERROR_HANDLE(SUCCEEDED(result), L"Could not create depth stencil view.", MOD_GRAPHIC);
在第一次呈现之后,我将深度模板与其他渲染目标(颜色、法线)一起设置为纹理资源,并将其附加到数组中:
ID3D11ShaderResourceView ** textures = new ID3D11ShaderResourceView *[targets.size()+1];
for (unsigned i = 0; i < targets.size(); i++) {
    textures[i] = targets[i]->getShaderResourceView();
}
textures[targets.size()] = depthStencilShaderResourceView;
context->PSSetShaderResources(0, targets.size()+1, textures);在第二步之前,我调用context->OMSetRenderTargets(1, &myRenderTargetView, NULL);来解除深度缓冲区的绑定(因此我可以使用它作为纹理)。
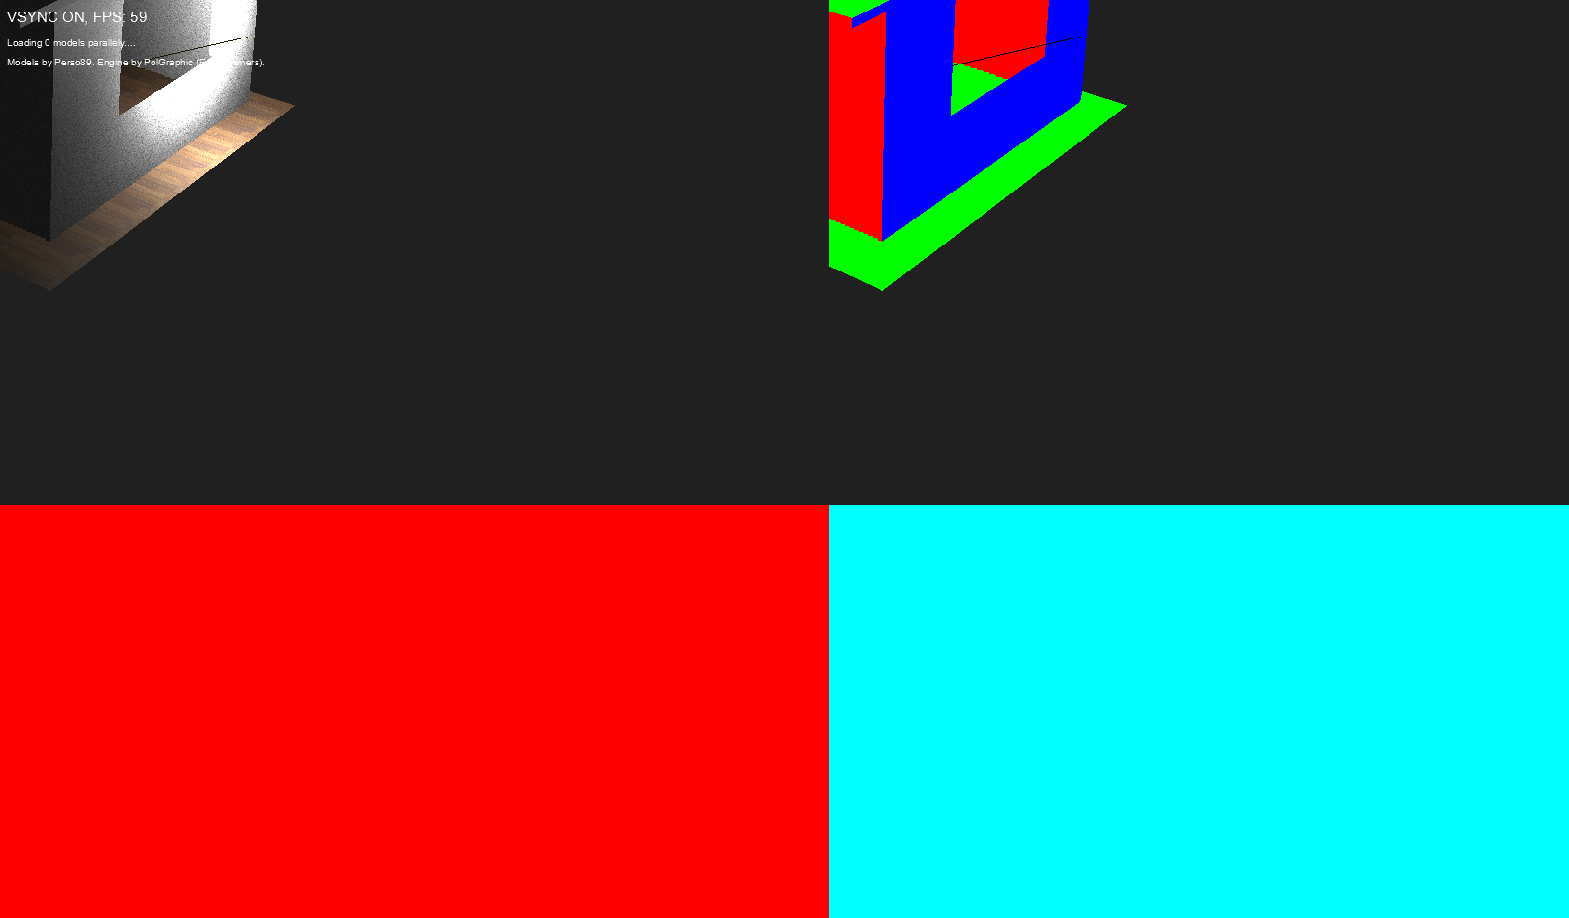
然后,我使用简单的后处理着色器渲染纹理(呈现来自第一遍+深度缓冲区的目标),只是为了调试目的(第二遍):
Texture2D ColorTexture[3];
SamplerState ObjSamplerState;

float4 main(VS_OUTPUT input) : SV_TARGET0{
    float4 Color;
    Color = float4(0, 1, 1, 1);
    float2 textureCoordinates = input.textureCoordinates.xy * 2;
    if (input.textureCoordinates.x < 0.5f && input.textureCoordinates.y < 0.5f) {
        Color = ColorTexture[0].Sample(ObjSamplerState, textureCoordinates);
    }
    if (input.textureCoordinates.x > 0.5f && input.textureCoordinates.y < 0.5f) {
        textureCoordinates.x -= 0.5f;
        Color = ColorTexture[1].Sample(ObjSamplerState, textureCoordinates);
    }
    if (input.textureCoordinates.x < 0.5f && input.textureCoordinates.y > 0.5f) { //depth texture
        textureCoordinates.y -= 0.5f;
        Color = ColorTexture[2].Sample(ObjSamplerState, textureCoordinates);
    }
...
它对法线纹理很好。为什么它不适用于深度缓冲区(作为着色器资源视图)?
回答 1
Stack Overflow用户
发布于 2015-08-16 01:03:04
根据评论意见:
对纹理进行了正确的渲染和采样,但由于数据分布在0.999 ~ 1.0f之间,数据呈现均匀红色。
您可以做一些事情来提高可用的深度精度,但最简单的方法是确保您的近距离和远距离剪辑距离对于您正在绘制的场景来说不会太小/太大。
假设米是你的单位,一个近的0.1 (10厘米)和一个远的剪辑200 (米)是比1厘米和20公里更合理。
即便如此,不要期望看到太多的黑/暗区域,z缓冲区的非线性特性仍将意味着你的大部分深度值会被分流到1。如果深度缓冲区的可视化很重要,那么在显示它之前,只需将数据重放到标准化的0-1范围即可。
https://stackoverflow.com/questions/32021030
复制相似问题
腾讯云开发者

Copyright © 2013 - 2026 Tencent Cloud. All Rights Reserved. 腾讯云 版权所有
深圳市腾讯计算机系统有限公司 ICP备案/许可证号:粤B2-20090059 ![]() 粤公网安备44030502008569号
粤公网安备44030502008569号
腾讯云计算(北京)有限责任公司 京ICP证150476号 | 京ICP备11018762号