
使用SQLite游标输出片段中列表视图中的表内容
我有一个MyDBHandler和一个getAllDetails方法,该方法使用游标查询数据库并返回列表。
我现在不知道要做的是如何在另一个片段中的listview中输出这个列表。我被告知要创建两个XML布局和一个自定义适配器,但我不知道如何做到这一点!
MyDBHandler类
package com.astuetz.viewpager.extensions.sample;

import android.content.ContentValues;
import android.content.Context;
import android.database.sqlite.SQLiteDatabase;
import android.database.sqlite.SQLiteOpenHelper;
import android.database.Cursor;
import android.content.Context;
import android.content.ContentValues;

import java.util.ArrayList;
import java.util.List;

public class MyDBHandler extends SQLiteOpenHelper {

private static final int DATABASE_VERSION = 1;
private static final String DATABASE_NAME = "detailsDB.db";
public static final String TABLE_DETAILS = "details";
public static final String COLUMN_ID = "_id";
public static final String COLUMN_FIRSTNAME = "firstname";
public static final String COLUMN_SURNAME = "surname";
public static final String COLUMN_PHONE = "phone";
public static final String COLUMN_EMAIL = "email";
public static final String COLUMN_ADDRESS1 = "address1";
public static final String COLUMN_ADDRESS2 = "address2";

public static final String TABLE_KIN_DETAILS = "kindetails";
public static final String COLUMN_KIN_ID = "_id";
public static final String COLUMN_KIN_YOUREMAIL = "youremailkin";
public static final String COLUMN_KIN_FIRSTNAME = "firstnamekin";
public static final String COLUMN_KIN_SURNAME = "surnamekin";
public static final String COLUMN_KIN_PHONE = "phonekin";
public static final String COLUMN_KIN_EMAIL = "emailkin";
public static final String COLUMN_KIN_ADDRESS1 = "address1kin";
public static final String COLUMN_KIN_ADDRESS2 = "address2kin";

// Pass database information along to superclass
public MyDBHandler(Context context, String name, SQLiteDatabase.CursorFactory factory, int version) {
    super(context, DATABASE_NAME, factory, DATABASE_VERSION);
}

@Override
public void onCreate(SQLiteDatabase db) {
    String query = " CREATE TABLE " + TABLE_DETAILS + "("
            + COLUMN_ID + " INTEGER PRIMARY KEY AUTOINCREMENT, "
            + COLUMN_FIRSTNAME + " TEXT, "
            + COLUMN_SURNAME + " TEXT, "
            + COLUMN_PHONE + " TEXT, "
            + COLUMN_EMAIL + " TEXT, "
            + COLUMN_ADDRESS1 + " TEXT, "
            + COLUMN_ADDRESS2 + " TEXT "
            + ");";

    String query2 = " CREATE TABLE " + TABLE_KIN_DETAILS + "("
            + COLUMN_KIN_ID + " INTEGER PRIMARY KEY AUTOINCREMENT, "
            + COLUMN_KIN_YOUREMAIL + " TEXT, "
            + COLUMN_KIN_FIRSTNAME + " TEXT, "
            + COLUMN_KIN_SURNAME + " TEXT, "
            + COLUMN_KIN_PHONE + " TEXT, "
            + COLUMN_KIN_EMAIL + " TEXT, "
            + COLUMN_KIN_ADDRESS1 + " TEXT, "
            + COLUMN_KIN_ADDRESS2 + " TEXT "
            + ");";
    db.execSQL(query);
    db.execSQL(query2);
}

@Override
public void onUpgrade(SQLiteDatabase db, int oldVersion, int newVersion) {
    db.execSQL(" DROP TABLE IF EXISTS " + TABLE_DETAILS);
    db.execSQL(" DROP TABLE IF EXISTS " + TABLE_KIN_DETAILS);
    onCreate(db);
}

//Add a new row to the database
public void addDetails(Details details) {
    ContentValues values = new ContentValues();
    values.put(COLUMN_FIRSTNAME, details.getFirstname());
    values.put(COLUMN_SURNAME, details.getSurname());
    values.put(COLUMN_PHONE, details.getPhone());
    values.put(COLUMN_EMAIL, details.getEmail());
    values.put(COLUMN_ADDRESS1, details.getAddress1());
    values.put(COLUMN_ADDRESS2, details.getAddress2());
    SQLiteDatabase db = getWritableDatabase();
    db.insert(TABLE_DETAILS, null, values);
    db.close();
}

public void addKinDetails(KinDetails kinDetails){
    ContentValues values = new ContentValues();
    values.put(COLUMN_KIN_YOUREMAIL, kinDetails.getyourEmailkin());
    values.put(COLUMN_KIN_FIRSTNAME, kinDetails.getFirstnamekin());
    values.put(COLUMN_KIN_SURNAME, kinDetails.getSurnamekin());
    values.put(COLUMN_KIN_PHONE, kinDetails.getPhonekin());
    values.put(COLUMN_KIN_EMAIL, kinDetails.getEmailkin());
    values.put(COLUMN_KIN_ADDRESS1, kinDetails.getAddress1kin());
    values.put(COLUMN_KIN_ADDRESS2, kinDetails.getAddress2kin());
    SQLiteDatabase db = getWritableDatabase();
    db.insert(TABLE_KIN_DETAILS, null, values);
    db.close();
}


public List<Details> getAllDetails(){

    //create a new list in which we put all persons
    List<Details>detailsList = new ArrayList<>();

    SQLiteDatabase db = getWritableDatabase();
    String query = "SELECT * FROM " + TABLE_DETAILS;

    //Cursor points to a location in your results
    Cursor c = db.rawQuery(query, null);
    //Move to the first row in your results

    if (c != null) {

        c.moveToFirst();

        //Position after the last row means the end of the results
        while (!c.isAfterLast()) {

            //create new details object
            Details details = new Details();

            //Here use static declared on top of the class..don't use "" for the table column
            details.set_id(c.getColumnIndex(COLUMN_ID));
            details.setFirstname(c.getString(c.getColumnIndex(COLUMN_FIRSTNAME)));
            details.setSurname(c.getString(c.getColumnIndex(COLUMN_SURNAME)));
            details.setPhone(c.getString(c.getColumnIndex(COLUMN_PHONE)));
            details.setEmail(c.getString(c.getColumnIndex(COLUMN_EMAIL)));
            details.setAddress1(c.getString(c.getColumnIndex(COLUMN_ADDRESS1)));
            details.setAddress2(c.getString(c.getColumnIndex(COLUMN_ADDRESS2)));

            detailsList.add(details);


            c.moveToNext();
        }

        c.close();
    }

    db.close();

    //return our list of persons
    return detailsList;

}
}回答 3
Stack Overflow用户
发布于 2015-02-25 11:43:53
您需要首先为片段和listview行创建布局文件。
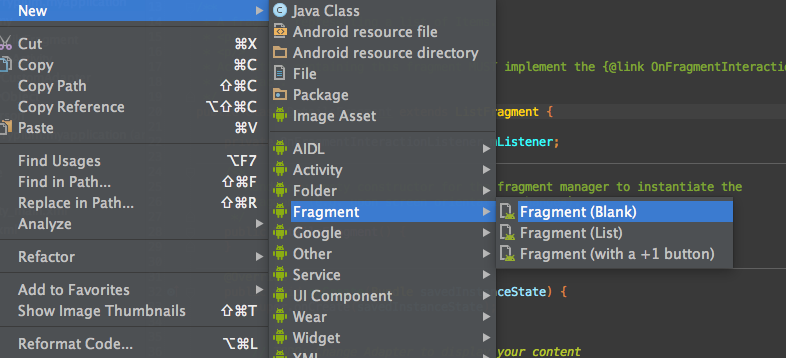
对于这个片段,您可以创建一个新的空白片段,如下所示:注意:我们使用空白片段是因为它具有很好的练习性,因为它在复杂的情况下提供了更多的控制。
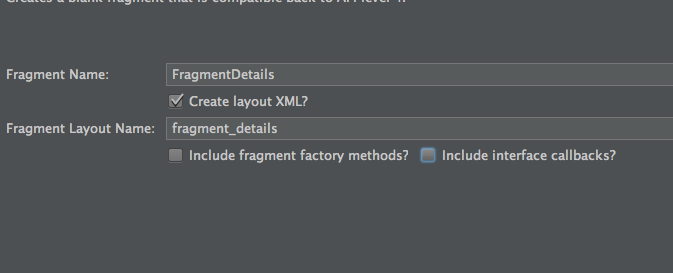
在fragment_details.xml中粘贴以下代码:注意将com.companyname更改为您的应用程序包名称!
<LinearLayout xmlns:android="http://schemas.android.com/apk/res/android"
xmlns:tools="http://schemas.android.com/tools" android:layout_width="match_parent"
android:layout_height="match_parent"
tools:context="com.companyname.myapplication.FragmentDetails">


<ListView
    android:layout_width="match_parent"
    android:layout_height="match_parent"
    android:id="@+id/frag_details_listView"
    android:layout_weight="1" />

 </LinearLayout>
创建一个新的xml布局文件并将其命名为row_details,这将是我们的列表视图的自定义行。
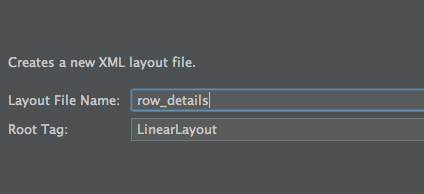
在文件row_details.xml中粘贴以下代码:
<?xml version="1.0" encoding="utf-8"?>
<TextView
    android:layout_width="wrap_content"
    android:layout_height="wrap_content"
    android:textAppearance="?android:attr/textAppearanceLarge"
    android:text="Large Text"
    android:id="@+id/row_details_textview_name"
    android:layout_marginTop="10dp"
    android:layout_marginLeft="10dp" />

<TextView
    android:layout_width="wrap_content"
    android:layout_height="wrap_content"
    android:textAppearance="?android:attr/textAppearanceSmall"
    android:text="Small Text"
    android:id="@+id/row_details_textview_id"
    android:layout_marginLeft="10dp" />

  </LinearLayout>
我们现在需要的是一个自定义适配器,它将负责将数据加载到列表视图中。
创建一个新的Java并将其命名为DetailsAdapter,并粘贴以下代码:注意,请参阅代码中的注释,因为理解Android中适配器背后的概念非常重要:
public class DetailsAdapter extends ArrayAdapter<Person> {

private Context context;

//Constructor
public DetailsAdapter(Context context, int resource, List<Person> objects) {
    super(context, resource, objects);

    this.context = context;
}


//The get view is the most crucial part of the adapter, here the listview asks the
//adapter for the row to display

@Override
public View getView(int position, View row, ViewGroup parent) {

    //Get an instance of our holder
    Holder holder;


    //Check if this is the first time we are creating this row for the listview
    if (row == null){

        //Row was null and thus we need to get components from the row_details.xml
        holder = new Holder();

        //get the Android's layout inflater service which will read our row_details.xml
        LayoutInflater inflater = (LayoutInflater)context.getSystemService(Context.LAYOUT_INFLATER_SERVICE);

        //Fill our row view with the xml layout file
        row = inflater.inflate(R.layout.row_details, null);

        //Fill our holder with the text view components
        holder.textViewName = (TextView)row.findViewById(R.id.row_details_textview_name);
        holder.textViewId = (TextView)row.findViewById(R.id.row_details_textview_id);

        //This is very imp! attach our holder to the row
        row.setTag(holder);

    }else{

        //row was created before! thus get the holder object from the row tag
        holder = (Holder)row.getTag();
    }


    //At this point we have our row, either created from new or got it from the row tag object
    //we can now fill the data

    //First get our object from the list which is in the position of the listview
    //The position as you can see is passed to the getView method by the listview
    Person person = getItem(position);

    holder.textViewName.setText(person.getFirstname());
    holder.textViewId.setText("ID: " + person.get_id());

    //we are done formatting our row..return to listview to show
    return row;
}

//A holder will be resposable to hold our components to improve listview performance
//We replicate the components we have in the row_details.xml
private class Holder{

    TextView textViewName;
    TextView textViewId;


}

}
在这一点上,我们准备隆隆!
在FragmentDetails java类中,我们声明Details...we的全局私有列表,获取listview..we的一个实例,获取data..create一个新的DetailsAdapter,并将其附加到列表视图。
public class FragmentDetails extends Fragment {

private List<Details>detailsList = new ArrayList<>();

private ListView mListView;

private DetailsAdapter adapter;

public FragmentDetails() {
    // Required empty public constructor
}


@Override
public View onCreateView(LayoutInflater inflater, ViewGroup container,
                         Bundle savedInstanceState) {
    // Inflate the layout for this fragment
    View rootView = inflater.inflate(R.layout.fragment_details, container, false);

    //get an instance of our listview
    mListView = (ListView)rootView.findViewById(R.id.frag_details_listView);

    //Get the data here!!
    MyDBHandler dbHandler = new MyDBHandler(getActivity().getApplicationContext());
    detailsList = dbHandler.getAllDetails();

    //Initiate our adapter
    adapter = new DetailsAdapter(getActivity().getApplicationContext(), R.layout.row_details, detailsList);

    //set adapter to the listview
    if(adapter != null){
        mListView.setAdapter(adapter);
    }

    return rootView;

}


}
便条!!
在您的MyDbHandler类中,包含另一个构造函数,它只将上下文作为参数,如下所示:
public MyDBHandler(Context context){
    super(context, DATABASE_NAME, null, DATABASE_VERSION);
}
你的好意去..run这个项目
使用此过程,您可以在android中创建任意类型的listview。
Stack Overflow用户
发布于 2015-02-25 11:00:39
创建一个扩展ListFragment并实现LoaderManager.LoaderCallbacks<Cursor>的片段。如下所示:
public class MyFragment extends ListFragment implements
LoaderManager.LoaderCallbacks<Cursor> {}实现了onCreateLoader()、onLoadFinished()和onLoaderReset()方法。
在片段的onActivityCreated()方法中,调用getLoaderManager().initLoader()方法。
您可以从dbhelper中删除getAllDetails()方法,并将其作为片段中的onCreateLoader()方法中的查询。
有关详细信息,请参阅以下链接:
https://developer.android.com/training/load-data-background/setup-loader.html
https://developer.android.com/training/load-data-background/handle-results.html
Stack Overflow用户
发布于 2015-02-25 11:26:38
我建议您使用“回收器”视图,其更多的efficient.The RecyclerView小部件是v7支持库的一部分。您需要导入回收视图库(请参阅此链接)
参考本教程获得更多的详细信息和更好地理解回收视图。
首先,在mainActivity代码中创建回收视图和customAdapter,如下所示:
         RecyclerView recyclerView = (RecyclerView) view.findViewById(R.id.my_recycler_view);
         RecyclerView.LayoutManager mLayoutManager;
        dbHelper = new DBHelper(getActivity().getApplicationContext());
        list = MyDBHandler.getAllDetails();
        mLayoutManager = new LinearLayoutManager(getActivity().getApplicationContext());
        recyclerView.setLayoutManager(mLayoutManager);
        c = new CustomAdapter(list); //send the list to the adapter
        recyclerView.setAdapter(c);
在您的主要布局代码中,您应该有以下内容来显示回收视图:
<android.support.v7.widget.RecyclerView
        android:id="@+id/my_recycler_view"
        android:layout_width="match_parent"
        android:layout_height="wrap_content"
        android:clipToPadding="false"
        android:scrollbars="vertical"/>
现在您需要创建一个自定义适配器来显示Details对象的内容。请注意,在活动的早期代码中,CustomAdapter被调用并传递了Details对象列表。我们需要用这个在视图中显示出来。
public class CustomAdapter extends RecyclerView.Adapter<CustomAdapter.viewHolder> {
    List<Details> records;

    public class viewHolder extends RecyclerView.ViewHolder {
        public TextView firstname, surname;

        public viewHolder(View v) {
            super(v);
            firstname = (TextView) v.findViewById(R.id.first);
            surname = (TextView) v.findViewById(R.id.last);
        }
    }

    public CustomAdapter(List<Details> records) {
        this.records = records;
    }

    @Override
    public viewHolder onCreateViewHolder(ViewGroup parent, int viewType) {
        View v = LayoutInflater.from(parent.getContext()).inflate(R.layout.listrow, parent, false);
        return new viewHolder(v);
    }

    @Override
    public void onBindViewHolder(final viewHolder holder, final int position) {
        Details rec = list.get(position);
        holder.firstname.setText(rec.getFirstname());
        holder.lastname.setText(rec.getSurname);
    }
}
现在您需要定制适配器的布局文件,创建如下所示:
<LinearLayout xmlns:android="http://schemas.android.com/apk/res/android"
              android:layout_width="match_parent"
              android:layout_height="match_parent"
              android:background="@android:color/white"
              android:orientation="vertical">

        <TextView
            android:id="@+id/first"
            android:layout_width="match_parent"
            android:layout_height="wrap_content"
            android:paddingBottom="16dp"
            android:textColor="#CC000000"
            android:textSize="16sp"
            android:text=""/>
        <TextView
            android:id="@+id/last"
            android:layout_width="match_parent"
            android:layout_height="wrap_content"
            android:paddingBottom="16dp"
            android:textColor="#CC000000"
            android:textSize="16sp"
            android:text=""/>
</LinearLayout>https://stackoverflow.com/questions/28717017
复制相似问题
腾讯云开发者

Copyright © 2013 - 2026 Tencent Cloud. All Rights Reserved. 腾讯云 版权所有
深圳市腾讯计算机系统有限公司 ICP备案/许可证号:粤B2-20090059 ![]() 粤公网安备44030502008569号
粤公网安备44030502008569号
腾讯云计算(北京)有限责任公司 京ICP证150476号 | 京ICP备11018762号