
Python OpenCV: Rubik的立方体求解器颜色提取
描述:
我正在使用Python&OpenCV来求解rubiks多维数据集。为此,我试图提取所有颜色的立方体(单个立方体碎片),然后应用适当的算法(这是我设计的,没有问题)。
问题:
假设我已经提取了所有的颜色,我如何定位提取的立方体的位置?我怎么知道它是在上、中、下层,还是在角-中边?
我所做的:
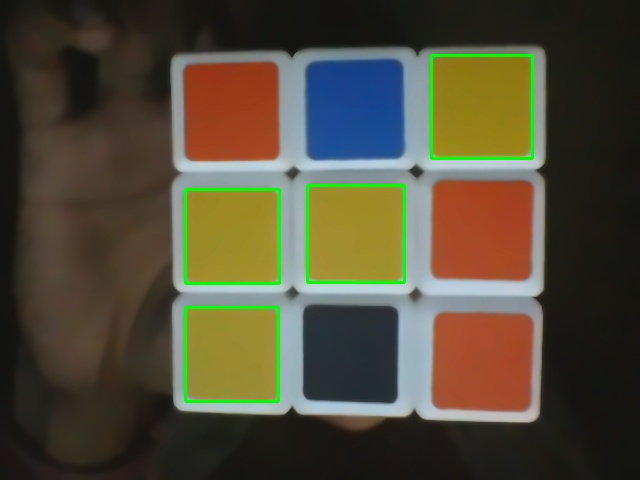
这里我刚刚提取了黄色。
颜色提取后的:
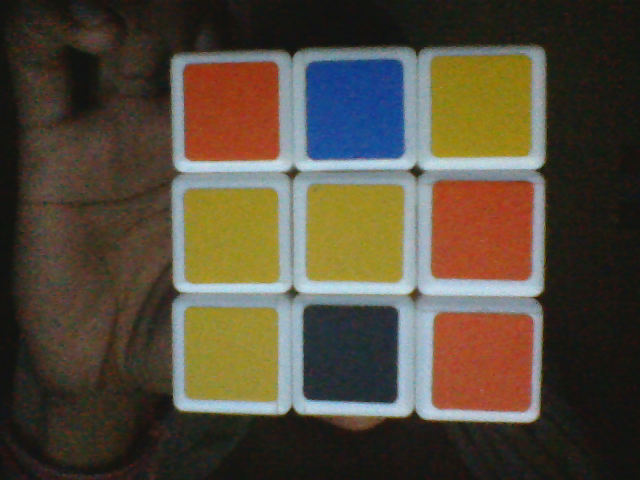
原始图像
代码
import numpy as np
import cv2
from cv2 import *

im = cv2.imread('v123.bmp')
im = cv2.bilateralFilter(im,9,75,75)
im = cv2.fastNlMeansDenoisingColored(im,None,10,10,7,21)
hsv_img = cv2.cvtColor(im, cv2.COLOR_BGR2HSV)   # HSV image


COLOR_MIN = np.array([20, 100, 100],np.uint8)       # HSV color code lower and upper bounds
COLOR_MAX = np.array([30, 255, 255],np.uint8)       # color yellow

frame_threshed = cv2.inRange(hsv_img, COLOR_MIN, COLOR_MAX)     # Thresholding image
imgray = frame_threshed
ret,thresh = cv2.threshold(frame_threshed,127,255,0)
contours, hierarchy = cv2.findContours(thresh,cv2.RETR_TREE,cv2.CHAIN_APPROX_SIMPLE)
print type(contours)
for cnt in contours:
    x,y,w,h = cv2.boundingRect(cnt)
    print x,
    print y
    cv2.rectangle(im,(x,y),(x+w,y+h),(0,255,0),2)
cv2.imshow("Show",im)
cv2.imwrite("extracted.jpg", im)
cv2.waitKey()
cv2.destroyAllWindows()
请给出一些建议,我如何定位位置的幼崽。这里发现了四个黄色的小方块:右上角,中间,右缘,左下角.我如何通过为每个职位分配数字来识别这些职位(这里: 3,4,5,7)
任何帮助/想法都很感激:)谢谢。
P.S.:OpenCV新手:)
回答 2
Stack Overflow用户
发布于 2019-09-19 21:07:35
下面是一个简单的方法:
- 将图像转换为HSV格式
- 用彩色阈值法检测
cv2.inRange()正方形 - 执行形态运算并在掩码上画正方形
- 掩码上的寻找轮廓并从自上而下或自下而上排序
- 取三个正方形的每一行,从左-右或右-左排序。
在转换为HSV格式后,利用cv2.inRange()进行颜色阈值检测。我们把检测到的方块画到面具上
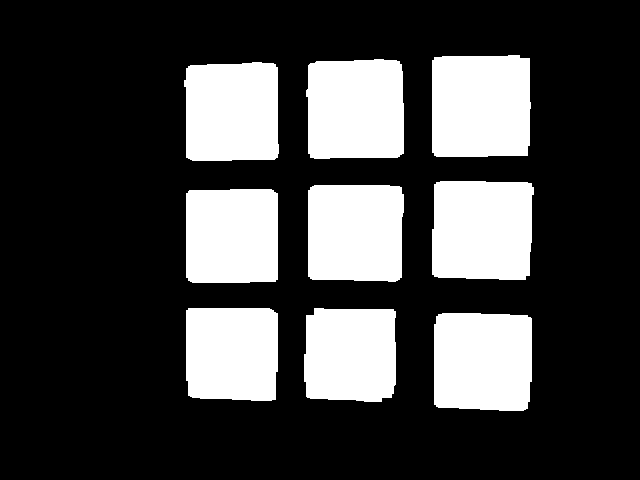
从这里,我们在掩码上找到轮廓,并利用imutils.contours.sort_contours()对轮廓从上到下或从下到顶进行排序。接下来,我们取三个正方形的每一行,并将这一行从左到右或从右到左排序。这是排序的可视化(上、下、左)或(上、上、右)。
现在,我们已经对轮廓进行了排序,我们只需将矩形绘制到图像上。这是结果
从左到右,从上到下(左),从右到左,从上到下

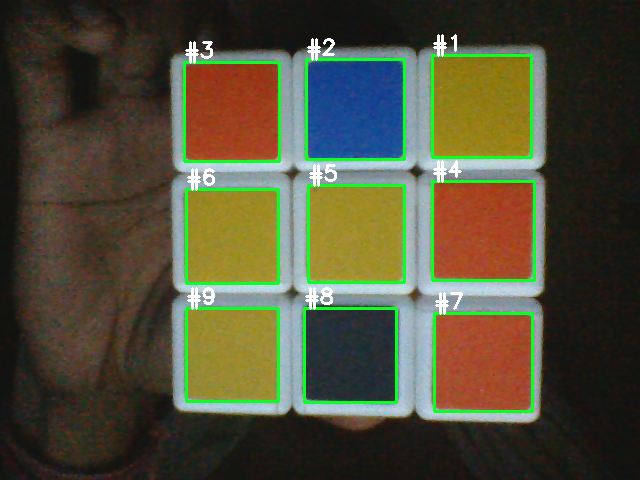
从左到右,从下到上(左),从右到左,从下到上


import cv2
import numpy as np
from imutils import contours

image = cv2.imread('1.png')
original = image.copy()
image = cv2.cvtColor(image, cv2.COLOR_BGR2HSV)
mask = np.zeros(image.shape, dtype=np.uint8)

colors = {
    'gray': ([76, 0, 41], [179, 255, 70]),        # Gray
    'blue': ([69, 120, 100], [179, 255, 255]),    # Blue
    'yellow': ([21, 110, 117], [45, 255, 255]),   # Yellow
    'orange': ([0, 110, 125], [17, 255, 255])     # Orange
    }

# Color threshold to find the squares
open_kernel = cv2.getStructuringElement(cv2.MORPH_RECT, (7,7))
close_kernel = cv2.getStructuringElement(cv2.MORPH_RECT, (5,5))
for color, (lower, upper) in colors.items():
    lower = np.array(lower, dtype=np.uint8)
    upper = np.array(upper, dtype=np.uint8)
    color_mask = cv2.inRange(image, lower, upper)
    color_mask = cv2.morphologyEx(color_mask, cv2.MORPH_OPEN, open_kernel, iterations=1)
    color_mask = cv2.morphologyEx(color_mask, cv2.MORPH_CLOSE, close_kernel, iterations=5)

    color_mask = cv2.merge([color_mask, color_mask, color_mask])
    mask = cv2.bitwise_or(mask, color_mask)

gray = cv2.cvtColor(mask, cv2.COLOR_BGR2GRAY)
cnts = cv2.findContours(gray, cv2.RETR_EXTERNAL, cv2.CHAIN_APPROX_SIMPLE)
cnts = cnts[0] if len(cnts) == 2 else cnts[1]
# Sort all contours from top-to-bottom or bottom-to-top
(cnts, _) = contours.sort_contours(cnts, method="top-to-bottom")

# Take each row of 3 and sort from left-to-right or right-to-left
cube_rows = []
row = []
for (i, c) in enumerate(cnts, 1):
    row.append(c)
    if i % 3 == 0:
        (cnts, _) = contours.sort_contours(row, method="left-to-right")
        cube_rows.append(cnts)
        row = []

# Draw text
number = 0
for row in cube_rows:
    for c in row:
        x,y,w,h = cv2.boundingRect(c)
        cv2.rectangle(original, (x, y), (x + w, y + h), (36,255,12), 2)

        cv2.putText(original, "#{}".format(number + 1), (x,y - 5), cv2.FONT_HERSHEY_SIMPLEX, 0.7, (255,255,255), 2)
        number += 1

cv2.imshow('mask', mask)
cv2.imwrite('mask.png', mask)
cv2.imshow('original', original)
cv2.waitKey()要获得HSV颜色范围,可以使用这个简单的HSV颜色阈值脚本来确定上下颜色范围。更改cv2.imread()中的图像路径
import cv2
import numpy as np

def nothing(x):
    pass

# Load image
image = cv2.imread('1.jpg')

# Create a window
cv2.namedWindow('image')

# Create trackbars for color change
# Hue is from 0-179 for Opencv
cv2.createTrackbar('HMin', 'image', 0, 179, nothing)
cv2.createTrackbar('SMin', 'image', 0, 255, nothing)
cv2.createTrackbar('VMin', 'image', 0, 255, nothing)
cv2.createTrackbar('HMax', 'image', 0, 179, nothing)
cv2.createTrackbar('SMax', 'image', 0, 255, nothing)
cv2.createTrackbar('VMax', 'image', 0, 255, nothing)

# Set default value for Max HSV trackbars
cv2.setTrackbarPos('HMax', 'image', 179)
cv2.setTrackbarPos('SMax', 'image', 255)
cv2.setTrackbarPos('VMax', 'image', 255)

# Initialize HSV min/max values
hMin = sMin = vMin = hMax = sMax = vMax = 0
phMin = psMin = pvMin = phMax = psMax = pvMax = 0

while(1):
    # Get current positions of all trackbars
    hMin = cv2.getTrackbarPos('HMin', 'image')
    sMin = cv2.getTrackbarPos('SMin', 'image')
    vMin = cv2.getTrackbarPos('VMin', 'image')
    hMax = cv2.getTrackbarPos('HMax', 'image')
    sMax = cv2.getTrackbarPos('SMax', 'image')
    vMax = cv2.getTrackbarPos('VMax', 'image')

    # Set minimum and maximum HSV values to display
    lower = np.array([hMin, sMin, vMin])
    upper = np.array([hMax, sMax, vMax])

    # Convert to HSV format and color threshold
    hsv = cv2.cvtColor(image, cv2.COLOR_BGR2HSV)
    mask = cv2.inRange(hsv, lower, upper)
    result = cv2.bitwise_and(image, image, mask=mask)

    # Print if there is a change in HSV value
    if((phMin != hMin) | (psMin != sMin) | (pvMin != vMin) | (phMax != hMax) | (psMax != sMax) | (pvMax != vMax) ):
        print("(hMin = %d , sMin = %d, vMin = %d), (hMax = %d , sMax = %d, vMax = %d)" % (hMin , sMin , vMin, hMax, sMax , vMax))
        phMin = hMin
        psMin = sMin
        pvMin = vMin
        phMax = hMax
        psMax = sMax
        pvMax = vMax

    # Display result image
    cv2.imshow('image', result)
    if cv2.waitKey(10) & 0xFF == ord('q'):
        break

cv2.destroyAllWindows()Stack Overflow用户
发布于 2014-07-23 17:53:18
这是找到的黄色方块的原始代码和位置。
来源
import numpy as np

import sys; sys.path.append('/usr/lib/pyshared/python2.7')

import cv2
from cv2 import *

im = cv2.imread('rubik.png')
im = cv2.bilateralFilter(im,9,75,75)
im = cv2.fastNlMeansDenoisingColored(im,None,10,10,7,21)
hsv_img = cv2.cvtColor(im, cv2.COLOR_BGR2HSV)   # HSV image


COLOR_MIN = np.array([20, 100, 100],np.uint8)       # HSV color code lower and upper bounds
COLOR_MAX = np.array([30, 255, 255],np.uint8)       # color yellow

frame_threshed = cv2.inRange(hsv_img, COLOR_MIN, COLOR_MAX)     # Thresholding image
imgray = frame_threshed
ret,thresh = cv2.threshold(frame_threshed,127,255,0)
contours, hierarchy = cv2.findContours(thresh,cv2.RETR_TREE,cv2.CHAIN_APPROX_SIMPLE)
# print type(contours)
for cnt in contours:
    x,y,w,h = cv2.boundingRect(cnt)
    print x,y
    cv2.rectangle(im,(x,y),(x+w,y+h),(0,255,0),2)
cv2.imshow("Show",im)
cv2.imwrite("extracted.jpg", im)
cv2.waitKey()
cv2.destroyAllWindows()
输出
185 307
185 189
307 185
431 55https://stackoverflow.com/questions/24916870
复制相似问题
腾讯云开发者

Copyright © 2013 - 2026 Tencent Cloud. All Rights Reserved. 腾讯云 版权所有
深圳市腾讯计算机系统有限公司 ICP备案/许可证号:粤B2-20090059 ![]() 粤公网安备44030502008569号
粤公网安备44030502008569号
腾讯云计算(北京)有限责任公司 京ICP证150476号 | 京ICP备11018762号