
可写位图Indexed8写后缀
可写位图Indexed8写后缀
提问于 2014-04-23 18:21:08
我试图使用写皮克斯()方法改变可写位图,但它不改变任何像素。它有如下的同意
public void createWbm(int viewportW, int viewportH)
        {
            writeableBitmap = new WriteableBitmap(
            viewportW,
            viewportH,
            96,
            96,
            PixelFormats.Indexed8,
            new BitmapPalette(Form1.form1.getColors()));
            i.Source = writeableBitmap;
        }
我使用这个方法调用左按钮事件,但是没有任何变化。是否需要使用两个循环(像素行的外部循环和列的内部循环)来绘制每个像素,或者可能只使用写像素()方法?谢谢
void BrushPixel(MouseEventArgs e)
{
    byte[] ColorData = { 0, 0, 0, 0 }; // B G R

    Int32Rect rect = new Int32Rect(
            (int)(e.GetPosition(i).X),
            (int)(e.GetPosition(i).Y),
            1,
            1);

    writeableBitmap.WritePixels( rect, ColorData, 4, 0);
}回答 1
Stack Overflow用户
回答已采纳
发布于 2014-04-24 00:05:35
你用错了它,
- 在这种格式(8位)中,数组
ColorData要么表示1x4、4x1或2x2像素图像。 - 因此,
rect尺寸应与上述任何一种尺寸相匹配。
请记住,这些是调色板中颜色的索引,而不是您已经评论过的BGR值。
下面是一个简单的例子:
public partial class MainWindow : Window
{
public MainWindow()
{
InitializeComponent();
Loaded += MainWindow_Loaded;
}
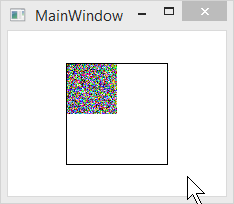
private void MainWindow_Loaded(object sender, RoutedEventArgs e)
{
var bitmap = new WriteableBitmap(100, 100, 96, 96, PixelFormats.Indexed8, BitmapPalettes.Halftone256);
int width = 50;
int height = 50;
var pixels = new byte[width*height];
var random = new Random();
random.NextBytes(pixels);
bitmap.WritePixels(new Int32Rect(0, 0, width, height), pixels, width, 0);
Image1.Source = bitmap;
}
}XAML:
<Window x:Class="WpfApplication14.MainWindow"
        xmlns="http://schemas.microsoft.com/winfx/2006/xaml/presentation"
        xmlns:x="http://schemas.microsoft.com/winfx/2006/xaml"
        Title="MainWindow"
        Width="525"
        Height="350"
        SnapsToDevicePixels="True"
        UseLayoutRounding="True">
    <Grid>
        <Border HorizontalAlignment="Center"
                VerticalAlignment="Center"
                BorderBrush="Black"
                BorderThickness="1">
            <Image x:Name="Image1" Stretch="None" />
        </Border>
    </Grid>
</Window>注意:在这种格式下,stride参数总是等于width,因为像素长度(以字节为单位)为1。
我强烈建议您使用WriteableBitmapEx,这样可以使WriteableBitmap操作更加容易。请注意,它只支持PixelFormats.Pbgra32,但除非您确实有特定的理由使用8位,我只能推荐它,它可以绘制许多原语,如线条,矩形,圆圈等.
页面原文内容由Stack Overflow提供。腾讯云小微IT领域专用引擎提供翻译支持
原文链接:
https://stackoverflow.com/questions/23252266
复制相关文章
相似问题
腾讯云开发者

Copyright © 2013 - 2026 Tencent Cloud. All Rights Reserved. 腾讯云 版权所有
深圳市腾讯计算机系统有限公司 ICP备案/许可证号:粤B2-20090059 ![]() 粤公网安备44030502008569号
粤公网安备44030502008569号
腾讯云计算(北京)有限责任公司 京ICP证150476号 | 京ICP备11018762号