
带图标的PopupMenu
当然,我们在这里处理的是SDK 11和更高版本。
我打算做一些类似的事情:
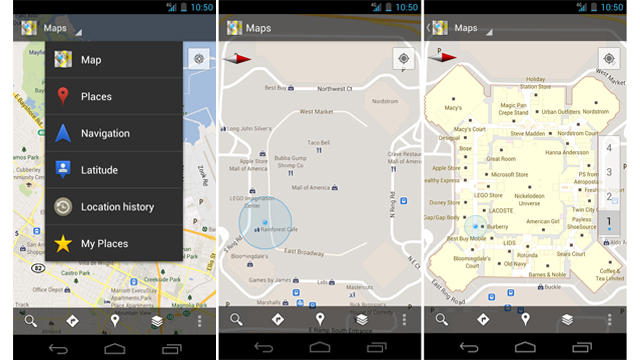
在该中的每个项的旁边,我想放置一个图标。
我创建了一个XML文件并将其放在/menu中。
<menu xmlns:android="http://schemas.android.com/apk/res/android" >

    <item
        android:id="@+id/action_one"
        android:title="Sync"
        android:icon="@android:drawable/ic_popup_sync"
        />

    <item
        android:id="@+id/action_two"
        android:title="About"
        android:icon="@android:drawable/ic_dialog_info"
        />
</menu>
正如您注意到的,在xml文件中,我定义了我想要的图标,但是,当弹出菜单显示时,它显示的是没有图标的图标。我该怎么做才能让这两个图标出现?
回答 12
Stack Overflow用户
发布于 2013-03-16 21:49:20
否则,我会执行它:
创建一个PopUpWindow布局:
<?xml version="1.0" encoding="utf-8"?>
<LinearLayout xmlns:android="http://schemas.android.com/apk/res/android"
android:id="@+id/llSortChangePopup"
android:layout_width="wrap_content"
android:layout_height="wrap_content"
android:background="@drawable/sort_popup_background"
android:orientation="vertical" >

<TextView
    android:id="@+id/tvDistance"
    android:layout_width="match_parent"
    android:layout_height="wrap_content"
    android:text="@string/distance"
    android:layout_weight="1.0"
    android:layout_marginLeft="20dp"
    android:paddingTop="5dp"
    android:gravity="center_vertical"
    android:textColor="@color/my_darker_gray" />

<ImageView
    android:layout_marginLeft="11dp"
    android:layout_width="wrap_content"
    android:layout_height="wrap_content"
    android:src="@drawable/sort_popup_devider"
    android:contentDescription="@drawable/sort_popup_devider"/>

<TextView
    android:id="@+id/tvPriority"
    android:layout_width="match_parent"
    android:layout_height="wrap_content"
    android:text="@string/priority"
    android:layout_weight="1.0"
    android:layout_marginLeft="20dp"
    android:gravity="center_vertical"
    android:clickable="true"
    android:onClick="popupSortOnClick"
    android:textColor="@color/my_black" />


<ImageView
    android:layout_marginLeft="11dp"
    android:layout_width="wrap_content"
    android:layout_height="wrap_content"
    android:src="@drawable/sort_popup_devider"
    android:contentDescription="@drawable/sort_popup_devider"/>

<TextView
    android:id="@+id/tvTime"
    android:layout_width="match_parent"
    android:layout_height="wrap_content"
    android:text="@string/time"
    android:layout_weight="1.0"
    android:layout_marginLeft="20dp"
    android:gravity="center_vertical"
    android:clickable="true"
    android:onClick="popupSortOnClick"
    android:textColor="@color/my_black" />

<ImageView
    android:layout_marginLeft="11dp"
    android:layout_width="wrap_content"
    android:layout_height="wrap_content"
    android:src="@drawable/sort_popup_devider"
    android:contentDescription="@drawable/sort_popup_devider"/>

<TextView
    android:id="@+id/tvStatus"
    android:layout_width="match_parent"
    android:layout_height="wrap_content"
    android:text="@string/status"
    android:layout_weight="1.0"
    android:layout_marginLeft="20dp"
    android:gravity="center_vertical"
    android:textColor="@color/my_black"
    android:clickable="true"
    android:onClick="popupSortOnClick"
    android:paddingBottom="10dp"/>

</LinearLayout>并在您的PopUpWindow中创建Activity:
    // The method that displays the popup.
private void showStatusPopup(final Activity context, Point p) {

   // Inflate the popup_layout.xml
   LinearLayout viewGroup = (LinearLayout) context.findViewById(R.id.llStatusChangePopup);
   LayoutInflater layoutInflater = (LayoutInflater) context.getSystemService(Context.LAYOUT_INFLATER_SERVICE);
   View layout = layoutInflater.inflate(R.layout.status_popup_layout, null);

   // Creating the PopupWindow
   changeStatusPopUp = new PopupWindow(context);
   changeStatusPopUp.setContentView(layout);
   changeStatusPopUp.setWidth(LinearLayout.LayoutParams.WRAP_CONTENT);
   changeStatusPopUp.setHeight(LinearLayout.LayoutParams.WRAP_CONTENT);
   changeStatusPopUp.setFocusable(true);

   // Some offset to align the popup a bit to the left, and a bit down, relative to button's position.
   int OFFSET_X = -20;
   int OFFSET_Y = 50;

   //Clear the default translucent background
   changeStatusPopUp.setBackgroundDrawable(new BitmapDrawable());

   // Displaying the popup at the specified location, + offsets.
   changeStatusPopUp.showAtLocation(layout, Gravity.NO_GRAVITY, p.x + OFFSET_X, p.y + OFFSET_Y);
}最后弹出按钮或其他任何东西的onClick:
 imTaskStatusButton.setOnClickListener(new OnClickListener()
        {
            public void onClick(View v)
            {
                 int[] location = new int[2];
                 currentRowId = position;
                 currentRow = v;
                 // Get the x, y location and store it in the location[] array
                 // location[0] = x, location[1] = y.
                 v.getLocationOnScreen(location);

                 //Initialize the Point with x, and y positions
                 point = new Point();
                 point.x = location[0];
                 point.y = location[1];
                 showStatusPopup(TasksListActivity.this, point);
            }
});PopUpWindow的一个好例子
http://androidresearch.wordpress.com/2012/05/06/how-to-create-popups-in-android/
Stack Overflow用户
发布于 2016-08-18 20:26:42
如果您使用的是AppCompat v7,那么这种方法是可行的。这有点麻烦,但比使用反射要好得多,并且允许您仍然使用核心的Android PopupMenu:
PopupMenu menu = new PopupMenu(getContext(), overflowImageView);
menu.inflate(R.menu.popup);
menu.setOnMenuItemClickListener(new PopupMenu.OnMenuItemClickListener() { ... });

MenuPopupHelper menuHelper = new MenuPopupHelper(getContext(), (MenuBuilder) menu.getMenu(), overflowImageView);
menuHelper.setForceShowIcon(true);
menuHelper.show();
res/menu/popup.xml
<?xml version="1.0" encoding="utf-8"?>
<menu xmlns:android="http://schemas.android.com/apk/res/android">
<item android:id="@+id/menu_share_location"
android:title="@string/share_location"
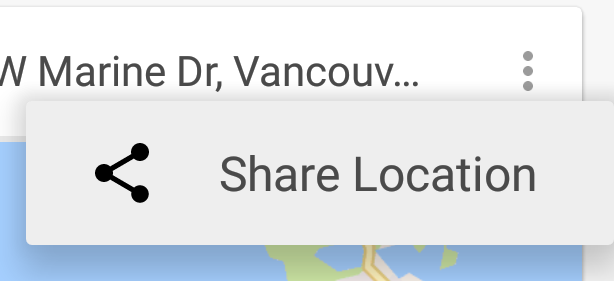
android:icon="@drawable/ic_share_black_24dp"/>
</menu>这将使用菜单资源文件中定义的图标生成弹出菜单:
Stack Overflow用户
发布于 2017-01-15 21:28:00
MenuPopupHelper类在AppCompat中有@hide注释。如果这是一个问题,或者由于任何原因不能使用AppCompat,那么在MenuItem标题中还有另一个使用Spannable的解决方案,它同时包含图标和标题文本。
主要步骤是:
- 使用
PopupMenuxml文件膨胀您的menu - 如果任何一个项目都有一个图标,那么对项目的all执行以下操作:
- 如果该项目没有图标,则创建一个透明图标。这将确保没有图标的项将与带有图标的项对齐。
- 创建包含图标和标题的
SpannableStringBuilder - 将菜单项的标题设置为
SpannableStringBuilder - 将菜单项的图标设置为空,“以防万一”
优点:没有反射。不使用任何隐藏的apis。可以使用框架PopupMenu。
缺点:更多代码。如果你有一个没有图标的子菜单,它会在一个小屏幕上留下多余的空白。
详细信息:
首先,为dimens.xml文件中的图标定义一个大小:
<dimen name="menu_item_icon_size">24dp</dimen>然后,将xml中定义的图标移到标题中的一些方法:
/**
 * Moves icons from the PopupMenu's MenuItems' icon fields into the menu title as a Spannable with the icon and title text.
 */
public static void insertMenuItemIcons(Context context, PopupMenu popupMenu) {
    Menu menu = popupMenu.getMenu();
    if (hasIcon(menu)) {
        for (int i = 0; i < menu.size(); i++) {
            insertMenuItemIcon(context, menu.getItem(i));
        }
    }
}

/**
 * @return true if the menu has at least one MenuItem with an icon.
 */
private static boolean hasIcon(Menu menu) {
    for (int i = 0; i < menu.size(); i++) {
        if (menu.getItem(i).getIcon() != null) return true;
    }
    return false;
}

/**
 * Converts the given MenuItem's title into a Spannable containing both its icon and title.
 */
private static void insertMenuItemIcon(Context context, MenuItem menuItem) {
    Drawable icon = menuItem.getIcon();

    // If there's no icon, we insert a transparent one to keep the title aligned with the items
    // which do have icons.
    if (icon == null) icon = new ColorDrawable(Color.TRANSPARENT);

    int iconSize = context.getResources().getDimensionPixelSize(R.dimen.menu_item_icon_size);
    icon.setBounds(0, 0, iconSize, iconSize);
    ImageSpan imageSpan = new ImageSpan(icon);

    // Add a space placeholder for the icon, before the title.
    SpannableStringBuilder ssb = new SpannableStringBuilder("       " + menuItem.getTitle());

    // Replace the space placeholder with the icon.
    ssb.setSpan(imageSpan, 1, 2, 0);
    menuItem.setTitle(ssb);
    // Set the icon to null just in case, on some weird devices, they've customized Android to display
    // the icon in the menu... we don't want two icons to appear.
    menuItem.setIcon(null);
}
最后,在展示之前,创建您的PopupMenu并使用上面的方法:
PopupMenu popupMenu = new PopupMenu(view.getContext(), view);
popupMenu.inflate(R.menu.popup_menu);
insertMenuItemIcons(textView.getContext(), popupMenu);
popupMenu.show();
截图:
https://stackoverflow.com/questions/15454995
复制相似问题
腾讯云开发者

Copyright © 2013 - 2026 Tencent Cloud. All Rights Reserved. 腾讯云 版权所有
深圳市腾讯计算机系统有限公司 ICP备案/许可证号:粤B2-20090059 ![]() 粤公网安备44030502008569号
粤公网安备44030502008569号
腾讯云计算(北京)有限责任公司 京ICP证150476号 | 京ICP备11018762号