
使用touchesMoved进行缩放:
我有一个饼形图,它是使用UIBezierPath的,现在我需要那些单独的路径(饼块)来进行扩展。我相信您需要一个视图才能使用夹点缩放,所以我认为touchesMoved:是要走的路(除非有解决办法)。
如有任何建议或帮助,敬请谅解!
更新/进度代码
MySliceClass.m
+ (UIBezierPath *)sliceRadius:(float)radius andStartingAngle:(float)startingAngle andFinishingAngle:(float)finishingAngle
{
  static UIBezierPath *path = nil;
  path = [UIBezierPath bezierPath];
  CGPoint center = {300,300};
  [path moveToPoint:center];
  [path addArcWithCenter:center radius:radius startAngle:radians(startingAngle) endAngle:radians(finishingAngle) clockwise:YES];
  [path closePath];
  path.lineWidth = 1;

  [[UIColor redColor] setFill];
  [path fill];

  return path;
}
MySliceView.m
- (void)drawRect:(CGRect)rect
{
  NSArray *arrayOfSlices = [NSArray arrayWithObjects:
                            slice01 = [WordplaySlice sliceRadius:200 andStartingAngle:0.5 andFinishingAngle:29.5],
                            slice02 = [WordplaySlice sliceRadius:200 andStartingAngle:30.5 andFinishingAngle:59.5],
                            slice03 = [WordplaySlice sliceRadius:200 andStartingAngle:60.5 andFinishingAngle:89.5],
                            slice04 = [WordplaySlice sliceRadius:200 andStartingAngle:90.5 andFinishingAngle:119.5],
                            slice05 = [WordplaySlice sliceRadius:200 andStartingAngle:120.5 andFinishingAngle:149.5],
                            slice06 = [WordplaySlice sliceRadius:200 andStartingAngle:150.5 andFinishingAngle:179.5],
                            slice07 = [WordplaySlice sliceRadius:200 andStartingAngle:180.5 andFinishingAngle:209.5],
                            slice08 = [WordplaySlice sliceRadius:200 andStartingAngle:210.5 andFinishingAngle:239.5],
                            slice09 = [WordplaySlice sliceRadius:200 andStartingAngle:240.5 andFinishingAngle:269.5],
                            slice10 = [WordplaySlice sliceRadius:200 andStartingAngle:270.5 andFinishingAngle:299.5],
                            slice11 = [WordplaySlice sliceRadius:200 andStartingAngle:300.5 andFinishingAngle:329.5],
                            slice12 = [WordplaySlice sliceRadius:200 andStartingAngle:330.5 andFinishingAngle:359.5], nil];
}回答 2
Stack Overflow用户
发布于 2012-02-20 05:51:26
我认为,如果您为每个切片创建一个视图并使用一个UIPinchGestureRecognizer,您会发现更容易。下面是如何实现的。
首先,我们需要一个绘制一个切片的UIView子类。它还应该覆盖pointInside:withEvent:,以忽略位于片外的触摸(即使触摸位于视图的矩形边界内)。
因此,我们将创建一个名为SliceView的类。它使用CAShapeLayer进行切片绘制:
@interface SliceView : UIView

@property (nonatomic) CGFloat padding;
@property (nonatomic) CGFloat startRadians;
@property (nonatomic) CGFloat endRadians;
@property (nonatomic, strong) UIColor *fillColor;

@end

@implementation SliceView

@synthesize padding = _padding;
@synthesize startRadians = _startRadians;
@synthesize endRadians = _endRadians;
@synthesize fillColor = _fillColor;我们告诉它通过重写CAShapeLayer方法而不是普通的CALayer来使用layerClass。我们还将添加一个方便的方法,将视图的层作为一个CAShapeLayer返回。
+ (Class)layerClass {
    return [CAShapeLayer class];
}

- (CAShapeLayer *)shapeLayer {
    return (CAShapeLayer *)self.layer;
}我们将在layoutSubviews中计算切片的路径,因为视图在其大小更改时随时接收layoutSubviews消息。
我们要把每个切片视图都画出来,以覆盖整个饼,但只画出它的楔子。每个切片的帧将覆盖整个屏幕(如果饼是全屏的话)。这意味着切片视图知道其弧的中心位于其边界的中心。然后我们用一个小的三角函数在相邻的切片之间插入填充物。
我们还调整了该层的锚点;这是层中的点,当您缩放或旋转该层时,它不会移动。我们希望锚点在离中心最近的切片的角落。
- (void)layoutSubviews {
    CAShapeLayer *layer = self.shapeLayer;
    CGRect bounds = self.bounds;
    CGFloat radius = MIN(bounds.size.width, bounds.size.height) / 2 - 2 * _padding;
    CGPoint center = CGPointMake(CGRectGetMidX(bounds), CGRectGetMidY(bounds));
    CGFloat sine = sinf((_startRadians + _endRadians) * 0.5f);
    CGFloat cosine = cosf((_startRadians + _endRadians) * 0.5f);
    center.x += _padding * cosine;
    center.y += _padding * sine;
    UIBezierPath *path = [UIBezierPath bezierPath];
    [path moveToPoint:center];
    [path addArcWithCenter:center radius:radius startAngle:_startRadians endAngle:_endRadians clockwise:YES];
    [path closePath];
    layer.path = path.CGPath;

    // Move my anchor point to the corner of my path so scaling will leave the corner in the same place.
    CGPoint cornerInSuperview = [self convertPoint:center toView:self.superview];
    layer.anchorPoint = CGPointMake(center.x / bounds.size.width, center.y / bounds.size.height);
    self.center = cornerInSuperview;
}
当任何与切片相关的视图属性被更改时,我们需要重新计算概述该切片的路径。当切片的填充颜色发生变化时,我们需要将这一变化传递给该层。所以我们要推翻财产设定者。
- (void)setPadding:(CGFloat)padding {
    _padding = padding;
    [self setNeedsLayout];
}

- (void)setStartRadians:(CGFloat)startRadians {
    _startRadians = startRadians;
    [self setNeedsLayout];
}

- (void)setEndRadians:(CGFloat)endRadians {
    _endRadians = endRadians;
    [self setNeedsLayout];
}

- (void)setFillColor:(UIColor *)color {
    _fillColor = color;
    self.shapeLayer.fillColor = color.CGColor;
}最后,我们重写了pointInside:withEvent:,这样命中测试只会在触摸位于切片路径内的情况下将触摸分配给切片视图。这一点至关重要,因为所有的切片视图都有一个覆盖整个屏幕的框架。
- (BOOL)pointInside:(CGPoint)point withEvent:(UIEvent *)event {
    return CGPathContainsPoint(self.shapeLayer.path, NULL, point, NO);
}
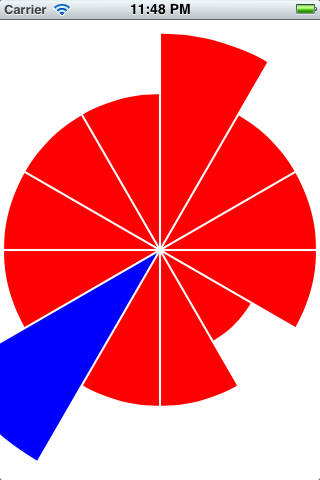
@end现在我们有了一个方便的SliceView类,我们可以使用它来绘制带有可缩放切片的饼图。很难将两个手指插入iPhone屏幕上的一个切片中,因此我们将让用户点击一个切片来选择它,然后在任何地方捏取所选的切片。(这个接口还使它在模拟器中可测试。)
@implementation ViewController {
    __weak SliceView *_selectedSlice;
}
我们将用红色绘制未选定的切片,用蓝色绘制选定的切片。
+ (UIColor *)unselectedSliceFillColor {
    return UIColor.redColor;
}

+ (UIColor *)selectedSliceFillColor {
    return UIColor.blueColor;
}
当用户点击一个片段时,我们将需要更改先前选择和新选择的颜色,并记录新的选择。
- (IBAction)sliceWasTapped:(UITapGestureRecognizer *)tapper {
    _selectedSlice.fillColor = self.class.unselectedSliceFillColor;
    _selectedSlice = (SliceView *)tapper.view;
    _selectedSlice.fillColor = self.class.selectedSliceFillColor;
}
当用户收缩时,我们调整所选片的转换(如果有)。
- (IBAction)pinched:(UIPinchGestureRecognizer *)pincher {
    if (!_selectedSlice)
        return;
    CGFloat scale = pincher.scale;
    pincher.scale = 1;
    _selectedSlice.transform = CGAffineTransformScale(_selectedSlice.transform, scale, scale);
}
最后,我们需要实际创建切片视图和手势识别器。我们为每个切片创建一个点击识别器,并创建一个附加到背景视图的“全局”夹点识别器。
- (void)viewDidLoad {
    static int const SliceCount = 12;
    CGRect bounds = self.view.bounds;
    for (int i = 0; i < SliceCount; ++i) {
        SliceView *slice = [[SliceView alloc] initWithFrame:bounds];
        slice.startRadians = 2 * M_PI * i / SliceCount;
        slice.endRadians = 2 * M_PI * (i + 1) / SliceCount;
        slice.padding = 4;
        slice.fillColor = self.class.unselectedSliceFillColor;
        slice.autoresizingMask = UIViewAutoresizingFlexibleWidth | UIViewAutoresizingFlexibleHeight;
        [self.view addSubview:slice];

        UITapGestureRecognizer *tapper = [[UITapGestureRecognizer alloc] initWithTarget:self action:@selector(sliceWasTapped:)];
        [slice addGestureRecognizer:tapper];
    }

    UIPinchGestureRecognizer *pincher = [[UIPinchGestureRecognizer alloc] initWithTarget:self action:@selector(pinched:)];
    [self.view addGestureRecognizer:pincher];
}

- (BOOL)shouldAutorotateToInterfaceOrientation:(UIInterfaceOrientation)interfaceOrientation
{
    return (interfaceOrientation != UIInterfaceOrientationPortraitUpsideDown);
}

@end
看上去是这样的:
您可以在这里下载我的测试项目:http://dl.dropbox.com/u/26919672/pie.zip
更新
在回应您关于限制规模的评论时,我建议在SliceView中增加一些属性
@property (nonatomic) CGFloat minScale;
@property (nonatomic) CGFloat maxScale;
@property (nonatomic) CGFloat scale;重要:在initWithFrame:和initWithCoder:中,您需要将所有三个属性初始化为1。
然后,实现scale设置器来实际执行限制并设置标度:
- (void)setScale:(CGFloat)scale {
    _scale = MAX(minScale, MIN(scale, maxScale));
    self.transform = CGAffineTransformMakeScale(_scale, _scale);
}在pinched:中,更新视图的scale属性,而不是直接设置视图的transform属性:
- (IBAction)pinched:(UIPinchGestureRecognizer *)pincher {
    if (!_selectedSlice)
        return;
    CGFloat scale = pincher.scale;
    pincher.scale = 1;
    _selectedSlice.scale = _selectedSlice.scale * scale;
}Stack Overflow用户
发布于 2012-02-20 00:17:37
首先,最好将切片存储在数组中。
其次,定义类MySliceClass (可以继承UIBezierPath)也是一个更好的主意。该类具有定义片的属性:startingAngle、endAngle。
现在,您不仅改进了代码,而且更容易调整切片的大小。
您必须向类radius中添加一个参数MySliceClass,每次碰到一个切片时,就更改它的半径,并调用[self setNeedsDisplay],以便调用方法drawRect。
最后,您还应该将初始化移动到视图的初始化方法,因为按照您的方法,每次绘制视图时都会创建新的切片。
编辑这里是一个示例实现
@implementation Slice // Subclass of NSObject

@synthesize radius, startAngle, endAngle, center;

- (void)draw
{
    UIBezierPath *path = nil;
    path = [UIBezierPath bezierPath];
    [path moveToPoint:center];
    [path addArcWithCenter:center radius:radius startAngle:startAngle endAngle:endAngle clockwise:YES];
    [path closePath];
    path.lineWidth = 1;

    [[UIColor redColor] setFill];
    [path fill];
}

@end
和
@implementation SliceView

@synthesize slices;

- (id)initWithFrame:(CGRect)frame {
    self = [super initWithFrame:frame];
    if (self) {
        int numSlices = 12; // you can change this
        slices = [NSMutableArray array];
        for (int i = 0; i < numSlices; i++) {
            Slice *slice = [[Slice alloc] init];
            slice.center = self.center;
            slice.radius = 100;
            slice.startAngle = (2*M_PI / numSlices) * i;
            slice.endAngle = (2*M_PI / numSlices) * (i+0.9);
        }
    }
    return self;
}

- (void)drawRect:(CGRect)rect
{
    [[UIColor redColor] setFill];
    for (Slice *slice in slices) {
    [slice draw];
    }
}

- (void)touchesMoved:(NSSet *)touches withEvent:(UIEvent *)event
{
    UITouch *touch = [touches anyObject];
    CGPoint point = [touch locationInView:self];
    CGFloat d = sqrtf(powf(point.x-self.center.x, 2) + powf(point.y-self.center.y, 2));

    int index = atan2f(point.x-self.center.x, point.y-self.center.y) * self.slices.count / (2*M_PI);
    Slice *slice = [slices objectAtIndex:index];
    slice.radius = d;
}

@end
我没有测试这段代码,所以可能有一些错误。但我希望你可以从这开始。
https://stackoverflow.com/questions/9354530
复制相似问题
腾讯云开发者

Copyright © 2013 - 2026 Tencent Cloud. All Rights Reserved. 腾讯云 版权所有
深圳市腾讯计算机系统有限公司 ICP备案/许可证号:粤B2-20090059 ![]() 粤公网安备44030502008569号
粤公网安备44030502008569号
腾讯云计算(北京)有限责任公司 京ICP证150476号 | 京ICP备11018762号