
Android:在屏幕上定位单词。Google包边框被关闭了一点
我正试图在手机屏幕上找到一个特定的单词,然后在它们周围显示一个边框,如果它们存在的话。我遵循以下步骤:
- 捕获整个屏幕内容(使用MediaProjection API)。
- 将此屏幕截图从
TextRecognizer传递给Google工具包对象 - 检查检测到的单词,如果匹配,请使用ML返回的
Rect在屏幕上绘图。
It 几乎工作,下面是在记事本应用程序中发现和突出显示单词hello的屏幕截图:
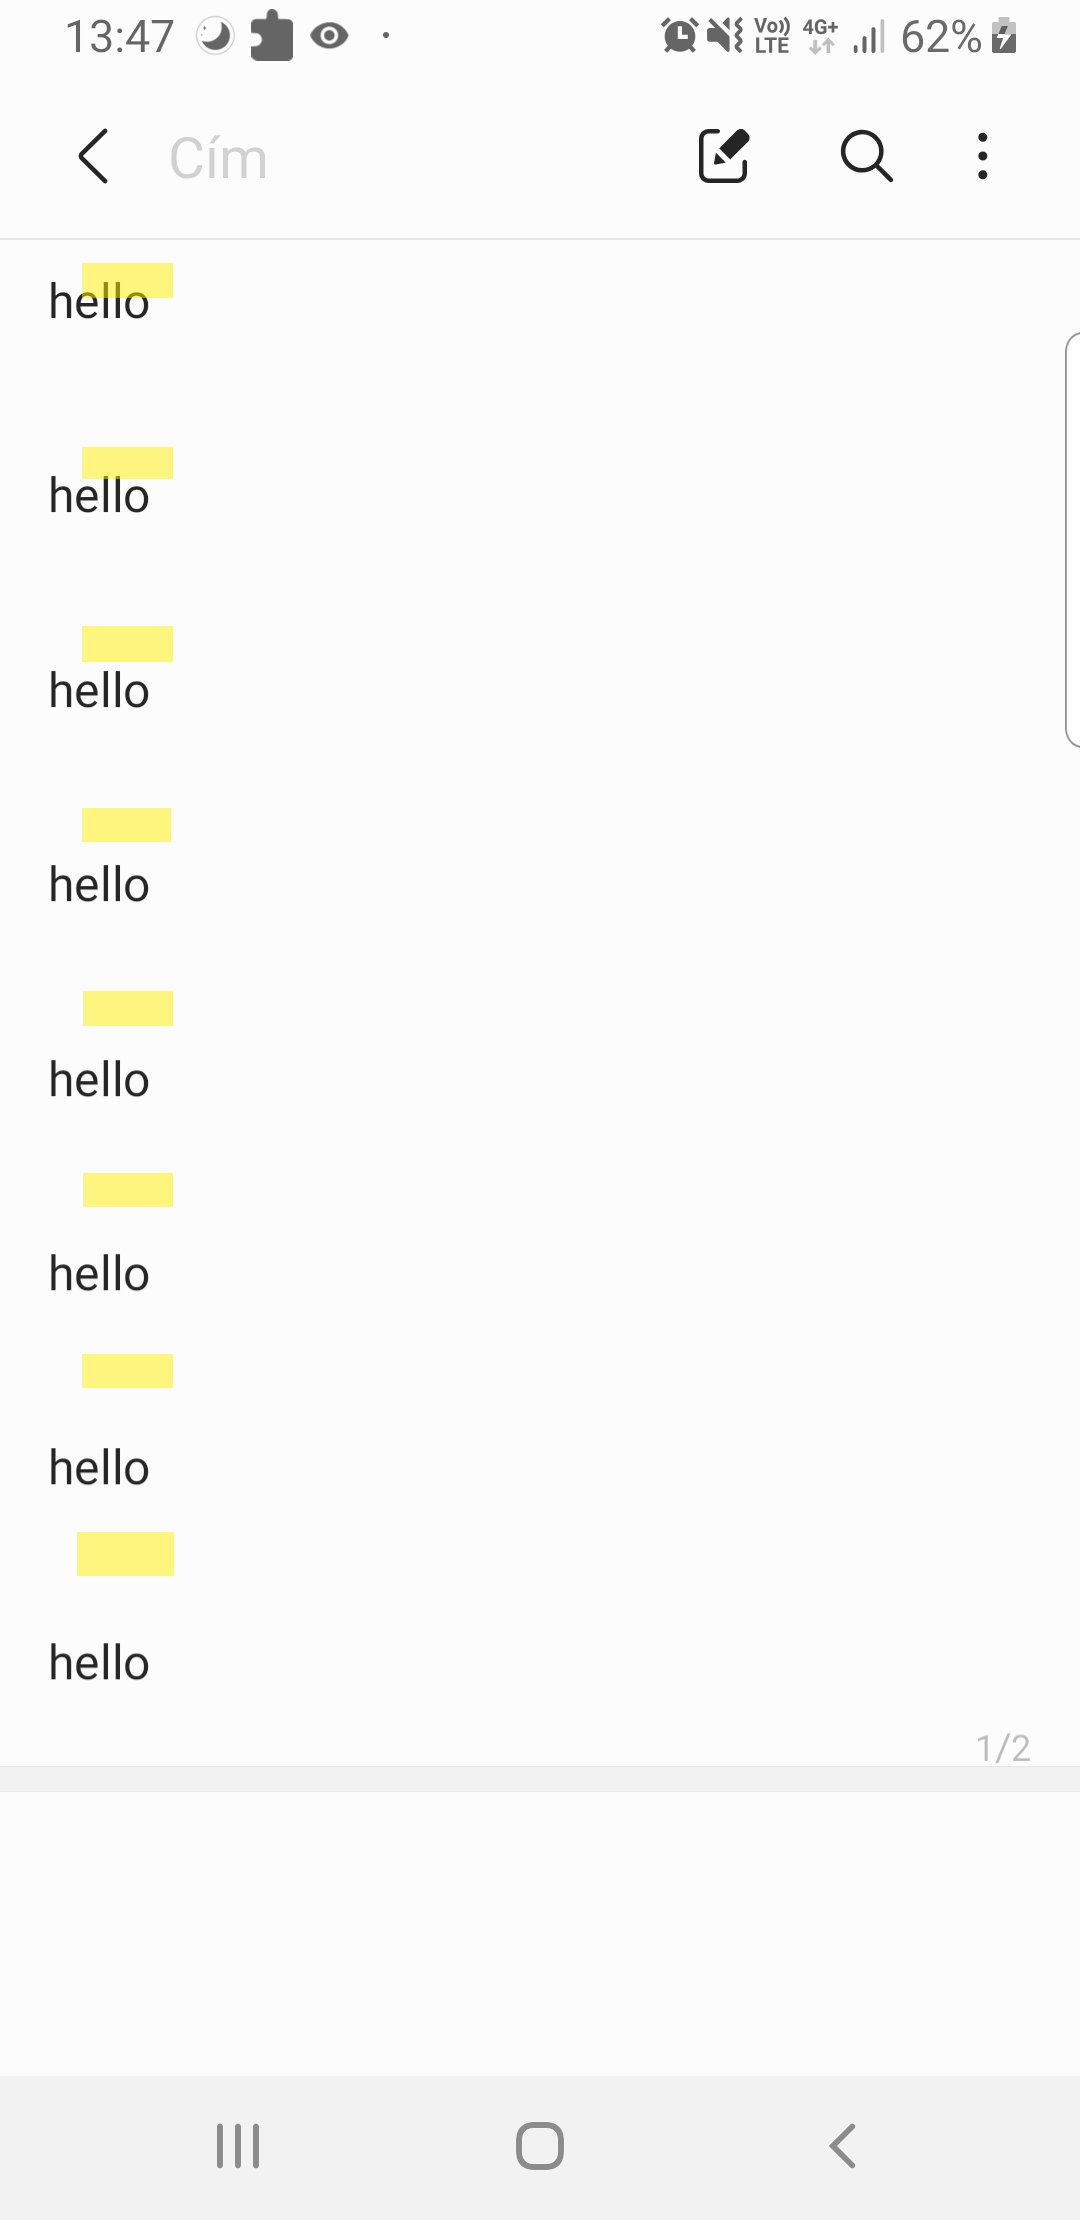
如您所见,半透明的黄色框在hellos上不是完全透明的。
这是相关的代码示例。将屏幕截图位图传递给ML工具包
InputImage image = InputImage.fromBitmap(screenshotBitmap, 0);
//I checked: image, screen, and overlay view dimensions are exactly the same.
TextRecognizer recognizer = TextRecognition.getClient();
recognizer.process(image)
.addOnSuccessListener(this::processText);获取可识别单词的processText方法:
 for (Text.Element element : getElements()) {
      String elementText = element.getText();
      Rect bounds = element.getBoundingBox(); //Getting the bounding box
      if (elementText.equalsIgnoreCase("hello")) { //hello is hardcoded for now
          addHighlightCard(bounds.left, bounds.top, bounds.width(), bounds.height());
      }
}最后,addHighlightCard,它创建并定位您在屏幕截图上看到的视图。它使用带有RelativeLayout的全屏覆盖,因为这个布局允许我指定子视图的确切位置和宽度。
public void addHighlightCard(int x, int y, int width, int height) {
    View highlightCard = inflater.inflate(R.layout.highlight_card, overlayRoot, false);
    RelativeLayout.LayoutParams params = new RelativeLayout.LayoutParams(width, height);
    params.leftMargin = x;
    params.topMargin = y;
    highlightCard.setLayoutParams(params);
    overlayRoot.addView(highlightCard, params);
}
正如您所看到的,没有任何缩放操作,我捕获了整个屏幕,并使用了一个填充整个屏幕(甚至工具栏)的布局。然后,我认为ML返回的坐标应该可以直接用于绘制屏幕。但很明显,我错了,这张照片在某个地方被缩小了,但我不知道在哪里。
解决方案:事实证明,Media虚拟显示的不正确大小导致了对齐框的错位。我将不再提出更长的问题,而是在这里发布一个指向GitHub存储库的链接,在这里您可以找到一个示例应用程序,它展示了使用和在屏幕截图上进行文本识别的工作方式。
示例应用程序:测试-文本识别
回答 3
Stack Overflow用户
发布于 2021-03-21 15:48:40
分析
我发现你的代码有4个潜在的问题。
屏幕坐标的使用
当您在这里创建突出显示卡时:
public void addHighlightCard(int x, int y, int width, int height) {
    ...
    params.leftMargin = x;
    params.topMargin = y;
    ...
}
您可以指定绝对坐标(屏幕坐标) x和y,而不是相对于RelativeLayout的坐标,这是错误的,因为RelativeLayout在设备屏幕上也有一些偏移。
要指定正确的坐标,首先计算RelativeLayout的屏幕坐标,然后根据这些坐标调整x和y。例如:
public void addHighlightCard(int x, int y, int width, int height) {
    ...
    int[] screenCoordinates = new int[2];
    overlayRoot.getLocationOnScreen(screenCoordinates);
    int xOffset = screenCoordinates[0];
    int yOffset = screenCoordinates[1];

    params.leftMargin = x - xOffset;
    params.topMargin = y - yOffset;
    ...
} 但是,如果您的根View 接管了整个屏幕,那么它就不会是一个问题。
RelativeLayout的使用
我认为这可能是一个问题,因为如果您想在另一个View的基础上添加一个新的FrameLayout,则应该使用它。但是,我不能确定这是否是一个问题,因为我没有看到完整的代码。
MediaProjection在屏幕捕捉中的应用
您还没有向我们展示您是如何使用MediaProjection实现的,所以这也可能是一个问题。我使用了一种不同的方式来捕获屏幕,您可以在下面看到。
突出文本
您正在从View中膨胀一个LayoutInflater,以突出显示找到的文本。对于一个测试,我通过组合一个ShapeDrawable和View来做一些不同的事情,比如:
...
                            ShapeDrawable drawable = new ShapeDrawable();
                            drawable.getPaint().setColor(Color.YELLOW);
                            drawable.getPaint().setStyle(Paint.Style.STROKE);
                            drawable.getPaint().setStrokeWidth(5f);
                            View shapeView = new View(decorView.getContext());
                            shapeView.setBackground(drawable);
...
完整的代码将在下面提供。
解决方案
由于您提到您的RelativeLayout控制了整个屏幕,所以我决定创建一个示例项目来演示与您的项目类似的项目是否正常工作。
下面是解释和相关代码。
build.gradle
plugins {
    id 'com.android.application'
}

android {
    compileSdkVersion 30
    buildToolsVersion "30.0.2"

    defaultConfig {
        applicationId "com.example.myapplication"
        minSdkVersion 24
        targetSdkVersion 30
        versionCode 1
        versionName "1.0"

        testInstrumentationRunner "androidx.test.runner.AndroidJUnitRunner"
    }

    buildTypes {
        release {
            minifyEnabled false
            proguardFiles getDefaultProguardFile('proguard-android-optimize.txt'), 'proguard-rules.pro'
        }
    }
    compileOptions {
        sourceCompatibility JavaVersion.VERSION_1_8
        targetCompatibility JavaVersion.VERSION_1_8
    }
}

dependencies {

    implementation 'androidx.appcompat:appcompat:1.2.0'
    implementation 'com.google.android.material:material:1.3.0'
    implementation 'com.google.android.gms:play-services-mlkit-text-recognition:16.1.3'
    testImplementation 'junit:junit:4.+'
    androidTestImplementation 'androidx.test.ext:junit:1.1.2'
    androidTestImplementation 'androidx.test.espresso:espresso-core:3.3.0'
}
MainActivity.java
在这里,为了截图,我使用了以下代码:
                Bitmap bitmap = Bitmap.createBitmap(decorView.getWidth(),
                        decorView.getHeight(), Bitmap.Config.ARGB_8888);
                Canvas canvas = new Canvas(bitmap);
                decorView.draw(canvas);
InputImage image = InputImage.fromBitmap(bitmap, 0);我在OnGlobalLayoutListener中这样做是为了确保装饰视图有适当的宽度和高度。好的,这个类的完整代码如下:
public class MainActivity extends AppCompatActivity {
    @Override
    protected void onCreate(@Nullable Bundle savedInstanceState) {
        super.onCreate(savedInstanceState);

        setContentView(R.layout.activity_main);

        RecyclerView recyclerView = findViewById(R.id.recycler_view);
        recyclerView.setAdapter(new RecyclerViewAdapter(this));
        recyclerView.setLayoutManager(new LinearLayoutManager(this));

        View decorView = getWindow().getDecorView();
        decorView.getViewTreeObserver().addOnGlobalLayoutListener(new ViewTreeObserver.OnGlobalLayoutListener() {
            @Override
            public void onGlobalLayout() {
                decorView.getViewTreeObserver().removeOnGlobalLayoutListener(this);

                // take a screenshot of your screen
                Bitmap bitmap = Bitmap.createBitmap(decorView.getWidth(),
                        decorView.getHeight(), Bitmap.Config.ARGB_8888);
                Canvas canvas = new Canvas(bitmap);
                decorView.draw(canvas);
                InputImage image = InputImage.fromBitmap(bitmap, 0);

                TextRecognizer recognizer = TextRecognition.getClient();
                recognizer.process(image).addOnSuccessListener(new OnSuccessListener<Text>() {
                    @Override
                    public void onSuccess(Text text) {
                        for (Text.TextBlock textBlock : text.getTextBlocks()) {
                            if ("hello".equalsIgnoreCase(textBlock.getText())) {
                                Rect box = textBlock.getBoundingBox();
                                int left = box.left;
                                int top = box.top;
                                int right = box.right;
                                int bottom = box.bottom;

                                ShapeDrawable drawable = new ShapeDrawable();
                                drawable.getPaint().setColor(Color.YELLOW);
                                drawable.getPaint().setStyle(Paint.Style.STROKE);
                                drawable.getPaint().setStrokeWidth(5f);
                                View shapeView = new View(decorView.getContext());
                                shapeView.setBackground(drawable);

                                FrameLayout rootView = findViewById(R.id.root_view);
                                int[] location = new int[2];
                                rootView.getLocationOnScreen(location);

                                FrameLayout.LayoutParams params = new FrameLayout.LayoutParams(right - left,
                                        bottom - top);
                                params.setMargins(left - location[0],
                                        top - location[1],
                                        right - location[0],
                                        bottom - location[1]);

                                rootView.addView(shapeView, params);
                            }
                        }
                    }
                });
            }
        });
    }

    private static class RecyclerViewAdapter extends RecyclerView.Adapter<RecyclerViewAdapter.RecyclerViewHolder> {
        private final Context context;
        private final String[] elements = new String[] {"Hello", "Hello", "Bye", "Hello", "Hi there", "Hello"};

        private RecyclerViewAdapter(Context context) {
            this.context = context;
        }

        @NonNull
        @Override
        public RecyclerViewHolder onCreateViewHolder(@NonNull ViewGroup parent, int viewType) {
            View item = LayoutInflater.from(context).
                    inflate(R.layout.list_item, parent, false);
            return new RecyclerViewHolder(item);
        }

        @Override
        public void onBindViewHolder(@NonNull RecyclerViewHolder holder, int position) {
            holder.textView.setText(elements[position]);
        }

        @Override
        public int getItemCount() {
            return elements.length;
        }

        public static class RecyclerViewHolder extends RecyclerView.ViewHolder {
            private final TextView textView;

            public RecyclerViewHolder(@NonNull View itemView) {
                super(itemView);

                this.textView = itemView.findViewById(R.id.element_view);
            }
        }
    }
}
activity_main.xml
<?xml version="1.0" encoding="utf-8"?>
<FrameLayout xmlns:android="http://schemas.android.com/apk/res/android"
    android:id="@+id/root_view"
    android:layout_width="match_parent"
    android:layout_height="match_parent">

    <LinearLayout xmlns:android="http://schemas.android.com/apk/res/android"
        android:layout_width="match_parent"
        android:layout_height="match_parent"
        android:paddingStart="30dp"
        android:orientation="vertical">

        <androidx.recyclerview.widget.RecyclerView
            android:id="@+id/recycler_view"
            android:layout_width="match_parent"
            android:layout_height="match_parent"
            android:scrollbars="vertical" />

    </LinearLayout>
</FrameLayout>如您所见,我使用FrameLayout作为根视图。
list_item.xml
<?xml version="1.0" encoding="utf-8"?>
<LinearLayout xmlns:android="http://schemas.android.com/apk/res/android"
    android:layout_width="match_parent"
    android:layout_height="wrap_content"
    android:background="?android:attr/selectableItemBackground"
    android:orientation="vertical">

    <TextView
        android:id="@+id/element_view"
        android:layout_width="match_parent"
        android:layout_height="wrap_content"
        android:paddingTop="16dp"
        android:paddingBottom="8dp"
        android:fontFamily="google-sans-medium"/>

    <View
        android:layout_width="match_parent"
        android:layout_height="1dp"
        android:background="#000"/>

</LinearLayout>没有什么特别的布局-只是一个简单的RecyclerView。
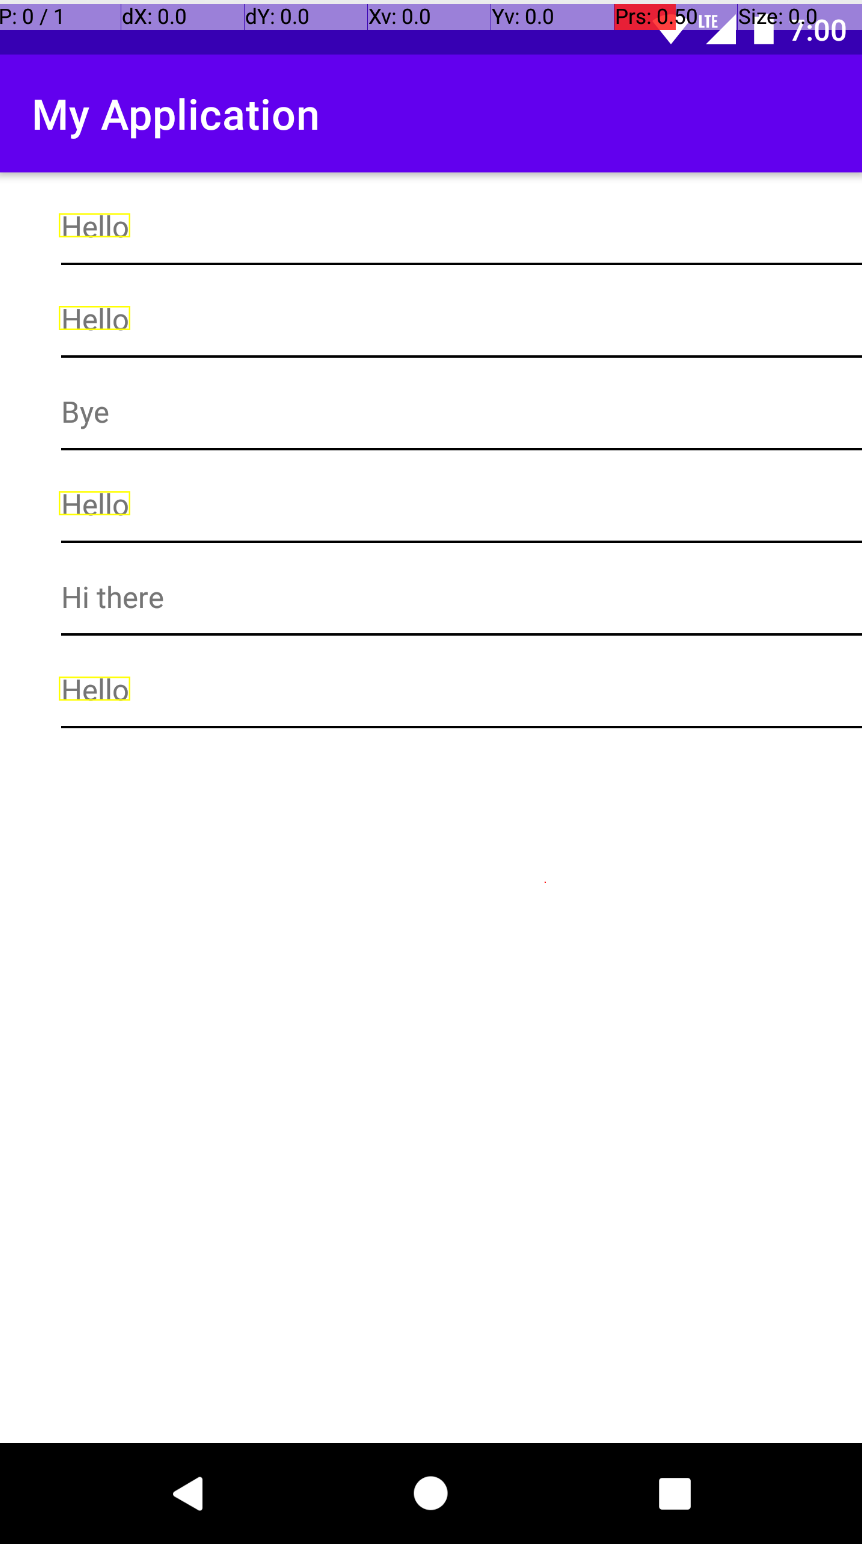
结果
所有4个"Hello“结果都以黄色突出显示。
更新
如果不是从Activity (在GitHub项目中是从Service检索它),请确保使用了正确的方法检索显示大小,因为您需要真正的显示大小,而不是其他的东西。所以,按照以下步骤来做:
        // get width and height
        WindowManager wm = (WindowManager) getApplicationContext().getSystemService(Context.WINDOW_SERVICE);
        Display display = wm.getDefaultDisplay();
        Point size = new Point();
        display.getRealSize(size);
        mWidth = size.x;
        mHeight = size.y;
因此,在您的示例中,您必须将方法更改为:
    private void createVirtualDisplay() {
        // get width and height
        WindowManager wm = (WindowManager) getApplicationContext().getSystemService(Context.WINDOW_SERVICE);
        Display display = wm.getDefaultDisplay();
        Point size = new Point();
        display.getRealSize(size);
        mWidth = size.x;
        mHeight = size.y;
        ...
    }
就这样。
Stack Overflow用户
发布于 2021-03-16 19:30:33
图像被输入到MLKit中,并显示在预览中,可能有不同的大小。请参考mlkit示例查看如何缩放和映射它们。
Stack Overflow用户
发布于 2021-03-16 19:55:22
它更像是一个下一个调试步骤,而不是一个答案。:因此,您可以看到每个标记之间的间隔随着每次高亮调用而增加。似乎你没有捕捉到整个屏幕。可能没有添加状态栏。这就是我的直觉。
当然,您可以尝试增加上边距并检查结果。
public void addHighlightCard(int x, int y, int width, int height) {
    View highlightCard = inflater.inflate(R.layout.highlight_card, overlayRoot, false);
    RelativeLayout.LayoutParams params = new RelativeLayout.LayoutParams(width, height);
    params.leftMargin = x;
    params.topMargin = y+5;
    highlightCard.setLayoutParams(params);
    overlayRoot.addView(highlightCard, params);
}https://stackoverflow.com/questions/66624836
复制相似问题
腾讯云开发者

Copyright © 2013 - 2026 Tencent Cloud. All Rights Reserved. 腾讯云 版权所有
深圳市腾讯计算机系统有限公司 ICP备案/许可证号:粤B2-20090059 ![]() 粤公网安备44030502008569号
粤公网安备44030502008569号
腾讯云计算(北京)有限责任公司 京ICP证150476号 | 京ICP备11018762号