
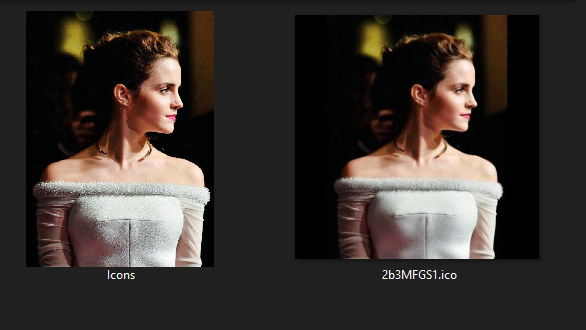
创建的C#图标看起来不错,但目录缩略图看上去不太正确
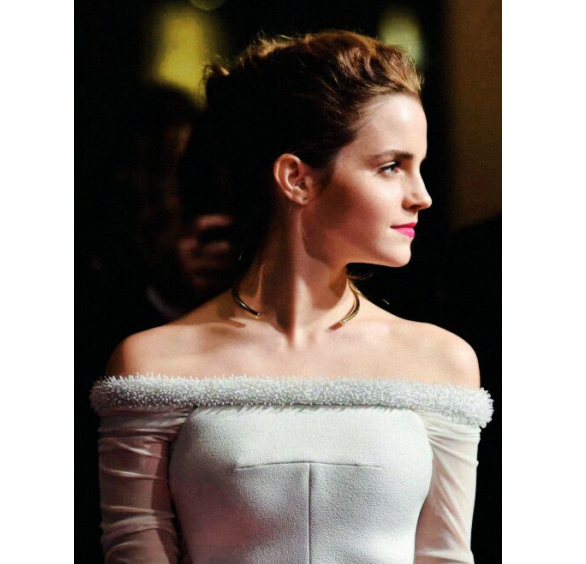
我编写了一些代码来从任何png、jpg等图像创建ico文件。图标的创建似乎是正确的,并且在Paint3d中打开时看起来几乎像原来的图像。以下是它的外观:
但是,当将图像设置为缩略图到文件夹时,它看起来很奇怪,而且闪闪发光。
下面是它在windows文件资源管理器中的外观:

首先,我想知道这是Windows本身的问题,还是与代码有关?如果这与Windows相关,那么代码并不重要。如果没有,则如下所示:
我从整个互联网上获取了一些代码片段,所以可能是一些非优化代码,但下面是我的代码的核心:
//imagePaths => all images which I am converting to ico files
imagePaths.ForEach(imgPath => {
    //create a temp png at this path after changing the original img to a squared img
    var tempPNGpath = Path.Combine(icoDirPath, imgName.Replace(ext, ".png"));
    var icoPath = tempPNGpath.Replace(".png", ".ico");

    using (FileStream fs1 = File.OpenWrite(tempPNGpath)) {
        Bitmap b = ((Bitmap)Image.FromFile(imgPath));
        b = b.CopyToSquareCanvas(Color.Transparent);
        b.Save(fs1, ImageFormat.Png);

        fs1.Flush();
        fs1.Close();

        ConvertToIco(b, icoPath, 256);
    }
    File.Delete(tempPNGpath);
});


public static void ConvertToIco(Image img, string file, int size) {
    Icon icon;
    using (var msImg = new MemoryStream())
        using (var msIco = new MemoryStream()) {
            img.Save(msImg, ImageFormat.Png);
            using (var bw = new BinaryWriter(msIco)) {
                bw.Write((short)0);           //0-1 reserved
                bw.Write((short)1);           //2-3 image type, 1 = icon, 2 = cursor
                bw.Write((short)1);           //4-5 number of images
                bw.Write((byte)size);         //6 image width
                bw.Write((byte)size);         //7 image height
                bw.Write((byte)0);            //8 number of colors
                bw.Write((byte)0);            //9 reserved
                bw.Write((short)0);           //10-11 color planes
                bw.Write((short)32);          //12-13 bits per pixel
                bw.Write((int)msImg.Length);  //14-17 size of image data
                bw.Write(22);                 //18-21 offset of image data
                bw.Write(msImg.ToArray());    // write image data
                bw.Flush();
                bw.Seek(0, SeekOrigin.Begin);
                icon = new Icon(msIco);
            }
        }
    using (var fs = new FileStream(file, FileMode.Create, FileAccess.Write))
        icon.Save(fs);
}
在扩展类中,方法是:
public static Bitmap CopyToSquareCanvas(this Bitmap sourceBitmap, Color canvasBackground) {
    int maxSide = sourceBitmap.Width > sourceBitmap.Height ? sourceBitmap.Width : sourceBitmap.Height;

    Bitmap bitmapResult = new Bitmap(maxSide, maxSide, PixelFormat.Format32bppArgb);
    using (Graphics graphicsResult = Graphics.FromImage(bitmapResult)) {
        graphicsResult.Clear(canvasBackground);

        int xOffset = (maxSide - sourceBitmap.Width) / 2;
        int yOffset = (maxSide - sourceBitmap.Height) / 2;

        graphicsResult.DrawImage(sourceBitmap, new Rectangle(xOffset, yOffset, sourceBitmap.Width, sourceBitmap.Height));
    }

    return bitmapResult;
}回答 1
Stack Overflow用户
发布于 2020-07-29 09:02:22
缩放方面的差异是由于您没有自己进行缩放的结果。
图标格式技术上只支持高达256x256的图像。您有代码可以从给定的输入中生成正方形图像,但是您永远不会将其大小调整到256x256,这意味着您最终会得到一个图标文件,其中标头显示图像为256x256,但实际上要大得多。这违反了格式规范,所以您正在创建一个技术损坏的ico文件。您所看到的奇怪的差异是操作系统在不同情况下使用不同的降尺度方法来纠正这种情况的结果。
因此,解决方案很简单:在将图像放入图标之前,将图像调整为256x256。
如果您希望更多地控制图标的任何较小的显示大小,您可以添加代码来调整图标的大小,将其调整为许多经典的使用格式,如16x16、32x32、64x64和128x128,并将它们放在一个图标文件中。我写了另一个问题的答案,详细说明了将多幅图像放入一个图标的过程:
A: Combine System.Drawing.Bitmap[] -> Icon
但是,您的代码中还有很多其他奇怪的地方:
- 我认为没有理由将您的中间图像保存为png文件。整个
fs1流根本不起任何作用。您从不使用或加载临时文件;只需继续使用b变量,该变量不需要任何写入磁盘的内容。 - 没有必要首先在
MemoryStream中创建图标,然后通过其文件加载函数将其作为Icon类加载,然后将其保存到文件中。您可以直接将该流的内容写入文件,或者立即使用FileStream。正如我在注释中所指出的,Bitmap是一个一次性类,所以您创建的任何位图对象也应该放在using语句中。
修改后的加载代码,删除了临时png写入,添加了using语句和大小:
public static void WriteImagesToIcons(List<String> imagePaths, String icoDirPath)
{
    // Change this to whatever you prefer.
    InterpolationMode scalingMode = InterpolationMode.HighQualityBicubic;
    //imagePaths => all images which I am converting to ico files
    imagePaths.ForEach(imgPath =>
    {
        // The correct way of replacing an extension
        String icoPath = Path.Combine(icoDirPath, Path.GetFileNameWithoutExtension(imgPath) + ".ico");
        using (Bitmap orig = new Bitmap(imgPath))
        using (Bitmap squared = orig.CopyToSquareCanvas(Color.Transparent))
        using (Bitmap resize16 = squared.Resize(16, 16, scalingMode))
        using (Bitmap resize32 = squared.Resize(32, 32, scalingMode))
        using (Bitmap resize48 = squared.Resize(48, 48, scalingMode))
        using (Bitmap resize64 = squared.Resize(64, 64, scalingMode))
        using (Bitmap resize96 = squared.Resize(96, 96, scalingMode))
        using (Bitmap resize128 = squared.Resize(128, 128, scalingMode))
        using (Bitmap resize192 = squared.Resize(192, 192, scalingMode))
        using (Bitmap resize256 = squared.Resize(256, 256, scalingMode))
        {
            Image[] includedSizes = new Image[]
                { resize16, resize32, resize48, resize64, resize96, resize128, resize192, resize256 };
            ConvertImagesToIco(includedSizes, icoPath);
        }
    });
}CopyToSquareCanvas保持不变,所以我没有在这里复制它。Resize函数非常简单:在设置所需的插值模式之后,只需使用Graphics.DrawImage在不同大小的画布上绘制图片。
public static Bitmap Resize(this Bitmap source, Int32 width, Int32 height, InterpolationMode scalingMode)
{
    Bitmap result = new Bitmap(width, height, PixelFormat.Format32bppArgb);
    using (Graphics g = Graphics.FromImage(result))
    {
        // Set desired interpolation mode here
        g.InterpolationMode = scalingMode;
        g.PixelOffsetMode = PixelOffsetMode.Half;
        g.DrawImage(source, new Rectangle(0, 0, width, height), new Rectangle(0, 0, source.Width, source.Height), GraphicsUnit.Pixel);
    }
    return result;
}最后,上面链接的Bitmap[]到图标函数略有调整,可以直接写入FileStream,而不是将结果加载到Icon对象中:
public static void ConvertImagesToIco(Image[] images, String outputPath)
{
    if (images == null)
        throw new ArgumentNullException("images");
    Int32 imgCount = images.Length;
    if (imgCount == 0)
        throw new ArgumentException("No images given!", "images");
    if (imgCount > 0xFFFF)
        throw new ArgumentException("Too many images!", "images");
    using (FileStream fs = new FileStream(outputPath, FileMode.Create, FileAccess.Write))
    using (BinaryWriter iconWriter = new BinaryWriter(fs))
    {
        Byte[][] frameBytes = new Byte[imgCount][];
        // 0-1 reserved, 0
        iconWriter.Write((Int16)0);
        // 2-3 image type, 1 = icon, 2 = cursor
        iconWriter.Write((Int16)1);
        // 4-5 number of images
        iconWriter.Write((Int16)imgCount);
        // Calculate header size for first image data offset.
        Int32 offset = 6 + (16 * imgCount);
        for (Int32 i = 0; i < imgCount; ++i)
        {
            // Get image data
            Image curFrame = images[i];
            if (curFrame.Width > 256 || curFrame.Height > 256)
                throw new ArgumentException("Image too large!", "images");
            // for these three, 0 is interpreted as 256,
            // so the cast reducing 256 to 0 is no problem.
            Byte width = (Byte)curFrame.Width;
            Byte height = (Byte)curFrame.Height;
            Byte colors = (Byte)curFrame.Palette.Entries.Length;
            Int32 bpp;
            Byte[] frameData;
            using (MemoryStream pngMs = new MemoryStream())
            {
                curFrame.Save(pngMs, ImageFormat.Png);
                frameData = pngMs.ToArray();
            }
            // Get the colour depth to save in the icon info. This needs to be
            // fetched explicitly, since png does not support certain types
            // like 16bpp, so it will convert to the nearest valid on save.
            Byte colDepth = frameData[24];
            Byte colType = frameData[25];
            // I think .Net saving only supports colour types 2, 3 and 6 anyway.
            switch (colType)
            {
                case 2: bpp = 3 * colDepth; break; // RGB
                case 6: bpp = 4 * colDepth; break; // ARGB
                default: bpp = colDepth; break; // Indexed & greyscale
            }
            frameBytes[i] = frameData;
            Int32 imageLen = frameData.Length;
            // Write image entry
            // 0 image width.
            iconWriter.Write(width);
            // 1 image height.
            iconWriter.Write(height);
            // 2 number of colors.
            iconWriter.Write(colors);
            // 3 reserved
            iconWriter.Write((Byte)0);
            // 4-5 color planes
            iconWriter.Write((Int16)0);
            // 6-7 bits per pixel
            iconWriter.Write((Int16)bpp);
            // 8-11 size of image data
            iconWriter.Write(imageLen);
            // 12-15 offset of image data
            iconWriter.Write(offset);
            offset += imageLen;
        }
        for (Int32 i = 0; i < imgCount; i++)
        {
            // Write image data
            // png data must contain the whole png data file
            iconWriter.Write(frameBytes[i]);
        }
        iconWriter.Flush();
    }
}https://stackoverflow.com/questions/62364153
复制相似问题
腾讯云开发者

Copyright © 2013 - 2026 Tencent Cloud. All Rights Reserved. 腾讯云 版权所有
深圳市腾讯计算机系统有限公司 ICP备案/许可证号:粤B2-20090059 ![]() 粤公网安备44030502008569号
粤公网安备44030502008569号
腾讯云计算(北京)有限责任公司 京ICP证150476号 | 京ICP备11018762号