
使图像边缘光滑
使图像边缘光滑
提问于 2020-08-20 14:53:58
我目前正在做一个简单的项目
它正在移除任何图像的背景,并将其转换为贴纸,但这并没有使我变得更流畅。
import cv2
import numpy as np
from PIL import Image, ImageFilter
from google.colab.patches import cv2_imshow
from matplotlib import pyplot as pl
#img = cv2.imread("/content/police-car-icon-cartoon-style-vector-16884775.jpg")
remove_background("/content/WhatsApp Image 2020-08-17 at 1.08.33 AM (2).jpeg")


def remove_background(img1):

#== Parameters =======================================================================

BLUR = 5
CANNY_THRESH_1 = 10
CANNY_THRESH_2 = 100
MASK_DILATE_ITER = 10
MASK_ERODE_ITER = (1,1)
MASK_COLOR = (220,220,220) # In BGR format

#== Processing =======================================================================

#-- Read image -----------------------------------------------------------------------
img = cv2.imread(img1)
#img = cv2.resize(img, (600,600))
gray = cv2.cvtColor(img,cv2.COLOR_BGR2GRAY)

#-- Edge detection -------------------------------------------------------------------
edges = cv2.Canny(gray, CANNY_THRESH_1, CANNY_THRESH_2)
edges = cv2.dilate(edges, None)
##edges = cv2.erode(edges, None)

#-- Find contours in edges, sort by area ---------------------------------------------
contour_info = []
contours, _ = cv2.findContours(edges, cv2.RETR_LIST, cv2.CHAIN_APPROX_NONE)

for c in contours:
    contour_info.append((
        c,
        cv2.isContourConvex(c),
        cv2.contourArea(c),
    ))
contour_info = sorted(contour_info, key=lambda c: c[2], reverse=True)


#-- Create empty mask, draw filled polygon on it corresponding to largest contour ----
# Mask is black, polygon is white
mask = np.zeros(edges.shape)
for c in contour_info:
    cv2.fillConvexPoly(mask, c[0], (255))
# cv2.fillConvexPoly(mask, max_contour[0], (255))

#-- Smooth mask, then blur it --------------------------------------------------------
mask = cv2.dilate(mask, None, iterations=MASK_DILATE_ITER)
mask_stack = np.dstack([mask]*3)    # Create 3-channel alpha mask

mask_u8 = np.array(mask,np.uint8)

back = np.zeros(mask.shape,np.uint8)
back[mask_u8 == 0] = 255

border = cv2.Canny(mask_u8, CANNY_THRESH_1, CANNY_THRESH_2)
border = cv2.dilate(border, None, iterations=3)


masked = mask_stack * img  # Blend
masked = (masked * 255).astype('uint8')

#     background Colors (blue,green,red)
masked[:,:,0][back == 255] = 190
masked[:,:,1][back == 255] = 190
masked[:,:,2][back == 255] = 190


cv2.imwrite('img.png', masked)

cv2_imshow(  masked)

cv2.waitKey(0)
cv2.destroyAllWindows()

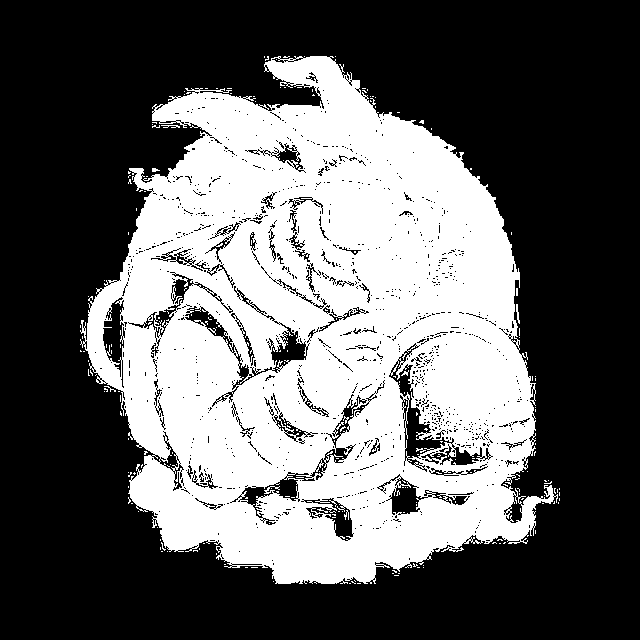
这是输出图像

但我希望这张照片像这样更流畅些

回答 3
Stack Overflow用户
回答已采纳
发布于 2020-08-23 19:01:33
下面是如何在Python/OpenCV中用一些彩色图像代替背景,而不是透明性。
gray
- Threshold
- Blur
- 读取输入的
- ,再将灰度转换为黑色,得到反别名
- ,得到外部轮廓和最大轮廓
- ,在黑色background
- Add上绘制最大的白色轮廓,以添加黑色边框(如果desired)
- Create a有色(红色)背景图像
- Create>H 117将掩码应用于输入<代码>H 218<代码>H 119将倒置掩码应用于background
- Add,两个结果together
- Save结果均为
H 224
- Create>F 225>
输入:

import cv2
import numpy as np
import skimage.exposure

# load image
img = cv2.imread('bunny.jpg')

# convert to gray
gray = cv2.cvtColor(img, cv2.COLOR_BGR2GRAY)

# threshold
thresh = cv2.threshold(gray, 32, 255, cv2.THRESH_BINARY)[1]

# blur threshold image
blur = cv2.GaussianBlur(thresh, (0,0), sigmaX=3, sigmaY=3, borderType = cv2.BORDER_DEFAULT)

# stretch so that 255 -> 255 and 127.5 -> 0
stretch = skimage.exposure.rescale_intensity(blur, in_range=(127.5,255), out_range=(0,255)).astype(np.uint8)

# threshold again
thresh2 = cv2.threshold(stretch, 0, 255, cv2.THRESH_BINARY)[1]

# get external contour
contours = cv2.findContours(thresh2, cv2.RETR_EXTERNAL, cv2.CHAIN_APPROX_SIMPLE)
contours = contours[0] if len(contours) == 2 else contours[1]
big_contour = max(contours, key=cv2.contourArea)

# draw white filled contour on black background
contour = np.zeros_like(thresh, dtype=np.uint8)
cv2.drawContours(contour, [big_contour], 0, 255, -1)

# dilate mask for dark border
kernel = cv2.getStructuringElement(cv2.MORPH_ELLIPSE, (20,20))
mask = cv2.morphologyEx(contour, cv2.MORPH_DILATE, kernel)

# create red colored background image
bckgrnd = np.full_like(img, (0,0,255), dtype=np.uint8)

# apply mask to img
img_masked = cv2.bitwise_and(img, img, mask=mask)

# apply inverse mask to colored background image
bckgrnd_masked = cv2.bitwise_and(bckgrnd, bckgrnd, mask=255-mask)

# combine the two
result = cv2.add(img_masked, bckgrnd_masked)

# save output
cv2.imwrite('bunny_thresh2.png', thresh)
cv2.imwrite('bunny_mask2.png', mask)
cv2.imwrite('bunny_masked2.png', img_masked)
cv2.imwrite('bunny_background_masked2.png', bckgrnd_masked)
cv2.imwrite('bunny_result2.png', result)

# Display various images to see the steps
cv2.imshow('gray',gray)
cv2.imshow('thresh', thresh)
cv2.imshow('blur', blur)
cv2.imshow('stretch', stretch)
cv2.imshow('thresh2', thresh2)
cv2.imshow('contour', contour)
cv2.imshow('mask', mask)
cv2.imshow('img_masked', img_masked)
cv2.imshow('bckgrnd_masked', bckgrnd_masked)
cv2.imshow('result', result)

cv2.waitKey(0)
cv2.destroyAllWindows()
阈值图像:
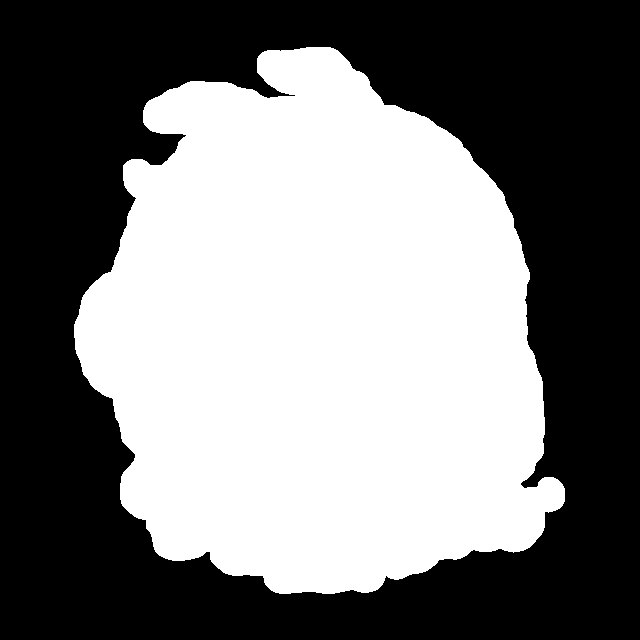
掩模图像:
应用于图像的掩码:

应用于背景的倒置掩模:
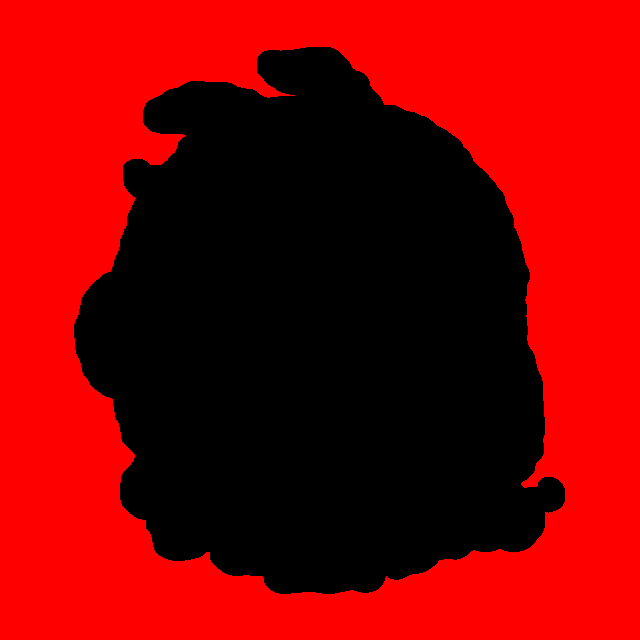
结果:

Stack Overflow用户
发布于 2020-08-20 17:21:33
下面是在Python/OpenCV中实现α通道反混叠的一种方法
grayscale
- threshold
- 读取输入
- 以创建一个mask
- blur
- Stretch对比度,因此中灰再到black
- Threshold,
- 获取外部轮廓
- ,在黑色background
- Dilate上绘制白色填充轮廓,用于黑色边框
H 119再模糊slightly
- Stretch对比度,因此中灰作为掩码
H 222<代码>H 123将掩码放置到输入的alpha通道中,H 224H 125保存结果H 226F 227/代码>
输入:

import cv2
import numpy as np
import skimage.exposure

# load image
img = cv2.imread('bunny.jpg')

# convert to gray
gray = cv2.cvtColor(img, cv2.COLOR_BGR2GRAY)

# threshold
thresh = cv2.threshold(gray, 32, 255, cv2.THRESH_BINARY)[1]

# blur threshold image
blur = cv2.GaussianBlur(thresh, (0,0), sigmaX=3, sigmaY=3, borderType = cv2.BORDER_DEFAULT)

# stretch so that 255 -> 255 and 127.5 -> 0
stretch = skimage.exposure.rescale_intensity(blur, in_range=(127.5,255), out_range=(0,255)).astype(np.uint8)

# threshold again
thresh2 = cv2.threshold(stretch, 0, 255, cv2.THRESH_BINARY)[1]

# get external contour
contours = cv2.findContours(thresh2, cv2.RETR_EXTERNAL, cv2.CHAIN_APPROX_SIMPLE)
contours = contours[0] if len(contours) == 2 else contours[1]
big_contour = max(contours, key=cv2.contourArea)

# draw white filled contour on black background as mas
contour = np.zeros_like(gray)
cv2.drawContours(contour, [big_contour], 0, 255, -1)

# dilate mask for dark border
kernel = cv2.getStructuringElement(cv2.MORPH_ELLIPSE, (20,20))
dilate = cv2.morphologyEx(contour, cv2.MORPH_DILATE, kernel)

# blur dilate image
blur2 = cv2.GaussianBlur(dilate, (3,3), sigmaX=0, sigmaY=0, borderType = cv2.BORDER_DEFAULT)

# stretch so that 255 -> 255 and 127.5 -> 0
mask = skimage.exposure.rescale_intensity(blur2, in_range=(127.5,255), out_range=(0,255))

# put mask into alpha channel of input
result = cv2.cvtColor(img, cv2.COLOR_BGR2BGRA)
result[:,:,3] = mask

# save output
cv2.imwrite('bunnyman_thresh.png', thresh)
cv2.imwrite('bunny_mask.png', mask)
cv2.imwrite('bunny_antialiased.png', result)


# Display various images to see the steps
cv2.imshow('gray',gray)
cv2.imshow('thresh', thresh)
cv2.imshow('blur', blur)
cv2.imshow('stretch', stretch)
cv2.imshow('thresh2', thresh2)
cv2.imshow('contour', contour)
cv2.imshow('dilate', dilate)
cv2.imshow('mask', mask)
cv2.imshow('result', result)

cv2.waitKey(0)
cv2.destroyAllWindows()
阈值图像:

掩模图像:
结果:

Stack Overflow用户
发布于 2020-08-20 15:01:41
抖动算法有效吗?下面是一个用于抖动的PIL扩展:https://github.com/hbldh/hitherdither
页面原文内容由Stack Overflow提供。腾讯云小微IT领域专用引擎提供翻译支持
原文链接:
https://stackoverflow.com/questions/63507755
复制相关文章
相似问题
腾讯云开发者

Copyright © 2013 - 2026 Tencent Cloud. All Rights Reserved. 腾讯云 版权所有
深圳市腾讯计算机系统有限公司 ICP备案/许可证号:粤B2-20090059 ![]() 粤公网安备44030502008569号
粤公网安备44030502008569号
腾讯云计算(北京)有限责任公司 京ICP证150476号 | 京ICP备11018762号