
使用google视觉示例减少跟踪窗口
我想减少减少条形码跟踪窗口时,使用谷歌视觉api。有一些答案,这里,但他们觉得有点过时。
我正在使用google的示例:https://github.com/googlesamples/mlkit/tree/master/android/vision-quickstart
目前,我试图找出BarcodeScannerProcessor onSuccess回调中的覆盖框中是否有条形码:
override fun onSuccess(barcodes: List<Barcode>, graphicOverlay: GraphicOverlay) {
    if(barcodes.isEmpty())
      return;

    for(barcode in barcodes) {
      val center = Point(graphicOverlay.imageWidth / 2, graphicOverlay.imageHeight / 2)
      val rectWidth = graphicOverlay.imageWidth * Settings.OverlayWidthFactor
      val rectHeight = graphicOverlay.imageHeight * Settings.OverlayHeightFactor

      val left = center.x - rectWidth / 2
      val top = center.y - rectHeight / 2
      val right = center.x + rectWidth / 2
      val bottom = center.y + rectHeight / 2

      val rect = Rect(left.toInt(), top.toInt(), right.toInt(), bottom.toInt())

      val contains = rect.contains(barcode.boundingBox!!)
      val color = if(contains) Color.GREEN else Color.RED

      graphicOverlay.add(BarcodeGraphic(graphicOverlay, barcode, "left: ${barcode.boundingBox!!.left}", color))
    }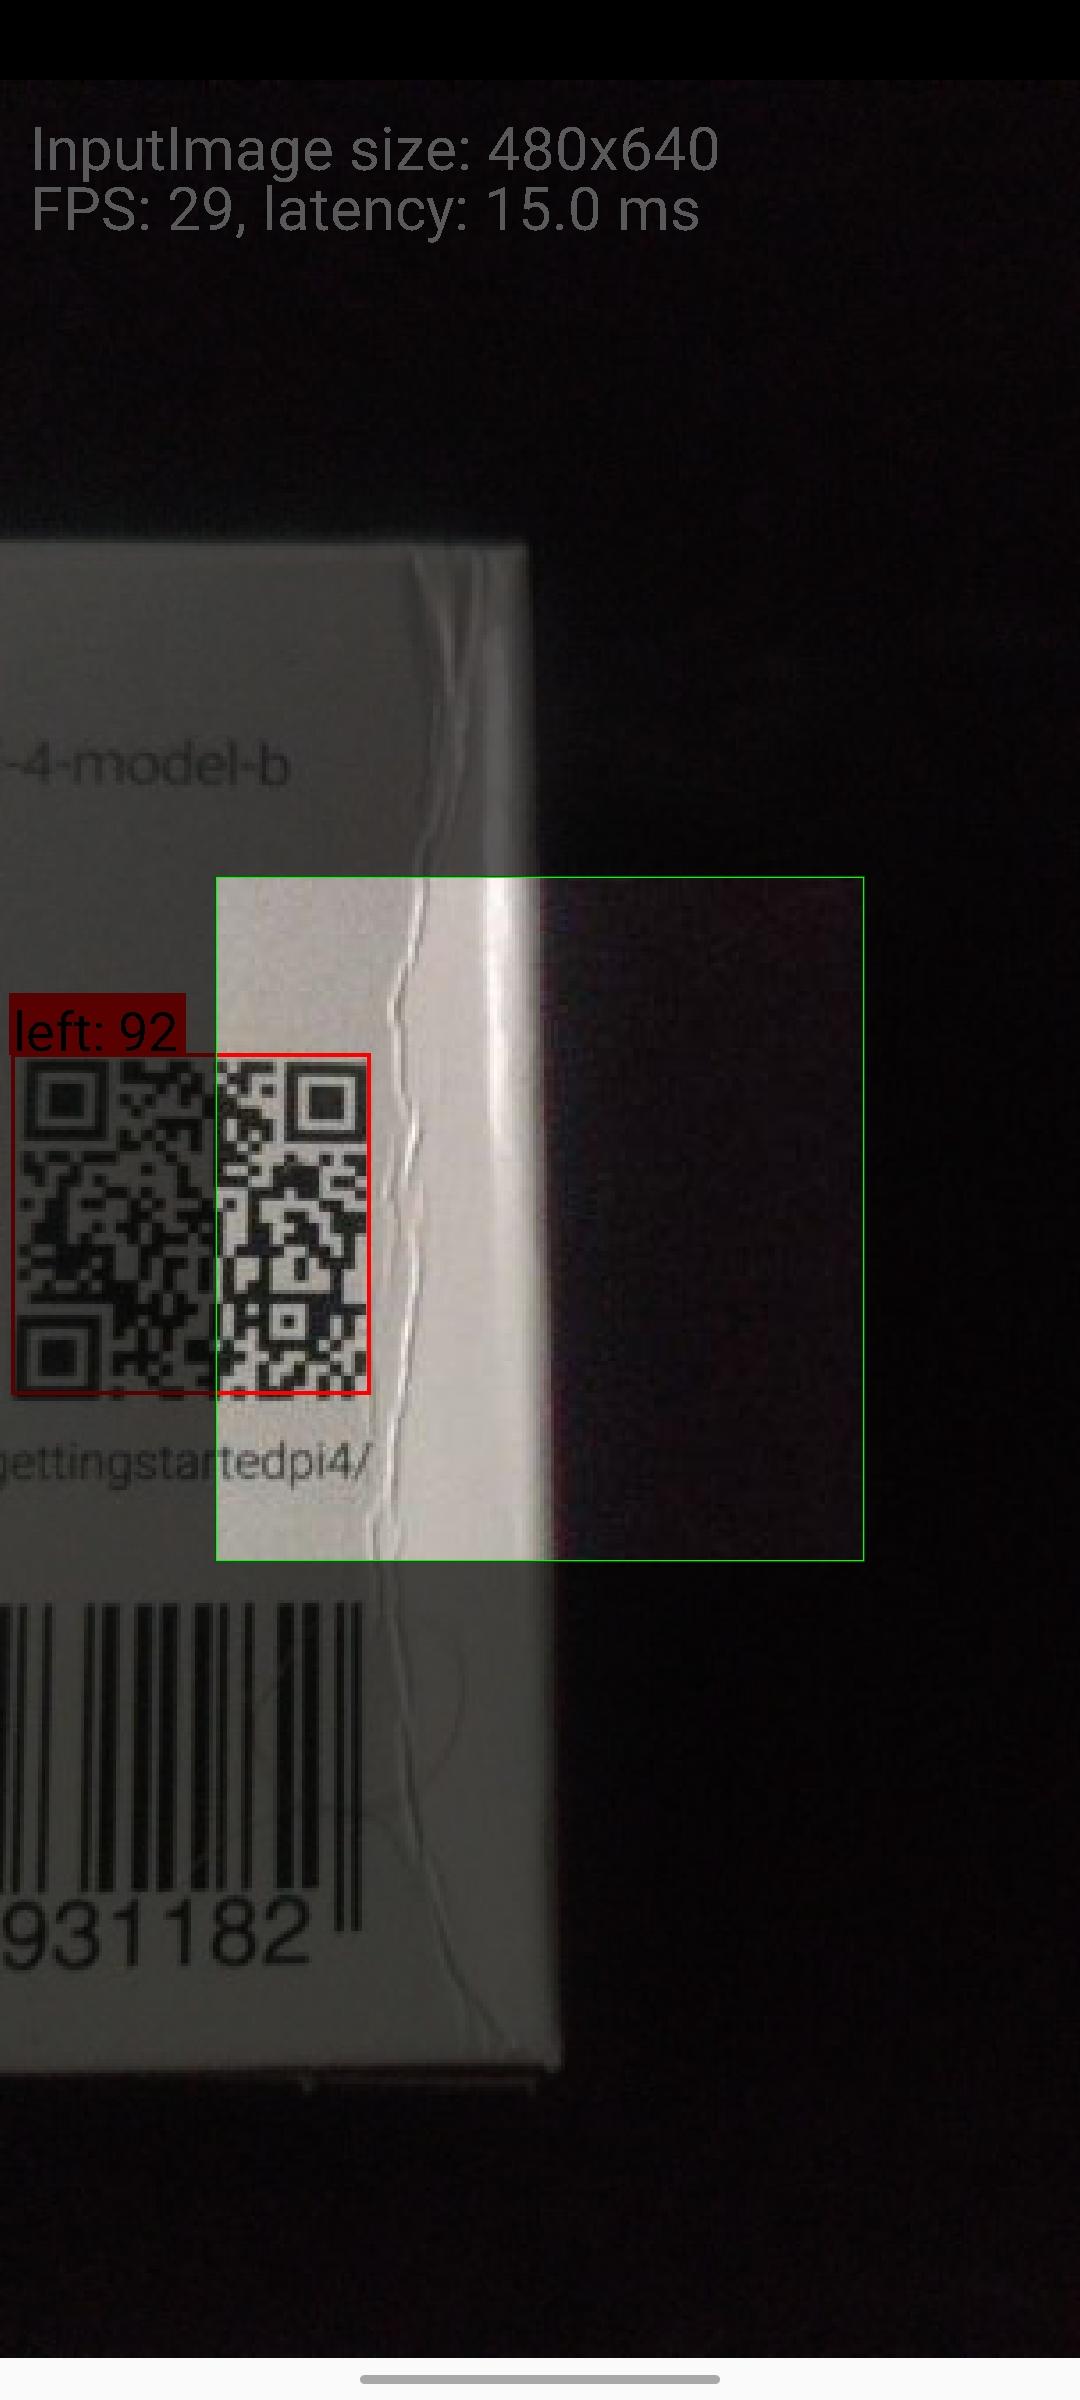
}就y而言,它工作得很好,但是barcode.boundingBox (例如,barcode.boundingBox.left )的X值似乎有一个偏移量。它是否基于在GraphicOverlay中正在计算的
我期望下面的值接近于0,但是偏移量在这里大约是90:
或者根据框裁剪图像的效率更高?
回答 2
Stack Overflow用户
发布于 2020-10-12 17:49:05
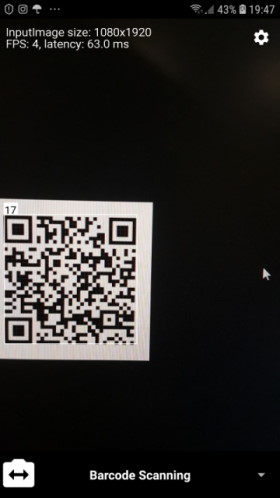
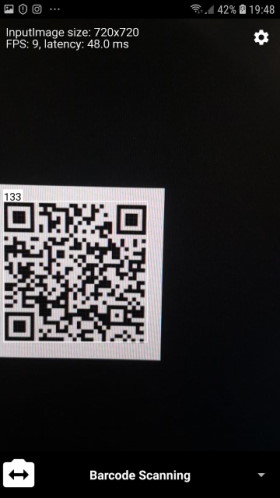
实际上,包围框是正确的。诀窍是图像的纵横比与视口纵横比不匹配,因此图像是水平裁剪的。尝试打开设置(右上角的齿轮)并选择适当的分辨率。
例如,看看这两个截图。在第一个屏幕上,选择的分辨率(1080x1920)与我的手机分辨率匹配,因此填充看起来很好(17 so )。在第二个屏幕截图中,纵横比是不同的( 720x720分辨率为1.0),因此图像被裁剪,填充看起来不正确。
因此,偏移量应从图像坐标转换为屏幕坐标。在幕后,GraphicOverlay使用一个矩阵来进行这种转换。您可以使用相同的矩阵:
    for(barcode in barcodes) {
      barcode.boundingBox?.let { bbox ->
        val offset = floatArrayOf(bbox.left.toFloat(), bbox.top.toFloat())
        graphicOverlay.transformationMatrix.mapPoints(offset)

        val leftOffset = offset[0]
        val topOffset = offset[1]

        ...
      }
}唯一的问题是transformationMatrix是私有的,所以您应该添加一个getter来访问它。
Stack Overflow用户
发布于 2020-10-13 08:20:09
如您所知,相机的预览大小可以在“设置”菜单上进行配置。此可配置大小指定graphicOverlay尺寸。
另一方面,显示在屏幕上的CameraSourcePreview (即preview_view in activity_vision_live_preview.xml)的纵横比不一定等于graphicOverlay的比率。因为这取决于手机屏幕的大小和父ConstraintLayout允许占用的高度。
因此,在预览中,基于graphicOverlay和preview_view的高宽比之间的差异,graphicOverlay的某些部分可能不会水平或垂直显示。
在GraphicOverlay中有一些参数可以帮助我们调整条形码的boundingBox的左边和顶部,使它们从可见区域的0开始。
首先,它们应该可以从GraphicOverlay类中访问。因此,只需为它们编写一个getter方法就足够了:
GraphicOverlay.java
public class GraphicOverlay extends View {

    ...

    /**
     * The factor of overlay View size to image size. Anything in the image coordinates need to be
     * scaled by this amount to fit with the area of overlay View.
     */
    public float getScaleFactor() {
        return scaleFactor;
    }

    /**
     * The number of vertical pixels needed to be cropped on each side to fit the image with the
     * area of overlay View after scaling.
     */
    public float getPostScaleHeightOffset() {
        return postScaleHeightOffset;
    }

    /**
     * The number of horizontal pixels needed to be cropped on each side to fit the image with the
     * area of overlay View after scaling.
     */
    public float getPostScaleWidthOffset() {
        return postScaleWidthOffset;
    }
}
现在,可以使用以下参数计算左差和顶差间隙:
BarcodeScannerProcessor.kt
class BarcodeScannerProcessor(
    context: Context
) : VisionProcessorBase<List<Barcode>>(context) {

    ...

    override fun onSuccess(barcodes: List<Barcode>, graphicOverlay: GraphicOverlay) {
        if (barcodes.isEmpty()) {
            Log.v(MANUAL_TESTING_LOG, "No barcode has been detected")
        }

        val leftDiff = graphicOverlay.run { postScaleWidthOffset / scaleFactor }.toInt()
        val topDiff = graphicOverlay.run { postScaleHeightOffset / scaleFactor }.toInt()

        for (i in barcodes.indices) {
            val barcode = barcodes[i]
            val color = Color.RED
            val text = "left: ${barcode.boundingBox!!.left - leftDiff}   top: ${barcode.boundingBox!!.top - topDiff}"
            graphicOverlay.add(MyBarcodeGraphic(graphicOverlay, barcode, text, color))
            logExtrasForTesting(barcode)
        }
    }

    ...
}
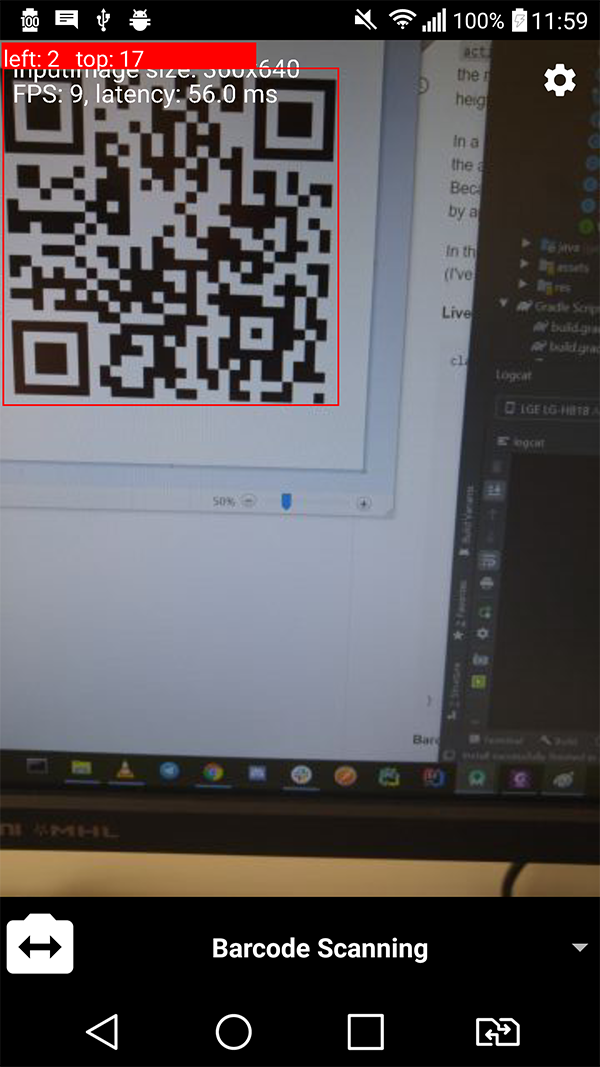
视觉效果:
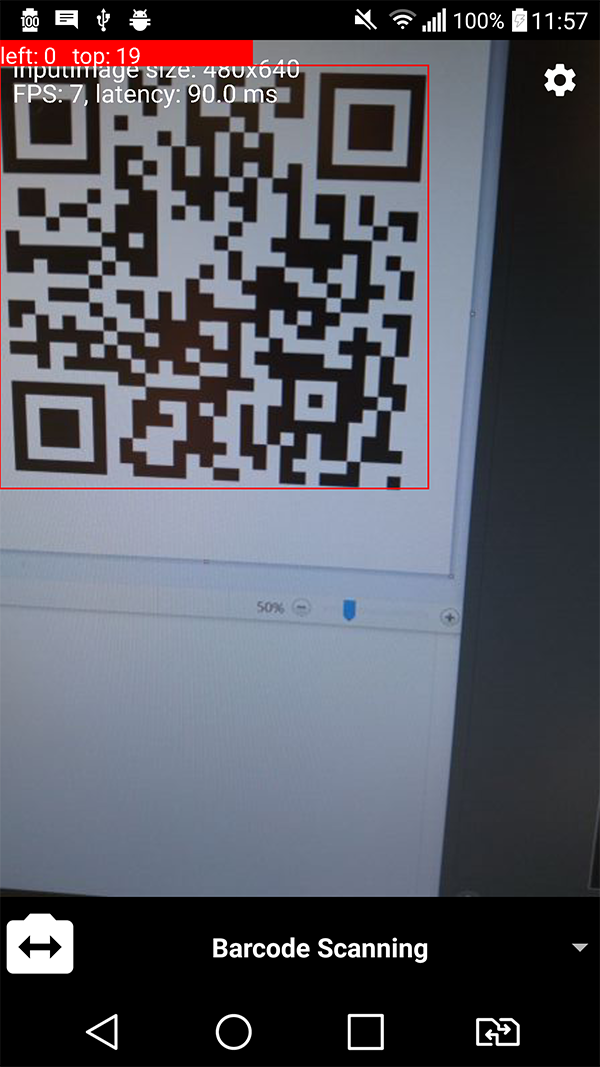
这是输出的可视化结果。正如图片中所显示的那样,barcode的左上角与可见区域的左上角之间的距离从0开始。在左图的情况下,graphicOverlay被设置为480x640的大小(纵横比≈1.3334)和右侧的360x640 (纵横比≈1.7778)的大小。在这两种情况下,在我的手机上,CameraSourcePreview有一个稳定的1440x2056像素大小(高宽比≈1.4278),因此这意味着计算确实反映了barcode在可见区域的位置。
(注意,在一个实验中,可见区域的纵横比低于graphicOverlay,而在另一个实验中,纵横比大于: 1.3334 < 1.4278 < 1.7778。因此,左值和顶值分别进行调整。)
https://stackoverflow.com/questions/64285580
复制相似问题
腾讯云开发者

Copyright © 2013 - 2026 Tencent Cloud. All Rights Reserved. 腾讯云 版权所有
深圳市腾讯计算机系统有限公司 ICP备案/许可证号:粤B2-20090059 ![]() 粤公网安备44030502008569号
粤公网安备44030502008569号
腾讯云计算(北京)有限责任公司 京ICP证150476号 | 京ICP备11018762号