
PyQt5 drawArc与宽“笔”
PyQt5 drawArc与宽“笔”
提问于 2020-11-28 18:33:47
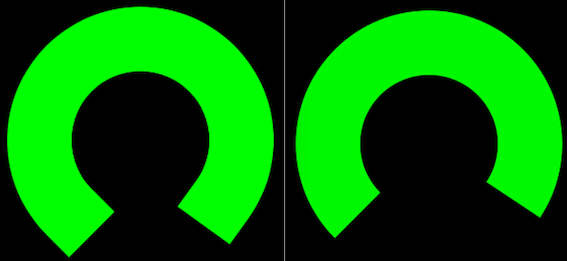
我正在尝试使用PyQt5绘制圆规(MacOS 11.0.1,Python3.9)。我使用drawArc语句创建了量规背景,因此我将笔宽设置为一个大值(70)。由此产生的弧线看起来像马蹄铁,大概是因为“钢笔”是一个70像素的正方形,而不是垂直于旅行方向的一条线。
有没有一种方法可以在PyQt5中创建一个弧形,就像图片右边的那个?
我愿意接受一些建议:应用程序已经用Python+Tkinter编写了,但是由于缺乏Tkinter+Raspberry上的反别名,我需要重写它。
(B计划继续使用PyQt,创建一个饼片(drawPie),并用一个圆形的背景颜色覆盖中心区域-但这并不理想,因为它给我的设计带来了一些限制。)
# importing libraries
from PyQt5.QtWidgets import *
from PyQt5.QtGui import *
from PyQt5.QtCore import *
import sys

arcreading = 0
adder = .1
# creating a Gauge class
class Gauge(QMainWindow):

    # constructor
    def __init__(self):
        super().__init__()

        timer = QTimer(self)                 # create a timer object
        timer.timeout.connect(self.update)   # add action to the timer, update the whole code
        timer.start(0)                    # update cycle in milliseconds

        self.setGeometry(200, 200, 600, 600)       # window location and size
        self.setStyleSheet("background : black;")  # background color

    # -----------------------
    # method for paint event
    # -----------------------
    def paintEvent(self, event):
        global arcreading
        global adder
        # print('x')
        kanvasx = 50        # binding box origin: x
        kanvasy = 50        # binding box origin: y
        kanvasheight = 150  # binding box height
        kanvaswidth = 150   # binding box width
        arcsize = 270       # arc angle between start and end.
        arcwidth = 70       # arc width


        painter = QPainter(self)    # create a painter object
        painter.setRenderHint(QPainter.Antialiasing)  # tune up painter
        painter.setPen(QPen(Qt.green, arcwidth))      # set color and width

        # ---------- the following lines simulate sensor reading. -----------
        if arcreading > arcsize or arcreading < 0:  # variable to make arc move
            adder = -adder  # arcreading corresponds to the
            # value to be indicated by the arc.
        arcreading = arcreading + adder
        # --------------------- end simulation ------------------------------
        #print(arcreading)

        # drawArc syntax:
        #       drawArc(x_axis, y_axis, width, length, startAngle, spanAngle)
        painter.drawArc(kanvasx, kanvasy,   # binding box: x0, y0, pixels
                   kanvasheight + arcwidth, # binding box: height
                   kanvaswidth + arcwidth,  # binding box: width
                   int((arcsize + (180 - arcsize) / 2)*16),  # arc start point, degrees (?)
                   int(-arcreading*16))         # arc span

        painter.end()                       # end painter

    # Driver code
if __name__ == '__main__':
    app = QApplication(sys.argv)
    # creating a Gauge object
    win = Gauge()
    # show
    win.show()
    exit(app.exec_())
回答 1
Stack Overflow用户
回答已采纳
发布于 2020-11-28 19:14:40
您需要用适当的capStyle设置笔的Qt.PenCapStyle,在您的情况下,您应该使用FlatCap,它的结尾正好在行的末尾,而默认的是SquareCap (它覆盖了笔的末端,并扩展了一半的线宽):
painter.setPen(QPen(Qt.green, arcwidth, cap=Qt.FlatCap))页面原文内容由Stack Overflow提供。腾讯云小微IT领域专用引擎提供翻译支持
原文链接:
https://stackoverflow.com/questions/65053173
复制相关文章
相似问题
腾讯云开发者

Copyright © 2013 - 2026 Tencent Cloud. All Rights Reserved. 腾讯云 版权所有
深圳市腾讯计算机系统有限公司 ICP备案/许可证号:粤B2-20090059 ![]() 粤公网安备44030502008569号
粤公网安备44030502008569号
腾讯云计算(北京)有限责任公司 京ICP证150476号 | 京ICP备11018762号