
OpenCV - Blob/缺陷/异常检测
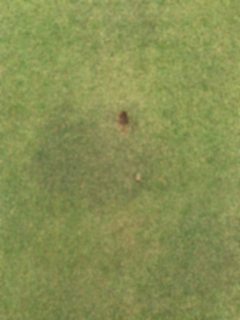
我正在做一个在家项目,基本上只是为了好玩,但我有更多的麻烦比预期。我希望能够在这个样本图像中找到音高标记。在这里输入图像描述
我遵循了一些教程和东西,从一个位置加载图像,并在图像上运行简单的blob检测。我的代码当前如下所示:->
import cv2
import numpy as np

# Read in the image in grayscale
img = cv2.imread('/home/pi/Downloads/divot1.jpeg', cv2.IMREAD_GRAYSCALE)

params = cv2.SimpleBlobDetector_Params()
params.filterByArea = True
params.minArea = 50

# Determine which openCV version were using
if cv2.__version__.startswith('2.'):
    detector = cv2.SimpleBlobDetector(params)
else:
    detector = cv2.SimpleBlobDetector_create(params)

# Detect the blobs in the image
keypoints = detector.detect(img)
print(len(keypoints))

# Draw detected keypoints as red circles
imgKeyPoints = cv2.drawKeypoints(img, keypoints, np.array([]), (0,0,255), cv2.DRAW_MATCHES_FLAGS_DRAW_RICH_KEYPOINTS)


# Display found keypoints
cv2.imshow("Keypoints", imgKeyPoints)
cv2.waitKey(0)

cv2.destroyAllWindows()
我知道在使用openCV时有更多的图像处理技术,但我希望有人能为我指明正确的方向。我试过了一些东西,比如不同的模糊类型,以消除每一片草的“噪音”。我也尝试了一些参数,虽然我不确定我使用的参数是否有帮助(min/maxAREA,颜色,凸性)
最终的目标是能够在图像中找到深棕色的异常,并返回该形状的中心“坐标”。
回答 2
Stack Overflow用户
发布于 2020-12-04 13:04:57
还没人提到模糊所以我会的。
草的细节相当于噪音,无论你如何处理这张照片,都会让你感到困扰。模糊它。
编辑:因为我被要求提供一些参数--“较少”的方法:
突出性。
或者好的旧统计数据。
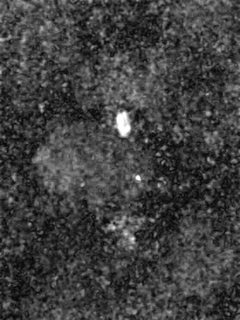
im = cv.imread("green-blurred.jpg")
yuv = cv.cvtColor(im, cv.COLOR_BGR2YCrCb) # or COLOR_BGR2YUV, should work equivalently here
#uv = yuv[:,:,(2,3)]
mean = np.mean(yuv, axis=(0,1))
std = np.std(yuv, axis=(0,1))
#mask = ((yuv - mean) / std >= 4.5).any(axis=2)
# EDIT: there needs to be an abs() on that difference, we want magnitudes, no signs
mask = (np.abs(yuv - mean) / std >= 4.5).any(axis=2)
mask_u8 = mask.astype(np.uint8) * 255
#grayscale = (np.abs(yuv - mean) / std / 5).max(axis=2)
cv.imshow("mask", mask_u8)
cv.waitKey(-1)
这不是一个完美的方法,但很可能会被调整。
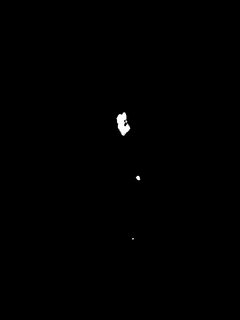
使用您喜欢的任何地方的blob。findContours将是一个简单的选择。使用cv::moments获取一些统计数据,您可以将其转化为一个质心(质量中心)。
Stack Overflow用户
发布于 2020-12-04 07:37:27
对不起,我没有时间去实现它,但是对于这个特殊的情况,这样的事情应该有效:
- 谷歌为“颜色选择器”,并找到正确的HSV范围的颜色。对于这个棕色,看起来你想要一个从20度到40度的范围。
- 将图像转换为HSV颜色空间。
hsv_img = cv2.cvtColor(img, cv2.COLOR_BGR2HSV) - 使用cv2.inRange创建棕色斑点所在位置的掩码。掩码=
cv2.inRange(hsv_img, (20,0,0), (40,255,255)) - 将您的面具转换为黑白图像。
img2 = np.where(mask, np.uint8(255), np.uint8(0)) - 使用cv2.findContos查找棕色斑点。
contours,_ = cv2.findContours(img2, cv2.RETR_EXTERNAL, cv2.CHAIN_APPROX_NONE) - 找到最大的位置。
brown_spot = sorted(contours, key=cv2.contourArea, reverse=True)[0] - 画等高线。
cv2.drawContours(img, [brown_spot], -1, (255,0,0), 3)
也许我错过了一些东西,或者在这方面有一些错误,但我认为你可以在这里玩一玩,然后从这里拿出来:)
编辑--我忽略了需要中心坐标的部分。如果你想要褐斑的质心,得到所有x坐标的平均x坐标和所有y坐标的平均y坐标。那应该是你的质心坐标。如果我没记错的话,轮廓上有一个额外的维度,你可能需要用np.squeeze删除。在这样做之后,您可以得到np.mean(brown_spot:,0)的y坐标平均值(第一列)和np.mean(brown_spot:,1)的x坐标平均值(第二列)。Cv2. finds只找到周长,间距不一致,所以你的质量中心可能有点偏离。如果您想要一个更精确的质量中心(或者也要说明褐斑内的空区域),您必须使用connectedComponents而不是findContours。
https://stackoverflow.com/questions/65138694
复制相似问题
腾讯云开发者

Copyright © 2013 - 2026 Tencent Cloud. All Rights Reserved. 腾讯云 版权所有
深圳市腾讯计算机系统有限公司 ICP备案/许可证号:粤B2-20090059 ![]() 粤公网安备44030502008569号
粤公网安备44030502008569号
腾讯云计算(北京)有限责任公司 京ICP证150476号 | 京ICP备11018762号