
字符/数字的边框检测
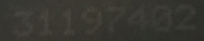
我有一些图片,如下所示:
我想找到8位数的边框。我的第一次尝试是在以下代码中使用cv2:
import cv2
import matplotlib.pyplot as plt
import cvlib as cv
from cvlib.object_detection import draw_bbox
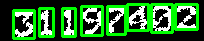
im = cv2.imread('31197402.png')
bbox, label, conf = cv.detect_common_objects(im)
output_image = draw_bbox(im, bbox, label, conf)
plt.imshow(output_image)
plt.show()不幸的是,这不管用。有谁有主意吗?
回答 1
Stack Overflow用户
发布于 2021-01-15 23:03:39
解决方案中的问题很可能是输入图像,它的质量很差。人物和背景之间几乎没有任何对比。来自cvlib的blob检测算法可能无法区分字符块和背景,产生无用的二进制掩码。让我们尝试使用纯OpenCV来解决这个问题。
我建议采取以下步骤:
filter.
- Improve应用自适应门限来获得一个相当好的二进制掩码。
- 使用区域清除blob噪声,使用区域清除二进制图像的质量--每个字符的外部轮廓,并使用以前计算的边界矩形>E 219E 219对每个字符进行
E 118包围矩形。H 224G 225
让我们看看代码:
# importing cv2 & numpy:
import numpy as np
import cv2

# Set image path
path = "C:/opencvImages/"
fileName = "mrrm9.png"

# Read input image:
inputImage = cv2.imread(path+fileName)
inputCopy = inputImage.copy()

# Convert BGR to grayscale:
grayscaleImage = cv2.cvtColor(inputImage, cv2.COLOR_BGR2GRAY)
从这里开始,没有什么可讨论的,只需读取BGR映像并将其转换为grayscale。现在,让我们使用adaptive threshold方法应用gaussian。这是一个棘手的部分,因为参数是根据输入的质量手动调整的。该方法的工作方法是将图像分割为windowSize的网格,然后应用局部阈值来确定前景和背景的最优分离。可以在阈值中添加一个由windowConstant指示的附加常量,以微调输出:
# Set the adaptive thresholding (gasussian) parameters:
windowSize = 31
windowConstant = -1
# Apply the threshold:
binaryImage = cv2.adaptiveThreshold(grayscaleImage, 255, cv2.ADAPTIVE_THRESH_GAUSSIAN_C, cv2.THRESH_BINARY, windowSize, windowConstant)
你可以得到一个很好的二值图像:
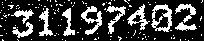
现在,正如你所看到的,图像有一些斑点噪声。让我们用一个area filter来消除噪音。噪声比感兴趣的目标小,所以我们可以很容易地根据面积过滤它们,如下所示:
# Perform an area filter on the binary blobs:
componentsNumber, labeledImage, componentStats, componentCentroids = \
cv2.connectedComponentsWithStats(binaryImage, connectivity=4)

# Set the minimum pixels for the area filter:
minArea = 20

# Get the indices/labels of the remaining components based on the area stat
# (skip the background component at index 0)
remainingComponentLabels = [i for i in range(1, componentsNumber) if componentStats[i][4] >= minArea]

# Filter the labeled pixels based on the remaining labels,
# assign pixel intensity to 255 (uint8) for the remaining pixels
filteredImage = np.where(np.isin(labeledImage, remainingComponentLabels) == True, 255, 0).astype('uint8')
这是经过过滤的图像:
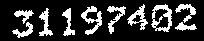
我们可以通过一些形态学来提高这幅图像的质量。一些字符似乎被打破(看看第一个3 -它是两个分开的小块)。我们可以加入他们,应用关闭操作:
# Set kernel (structuring element) size:
kernelSize = 3

# Set operation iterations:
opIterations = 1

# Get the structuring element:
maxKernel = cv2.getStructuringElement(cv2.MORPH_RECT, (kernelSize, kernelSize))

# Perform closing:
closingImage = cv2.morphologyEx(filteredImage, cv2.MORPH_CLOSE, maxKernel, None, None, opIterations, cv2.BORDER_REFLECT101)
这是“封闭”图像:
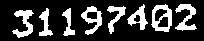
现在,您希望获得每个字符的bounding boxes。让我们来检测每一个水珠的外部轮廓,并在它周围放一个很好的矩形:
# Get each bounding box
# Find the big contours/blobs on the filtered image:
contours, hierarchy = cv2.findContours(closingImage, cv2.RETR_CCOMP, cv2.CHAIN_APPROX_SIMPLE)

contours_poly = [None] * len(contours)
# The Bounding Rectangles will be stored here:
boundRect = []

# Alright, just look for the outer bounding boxes:
for i, c in enumerate(contours):

    if hierarchy[0][i][3] == -1:
        contours_poly[i] = cv2.approxPolyDP(c, 3, True)
        boundRect.append(cv2.boundingRect(contours_poly[i]))


# Draw the bounding boxes on the (copied) input image:
for i in range(len(boundRect)):
    color = (0, 255, 0)
    cv2.rectangle(inputCopy, (int(boundRect[i][0]), int(boundRect[i][1])), \
              (int(boundRect[i][0] + boundRect[i][2]), int(boundRect[i][1] + boundRect[i][3])), color, 2)
最后一个for循环几乎是可选的。它从列表中获取每个边界矩形,并将其绘制到输入图像上,这样您就可以看到每个单独的矩形,如下所示:
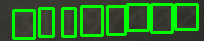
让我们将其可视化在二进制图像上:
此外,如果您想使用我们刚刚得到的边框裁剪每个字符,您可以这样做:
# Crop the characters:
for i in range(len(boundRect)):
    # Get the roi for each bounding rectangle:
    x, y, w, h = boundRect[i]

    # Crop the roi:
    croppedImg = closingImage[y:y + h, x:x + w]
    cv2.imshow("Cropped Character: "+str(i), croppedImg)
    cv2.waitKey(0)
这就是你如何得到单独的边框。现在,也许您正在尝试将这些图像传递给OCR。我尝试将过滤后的二进制图像(在关闭操作之后)传递给pyocr (这是我正在使用的OCR ),并将其作为输出字符串:31197402
我用来获取封闭图像的OCR的代码如下:
# Set the OCR libraries:
from PIL import Image
import pyocr
import pyocr.builders

# Set pyocr tools:
tools = pyocr.get_available_tools()
# The tools are returned in the recommended order of usage
tool = tools[0]

# Set OCR language:
langs = tool.get_available_languages()
lang = langs[0]

# Get string from image:
txt = tool.image_to_string(
    Image.open(path + "closingImage.png"),
    lang=lang,
    builder=pyocr.builders.TextBuilder()
)

print("Text is:"+txt)
请注意,OCR在白色背景上接收黑色字符,因此必须首先反转图像。
https://stackoverflow.com/questions/65738928
复制相似问题
腾讯云开发者

Copyright © 2013 - 2026 Tencent Cloud. All Rights Reserved. 腾讯云 版权所有
深圳市腾讯计算机系统有限公司 ICP备案/许可证号:粤B2-20090059 ![]() 粤公网安备44030502008569号
粤公网安备44030502008569号
腾讯云计算(北京)有限责任公司 京ICP证150476号 | 京ICP备11018762号