
使用SerialTransfer库接收从nodemcu发送到Arduino UNO的有效载荷中的所有零
我有一个nodemcu主流传感器值到Arduino Uno从UART使用SerialTransfer.h。我已经在Arduino数字引脚2,3上设置了一个额外的串口,用于使用SoftwareSerial.h的Rx,Tx。我已经将Tx在nodemcu上连接到了Uno上,Rx在nodemcu上转到Tx上了。我有一个电平移位器来调整3.3V和5伏Arduino.我已确保提供一个共同点。
我从nodemcu发送带有传感器值的结构(bool和int类型,硬编码用于演示),但在Arduino只接收零值,如串行监视器所见。我的密码在下面。如有任何意见,我将不胜感激。
我试过以下几种方法,但没有区别。
在Uno上使用SoftwareSerial.h
- Reversing创建的
- ,在nodemcu Tx和Arduino Uno Rx
上设置有和不带电平移位器的从
- 。
这是nodemcu主人的代码。
#include <Wire.h>
#include <SerialTransfer.h>

SerialTransfer masterMCU;

struct PAYMASTER {
  /*
  water: instruction to switch pump on or off. Note the float sensor in pump's circuit will prevent overflow.
  fan: instruction to control fan speed - LO, MED, HIGH. Note PC fan requires an int between 0 and 255.
  led: instruction to control LED brightness. Note that the FastLED library requires an int between 0 and 255.
  */
  bool water;
  int fan;
  int led;
} instructions = {
  true,
  201,
  60
};

void setup() {
  // put your setup code here, to run once:
  Serial.begin(9600);
  delay(999);
  masterMCU.begin(Serial);
  delay(999);
}

void debug() {
  Serial.print("MASTER: ");
  Serial.print(millis());
  Serial.print("   Water: ");
  Serial.print(instructions.water);
  Serial.print(", Fan: ");
  Serial.print(instructions.fan);
  Serial.print(", LED: ");
  Serial.println(instructions.led);
}

void loop() {
  // put your main code here, to run repeatedly:
  masterMCU.txObj(instructions, sizeof(instructions));
  masterMCU.sendData(sizeof(instructions));
  debug();
  delay(999);

}
这是Arduino Uno奴隶的代码。
#include <Wire.h>
#include <SerialTransfer.h>
#include <SoftwareSerial.h>

SerialTransfer slaveMCU;
SoftwareSerial extra(2, 3); // Rx 2, Tx 3

struct PAYMASTER {
  /*
  water: instruction to switch pump on or off. Note the float sensor in pump's circuit will prevent overflow.
  fan: instruction to control fan speed - LO, MED, HIGH. Note PC fan requires an int between 0 and 255.
  led: instruction to control LED brightness. Note that the FastLED library requires an int between 0 and 255.
  */
  bool water;
  int fan;
  int led;
} instructions;

void setup() {
  // put your setup code here, to run once:
  Serial.begin(9600);
  delay(201);
  extra.begin(9600);
  delay(201);
  slaveMCU.begin(extra);
  delay(201);
}

void debug() {
  Serial.print("SLAVE: ");
  Serial.print(millis());
  Serial.print("   Water: ");
  Serial.print((bool)instructions.water);
  Serial.print(", Fan: ");
  Serial.print(instructions.fan);
  Serial.print(", LED: ");
  Serial.println(instructions.led);
}

void loop() {
  // put your main code here, to run repeatedly:
  if (slaveMCU.available()) {
    slaveMCU.rxObj(instructions, sizeof(instructions));
    debug();
  } else if (slaveMCU.status < 0) {
    Serial.print("ERROR: ");

    if(slaveMCU.status == -1)
      Serial.println(F("CRC_ERROR"));
    else if(slaveMCU.status == -2)
      Serial.println(F("PAYLOAD_ERROR"));
    else if(slaveMCU.status == -3)
      Serial.println(F("STOP_BYTE_ERROR"));
  }
  delay(999);
}回答 1
Stack Overflow用户
发布于 2021-08-01 19:45:31
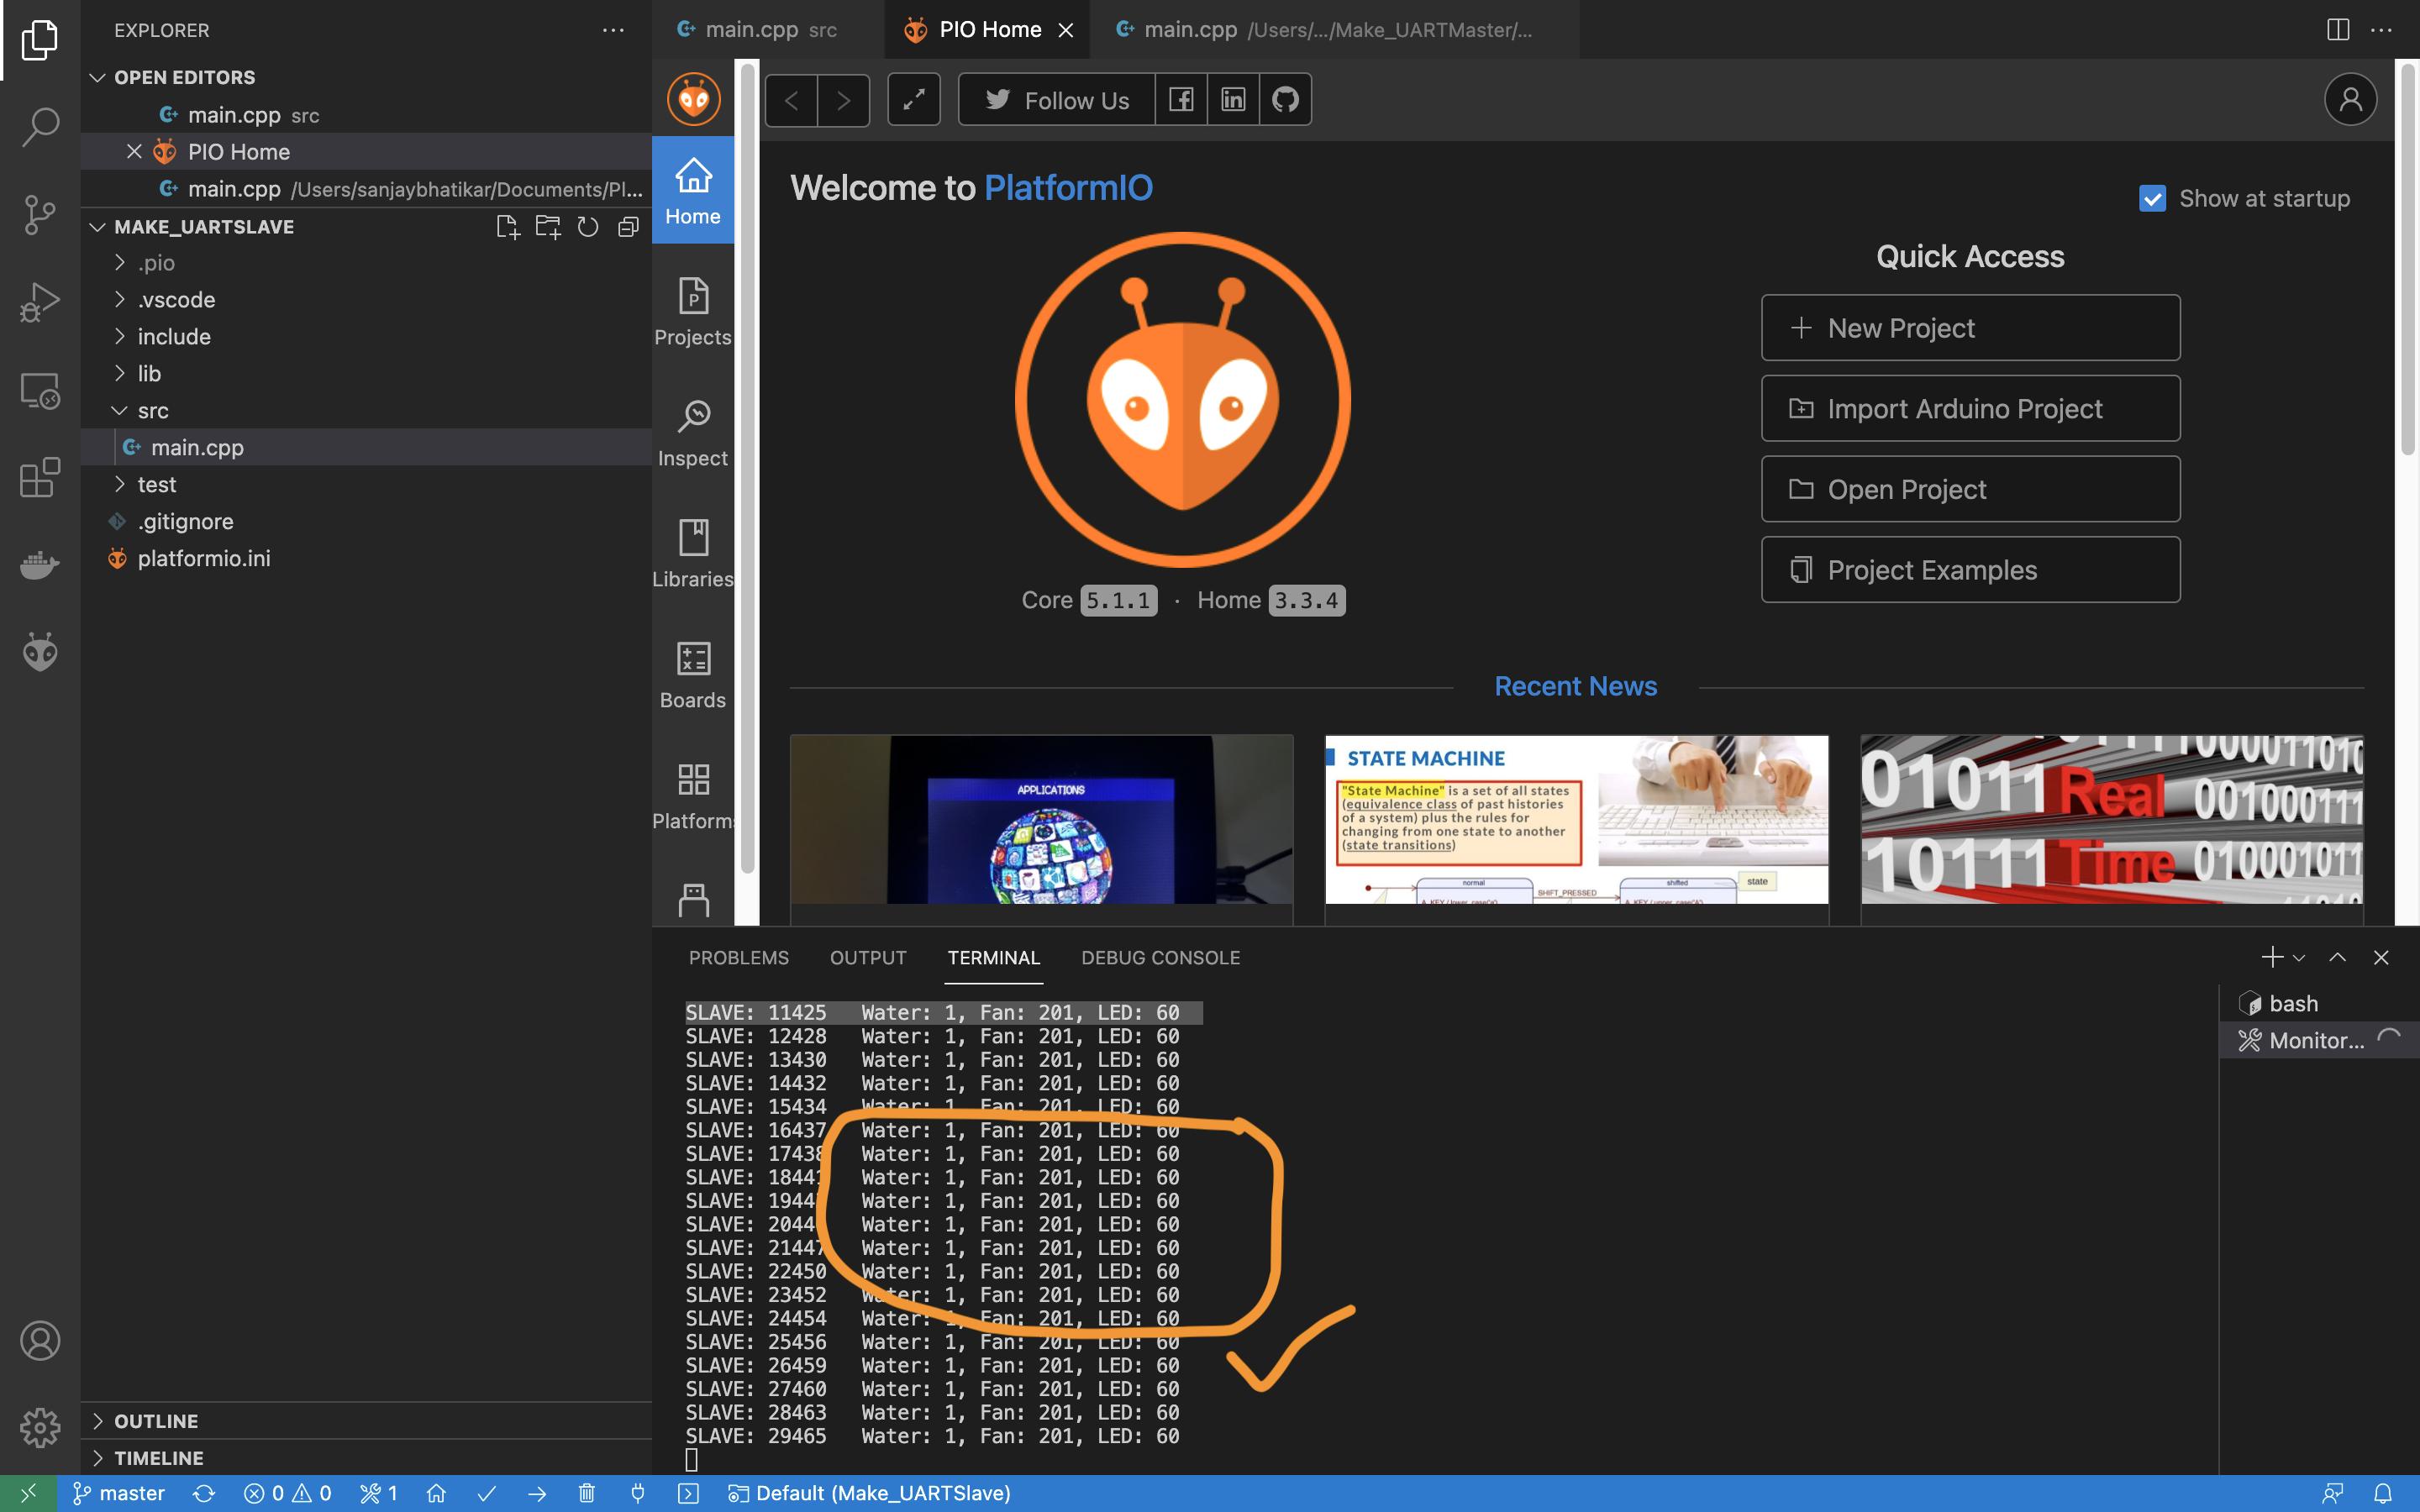
我做了一些修改,现在收到的数据都是正确的。
- I在master中用
millis()代替delay(), - 在master中用
SerialTransfer::sendDatum()代替SerialTransfer::sendData()。前者用于流多个对象,而后者用于流单个对象。 - i将结构中的
int类型替换为uint8_t,该结构由主程序和从机发送。
。
这些值现在在Arduino Uno正确地接收到。直到上面的3点,所有的改变都没有什么区别。我保留了其他的变化,因为它们似乎对结果也很重要。下面是最终代码,用于正确地传输和接收从nodemcu主到Arduino Uno从服务器的对象。
nodemcu主
#include <Wire.h>
#include <SerialTransfer.h>

SerialTransfer masterMCU;
unsigned long tic = millis();
unsigned long toc = tic;

#define DELTA 1000

struct PAYMASTER {
  /*
  water: instruction to switch pump on or off. Note the float sensor in pump's circuit will prevent overflow.
  fan: instruction to control fan speed - LO, MED, HIGH. Note PC fan requires an int between 0 and 255.
  led: instruction to control LED brightness. Note that the FastLED library requires an int between 0 and 255.
  */
  bool water;
  uint8_t fan;
  uint8_t led;
} instructions = {
  true,
  201,
  60
};

void setup() {
  // put your setup code here, to run once:
  Serial.begin(9600);
  delay(999);
  masterMCU.begin(Serial);
  delay(999);
}

void debug() {
  Serial.print("MASTER: ");
  Serial.print(millis());
  Serial.print("   Water: ");
  Serial.print(instructions.water);
  Serial.print(", Fan: ");
  Serial.print(instructions.fan);
  Serial.print(", LED: ");
  Serial.println(instructions.led);
}

void loop() {
  // put your main code here, to run repeatedly:
  toc = millis();
  if ((toc - tic) > DELTA) {
    masterMCU.txObj(instructions, sizeof(instructions));
    masterMCU.sendDatum(instructions), sizeof(instructions);
    debug();
    tic = toc;
  }

}
Arduino Uno从
#include <Wire.h>
#include <SerialTransfer.h>
#include <SoftwareSerial.h>

SerialTransfer slaveMCU;
SoftwareSerial Extra(2, 3); // Rx: 2, Tx: 3
unsigned long tic = millis();
unsigned long toc = tic;

struct PAYMASTER {
  /*
  water: instruction to switch pump on or off. Note the float sensor in pump's circuit will prevent overflow.
  fan: instruction to control fan speed - LO, MED, HIGH. Note PC fan requires an int between 0 and 255.
  led: instruction to control LED brightness. Note that the FastLED library requires an int between 0 and 255.
  */
  bool water;
  uint8_t fan;
  uint8_t led;
} instructions;

void setup() {
  // put your setup code here, to run once:
  Serial.begin(9600);
  delay(201);
  Extra.begin(9600);
  delay(201);
  slaveMCU.begin(Extra);
  delay(201);
}

void debug() {
  Serial.print("SLAVE: ");
  Serial.print(millis());
  Serial.print("   Water: ");
  Serial.print((bool)instructions.water);
  Serial.print(", Fan: ");
  Serial.print(instructions.fan);
  Serial.print(", LED: ");
  Serial.println(instructions.led);
}

void loop() {
  // put your main code here, to run repeatedly:
  if (slaveMCU.available()) {
    slaveMCU.rxObj(instructions);
    debug();
  } else if (slaveMCU.status < 0) {
    Serial.print("ERROR: ");

    if(slaveMCU.status == -1)
      Serial.println(F("CRC_ERROR"));
    else if(slaveMCU.status == -2)
      Serial.println(F("PAYLOAD_ERROR"));
    else if(slaveMCU.status == -3)
      Serial.println(F("STOP_BYTE_ERROR"));
  }
}https://stackoverflow.com/questions/68608433
复制相似问题
腾讯云开发者

Copyright © 2013 - 2026 Tencent Cloud. All Rights Reserved. 腾讯云 版权所有
深圳市腾讯计算机系统有限公司 ICP备案/许可证号:粤B2-20090059 ![]() 粤公网安备44030502008569号
粤公网安备44030502008569号
腾讯云计算(北京)有限责任公司 京ICP证150476号 | 京ICP备11018762号