
将H1.6的列表转换为层次结构
我希望通过标记文件中的H1标记将H6列表转换为Javascript层次结构,以便在目录中使用。
当前,列表是由AstroJS以这种格式[{depth: 1, text: 'I am a H1'}, {depth: 2: 'I am a H2}]生成的。
警告
end-users.
- This列表创建的标记可能有一个根标题(
H1 -> H2 -> H3),但是
- 它可能有多个根标题(
H2 -> H3, H2 -> H3)或
- ,它可能有一个非常规的标题列表,(
H3, H2 -> H3)
- It可以跳过嵌套级别(
H1 -> H3 -> H6)
寻找Javascript或类型记录示例。
以下三个场景基于AstroJS网站正在处理的一些标记内容。
单根标题
这个标准的SEO友好标题集有一个H1和其他标题
作为标价
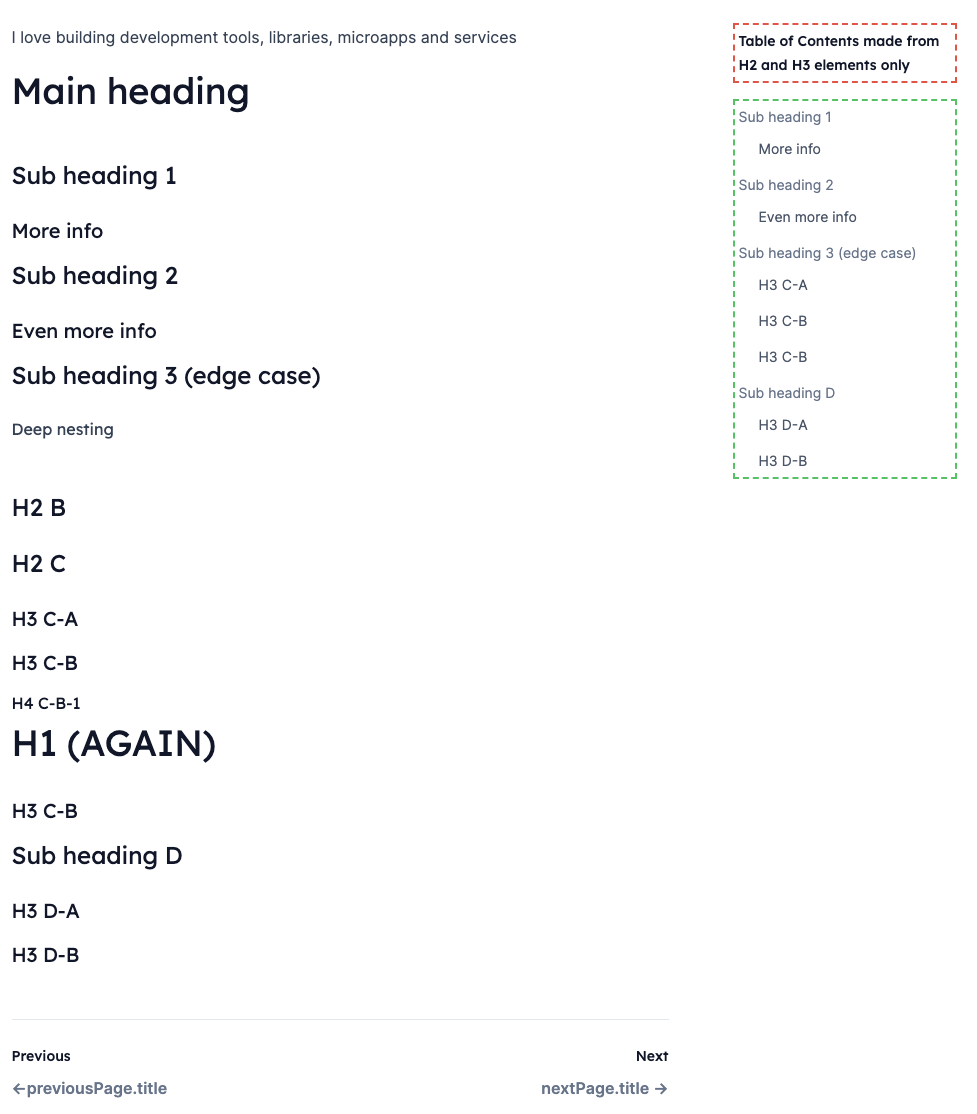
# Main heading
## Sub heading 1
### More info
## Sub heading 2
### Even more info
## Sub heading 3 (edge case)
##### Deep nesting
作为平面javascript数组
headings = [
  { depth: 1, text: 'Main heading' },
  { depth: 2, text: 'Sub heading 1' },
  { depth: 3, text: 'More info' },
  { depth: 2, text: 'Sub heading 2' },
  { depth: 3, text: 'Even more info' },
  { depth: 2, text: 'Sub heading 3 (edge case)' },
  { depth: 6, text: 'Deep nesting' },
]
作为javascript层次结构
list_of_heading_heirachies = [
  { text: 'Main heading', headings: [
    { text: 'Sub heading 1', headings: [
      { text: 'More info', headings: [] },
    ] },
    { text: 'Sub heading 2', headings: [
      { text: 'Even more info', headings: [] },
    ] },
    { text: 'Sub heading 3 (edge case)', headings: [
      { text: 'Deep nesting', headings: [] },
    ] }
  ]}
]

console.log(list_of_heading_heirachies.length);
// => 1
多根标题
这个标记(对于listicle页面来说是常见的)没有像上面这样的单个根节点,而是有多个H2s。
作为标价
## Why is it done
### Why abc
### Why xyz
## How is it done
### How reason 1
### How reason 2
#### More info
## Conclusion
作为平面javascript数组
headings = [
  { depth: 2, 'Why is it done' },
  { depth: 3, 'Why abc' },
  { depth: 3, 'Why xyz' },
  { depth: 2, 'How is it done' },
  { depth: 3, 'How reason 1' },
  { depth: 3, 'How reason 2' },
  { depth: 4, 'More info' },
  { depth: 2, 'Conclusion' }
]
作为javascript层次结构
list_of_heading_heirachies = [
  { text: 'Why is it done', headings: [
    { text: 'Why abc', headings: [] },
    { text: 'Why xyz', headings: [] },
  ] },
  { text: 'How is it done', headings: [
    { text: 'How reason 1', headings: [] },
    { text: 'How reason 2', headings: [
      { text: 'More info', headings: [] },
    ] },
  ] },
  { text: 'Conclusion', headings: [] }
]

console.log(list_of_heading_heirachies.length);
// => 3
非常规标题列表
此非常规标题列表发生在一般内容标题之前有元数据或面包屑数据时。
#### Home -> Blog -> Some Articles
### By Ben Hurr
#### 24th, Sep, 2022
# Some cool Article
## Why abc
### info on why
### more info on why
## How
### How we did it
## Conclusion
作为平面javascript数组
headings = [
  { depth: 4, text: 'Home -> Blog -> Some Articles' },
  { depth: 3, text: 'By Ben Hurr' },
  { depth: 4, text: '24th, Sep, 2022' },
  { depth: 1, text: 'Some cool Article' },
  { depth: 2, text: 'Why abc' },
  { depth: 3, text: 'info on why' },
  { depth: 3, text: 'more info on why' },
  { depth: 2, text: 'How' },
  { depth: 3, text: 'How we did it' },
  { depth: 2, text: 'Conclusion' },
]
作为javascript层次结构
list_of_heading_heirachies = [
  { text: 'Home -> Blog -> Some Articles', headings: [] },
  { text: 'By Ben Hurr', headings: [
    { text: '24th, Sep, 2022', headings: [] },
  ] },
  { text: 'Some cool Article', headings: [
    { text: 'Why abc', headings: [
      { text: 'info on why', headings: [] },
      { text: 'more info on why', headings: [] },
    ] },
    { text: 'How', headings: [
      { text: 'How we did it', headings: [] },
    ] },
    { text: 'Conclusion', headings: [] },
  ] },
]

console.log(list_of_heading_heirachies.length);
// => 3回答 2
Stack Overflow用户
发布于 2022-09-24 22:58:48
我在打字稿中解决了这个问题。
我对这门语言没有经验,虽然它工作得很好,但有更多经验的人可能能够改进这段代码。
我的目标是获取H1.6的任何列表,并将其转换为层次结构,然后筛选到最终的层次结构,以生成有用的内容表。
输出屏幕镜头
Heading.ts
export default class Heading {
  text: string;
  slug: string;
  depth: number;
  sequence: number;

  parent: Heading | null;
  headings: Heading[] | null;

  constructor(text: string, slug: string, depth: number, sequence: number) {
    this.text = text;
    this.slug = slug;
    this.depth = depth;
    this.sequence = sequence;

    this.parent = null;
    this.headings = null;
  }

  add_heading(heading: Heading) {
    heading.parent = this;
    if (this.headings === null) {
      this.headings = [];
    }
    this.headings.push(heading);
  }

  root() {
    return this.depth === 0;
  }

  valid() {
    return this.depth > 0;
  }

  data() {
    let result: any = {
      text: this.text,
      slug: this.slug,
      depth: this.depth,
      sequence: this.sequence,
      headings: this.headings?.map((h) => h.data()),
    };
    return result;
  }
}
CreateToc.ts
import Heading from './heading';

export default class CreateToc {
  toc: Heading;
  current_heading: Heading;

  constructor() {
    this.toc = new Heading("*", '-', 0, -1);
    this.current_heading = this.toc;
  }

  process(astro_headings: any[]) {
    astro_headings.forEach((astro_heading, index) => {
      let heading = new Heading(
        astro_heading.text,
        astro_heading.slug,
        astro_heading.depth,
        index
      );
      this.process_heading(heading);
    });
    return this.data();
  }

  debug() {
    console.log(JSON.stringify(this.data(), null, 2));
  }

  private data() {
    return (this.toc.headings || []).map((h) => h.data());
  }

  private process_heading(heading: Heading) {
    if (heading.depth > this.current_heading.depth) {
      this.add_child_heading(heading);
    } else if (heading.depth === this.current_heading.depth) {
      this.add_sibling_heading(heading);
    } else if (heading.depth < this.current_heading.depth) {
      this.add_upstream_heading(heading);
    }
  }

  private add_child_heading(heading: Heading) {
    this.current_heading.add_heading(heading);
    this.current_heading = heading;
  }

  private add_sibling_heading(heading: Heading) {
    if (this.current_heading!.parent === null) {
      return;
    }
    this.current_heading = this.current_heading.parent;
    this.add_child_heading(heading);
  }

  private add_upstream_heading(heading: Heading) {
    while (this.current_heading.valid() && heading.depth < this.current_heading.depth) {
      if (this.current_heading.parent === null) {
        throw new Error("current_heading.parent is null");
      }

      this.current_heading = this.current_heading.parent;
    }

    // There is no upstream heading to attach to, so just add a new root node
    if (this.current_heading.root()) {
      return this.add_child_heading(heading);
    }

    this.add_sibling_heading(heading);
  }
}
示例用法
let filterHeadings = headings
  .filter((heading) => heading.depth === 2 || heading.depth === 3)

let tocHeadings = (new CreateToc()).process(filterHeadings);
样本数据
[
  {
    "text": "Traits for data variation",
    "slug": "traits-for-data-variation",
    "depth": 2,
    "sequence": 0,
    "headings": [
      {
        "text": "User with role flag",
        "slug": "user-with-role-flag",
        "depth": 3,
        "sequence": 1
      },
      {
        "text": "Blog article in draft mode",
        "slug": "blog-article-in-draft-mode",
        "depth": 3,
        "sequence": 2
      }
    ]
  },
  {
    "text": "Enum Traits (non ActiveRecord)",
    "slug": "enum-traits-non-activerecord",
    "depth": 2,
    "sequence": 3,
    "headings": [
      {
        "text": "#traits_for_enums",
        "slug": "traits_for_enums",
        "depth": 3,
        "sequence": 4
      }
    ]
  },
  {
    "text": "Get a list of available traits",
    "slug": "get-a-list-of-available-traits",
    "depth": 2,
    "sequence": 5,
    "headings": [
      {
        "text": "#defined_traits",
        "slug": "defined_traits",
        "depth": 3,
        "sequence": 6
      }
    ]
  },
  {
    "text": "Global traits",
    "slug": "global-traits",
    "depth": 2,
    "sequence": 7
  }
]Stack Overflow用户
发布于 2022-09-27 14:27:55
这似乎是解决这个问题的很多代码。
我会将节点列表折叠成一个仍然可以添加子节点的节点数组,并按深度排序。我们从深度为0的初始节点开始。最后,我们可以简单地提取第一个节点的子节点。
如果我们不介意在您的节点上保留depth属性,这就是所需要的。如果我们真的不想要它们,那么可以用一个简单的函数来包装,这个函数可以递归地删除这些属性。
这里有一个版本:
const removeDepth = (xs) => xs .map (
  ({headings = [], depth, ...rest}) => ({...rest, headings: removeDepth(headings)})
)
const makeTree = (xs) => removeDepth (xs .reduce (
  (hs, {depth, text}) => {
    const idx = hs .findLastIndex (x => x .depth < depth)
    const node = {text, headings: [], depth}
    hs [idx] .headings .push (node)
    return [...hs.slice (0, idx + 1), node]
  },
  [{text: null, headings: [], depth: 0}]
) [0] .headings)


const singleRoot = [{depth: 1, text: 'Main heading'}, {depth: 2, text: 'Sub heading 1'}, {depth: 3, text: 'More info'}, {depth: 2, text: 'Sub heading 2'}, {depth: 3, text: 'Even more info'}, {depth: 2, text: 'Sub heading 3 (edge case)'}, {depth: 6, text: 'Deep nesting'}]
const multipleRoot = [{depth: 2, text: 'Why is it done'}, {depth: 3, text: 'Why abc'}, {depth: 3, text: 'Why xyz'}, {depth: 2, text: 'How is it done'}, {depth: 3, text: 'How reason 1'}, {depth: 3, text: 'How reason 2'}, {depth: 4, text: 'More info'}, {depth: 2, text: 'Conclusion'}]
const nonCon = [{depth: 4, text: 'Home -> Blog -> Some Articles'}, {depth: 3, text: 'By Ben Hurr'}, {depth: 4, text: '24th, Sep, 2022'}, {depth: 1, text: 'Some cool Article'}, {depth: 2, text: 'Why abc'}, {depth: 3, text: 'info on why'}, {depth: 3, text: 'more info on why'}, {depth: 2, text: 'How'}, {depth: 3, text: 'How we did it'}, {depth: 2, text: 'Conclusion'}]

console .log ('Single root: ', makeTree (singleRoot))
console .log ('Multiple root: ', makeTree (multipleRoot))
console .log ('Non-conventional headings list: ', makeTree (nonCon)).as-console-wrapper {max-height: 100% !important; top: 0}
真正的诀窍是维护当前打开的数组列表。我们维护它的方法是找到列表中的最后一个节点,其深度低于当前节点,将当前节点添加为该节点的子节点,在该节点上裁剪列表,并将当前节点添加到其中。在我们从一个示例中添加一个节点之后,这个数组是如何运行的:
//Initial list:
[
  {depth: 0, headings: [], text: null}
]

// After breadcrumbs (i.e. "Home -> Blog -> Some Articles"): (4)
[
  {depth: 0, headings: [<breadcrumbs>], text: null}
  {depth: 4, headings: [], text: "Home -> Blog -> Some Articles"}
]

// After "By Ben Hurr": (3):
[
  {depth: 0, headings: [<breadcrumbs>, <By Ben>], text: null}
  {depth: 3, headings: [], text: "By Ben Hurr"}
]


// After "24th Sept" (4):
[
  {depth: 0, headings: [<breadcrumbs>, <By Ben>], text: null}
  {depth: 3, headings: [<24th Sept>], text: "By Ben Hurr"}
  {depth: 4, headings: [], text: "24th, Sep, 2022"}
]


// After "Some Cool Article" (1):
[
  {depth: 0, headings: [<breadcrumbs>, <By Ben>, <Some Cool>], text: null}
  {depth: 1, headings: [], text: 'Some Cool Article'}
]

// After "Why ABC" (2):
[
  {depth: 0, headings: [<breadcrumbs>, <By Ben>, <Some Cool>], text: null}
  {depth: 1, headings: [<Why abc>], text: 'Some Cool Article'}
  {depth: 2, headings: [], text: 'Why abc'}
]

// ...

// Finally

// After "Conclusion" (2):
[
  {depth: 0, headings: [<breadcrumbs>, <By Ben>, <Some Cool>], text: null}
  {depth: 1, headings: [<Why abc>, <How>, <Conclusion>], text: 'Some Cool Article'}
  {depth: 2, headings: [], text: 'Conclusion'}
]
我认为这比您的方法要简单得多,但我必须承认没有仔细阅读过您的方法;对于一个有趣但不太复杂的问题来说,它的代码太多了。
https://stackoverflow.com/questions/73834414
复制相似问题
腾讯云开发者

Copyright © 2013 - 2026 Tencent Cloud. All Rights Reserved. 腾讯云 版权所有
深圳市腾讯计算机系统有限公司 ICP备案/许可证号:粤B2-20090059 ![]() 粤公网安备44030502008569号
粤公网安备44030502008569号
腾讯云计算(北京)有限责任公司 京ICP证150476号 | 京ICP备11018762号