
NSItemProvider[URL] -如何复制拖放而不是移动?
我已经实现了返回NSItemProvider的函数
func dragOutsideWnd(url: URL?) -> NSItemProvider {
    if let url = url {
        TheApp.appDelegate.hideMainWnd()

        let provider = NSItemProvider(item: url as NSSecureCoding?, typeIdentifier: UTType.fileURL.identifier as String)

        provider.suggestedName = url.lastPathComponent
        //provider.copy()// This doesn't work :)

        //DispatchQueue.main.async {
        //    TheApp.appDelegate.hideMainWnd()
        //}

        return provider
    }

    return NSItemProvider()
}
我用这个方法:
.onDrag {
   return dragOutsideWnd(url: itm.url)
}此拖放操作执行文件移动操作到查找器/HDD.的任何位置。
但是如何执行复制操作呢?
回答 2
Stack Overflow用户
发布于 2022-09-20 11:58:13
记住,拖放实际上是用NSPasteboard实现的。
我给你写了一个例子:GitHub
现在,你问题的关键是:
控制拖动行为的(您的窗口是源):
可拖放对象符合NSDraggingSource协议,因此请检查该协议的第一个方法:
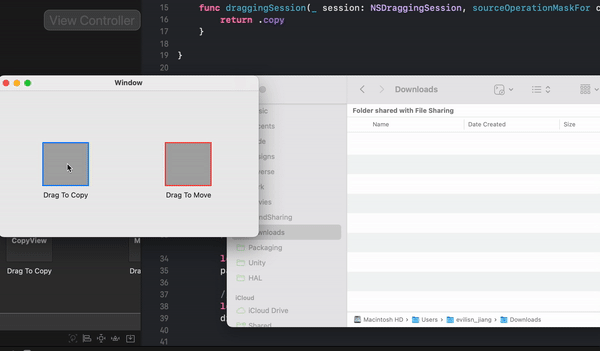
@MainActor func draggingSession(
    _ session: NSDraggingSession,
    sourceOperationMaskFor context: NSDraggingContext
) -> NSDragOperation正如方法文档所建议的,在这个委托方法中返回不同的NSDragOperation。包括:“复制”、“移动”、“链接”等。
控制删除行为的(您的窗口是目标):
接受drop的NSView符合NSDraggingDestination协议,因此需要通过在NSDraggingDestination类实现中添加以下代码来重写draggingEntered(_:)方法:
override func draggingEntered(_ sender: NSDraggingInfo) -> NSDragOperation
{
   var allow = true
   //.copy .move, see more options in NSDragOperation, up to you.
   return allow ? .copy : NSDragOperation()
}更多信息来自苹果的文档
对于swiftUI,一个简单的演示案例SwiftUI展示会
深度阅读:RayWenderlich.com为您提供了详细的教程macOS的拖放教程教程(需要快速升级)。
Stack Overflow用户
发布于 2022-09-21 14:11:00
非常感谢你的回答!
以下解决方案适用于swiftUI:
import Foundation
import SwiftUI

extension View {
    func asDragable(url: URL, tapAction: @escaping () -> () , dTapAction: @escaping () -> ()) -> some View {
        self.background {
            DragDropView(url: url, tapAction: tapAction, dTapAction: dTapAction)
        }
    }
}

struct DragDropView: NSViewRepresentable  {
    let url: URL
    let tapAction: () -> ()
    let dTapAction: () -> ()

    func makeNSView(context: Context) -> NSView {
        return DragDropNSView(url: url, tapAction: tapAction, dTapAction: dTapAction)
    }

    func updateNSView(_ nsView: NSView, context: Context) { }
}

class DragDropNSView: NSView, NSDraggingSource  {
    let url: URL
    let tapAction: () -> ()
    let dTapAction: () -> ()

    let imgMove: NSImage = NSImage(named: "arrow.down.doc.fill_cust")!

    init(url: URL, tapAction: @escaping () -> (), dTapAction: @escaping () -> ()) {
        self.url = url
        self.tapAction = tapAction
        self.dTapAction = dTapAction

        super.init(frame: .zero)
    }

    required init?(coder: NSCoder) {
        fatalError("init(coder:) has not been implemented")
    }

    func draggingSession(_ session: NSDraggingSession, sourceOperationMaskFor context: NSDraggingContext) -> NSDragOperation {
        return mustBeMoveAction ? .move : .copy
    }
}

extension DragDropNSView: NSPasteboardItemDataProvider {
    func pasteboard(_ pasteboard: NSPasteboard?, item: NSPasteboardItem, provideDataForType type: NSPasteboard.PasteboardType) {
        // If the desired data type is fileURL, you load an file inside the bundle.
        if let pasteboard = pasteboard, type == NSPasteboard.PasteboardType.fileURL {
            pasteboard.setData(url.dataRepresentation, forType:type)
        }
    }

    override func mouseDown(with event: NSEvent) {
        super.mouseDown(with: event)

        tapAction()

        if event.clickCount == 2 {
            dTapAction()
        }
    }

    override func mouseDragged(with event: NSEvent) {
        //1. Creates an NSPasteboardItem and sets this class as its data provider. A NSPasteboardItem is the box that carries the info about the item being dragged. The NSPasteboardItemDataProvider provides data upon request. In this case a file url
        let pasteboardItem = NSPasteboardItem()
        pasteboardItem.setDataProvider(self, forTypes: [NSPasteboard.PasteboardType.fileURL])

        var rect = imgMove.alignmentRect
        rect.size = NSSize(width: imgMove.size.width/2, height: imgMove.size.height/2)

        //2. Creates a NSDraggingItem and assigns the pasteboard item to it
        let draggingItem = NSDraggingItem(pasteboardWriter: pasteboardItem)

        draggingItem.setDraggingFrame(rect, contents: imgMove) // `contents` is the preview image when dragging happens.

        //3. Starts the dragging session. Here you trigger the dragging image to start following your mouse until you drop it.
        beginDraggingSession(with: [draggingItem], event: event, source: self)
    }
}

////////////////////////////////////////
///HELPERS
///////////////////////////////////////
extension DragDropNSView {
    var dragGoingOutsideWindow: Bool {
        guard let currEvent = NSApplication.shared.currentEvent else { return false }

        if let rect = self.window?.contentView?.visibleRect,
           rect.contains(currEvent.locationInWindow)
        {
            return false
        }

        return true
    }

    var mustBeMoveAction: Bool {
        guard let currEvent = NSApplication.shared.currentEvent else { return false }

        if currEvent.modifierFlags.check(equals: [.command]) {
            return true
        }

        return false
    }
}

extension NSEvent.ModifierFlags {
    func check(equals: [NSEvent.ModifierFlags] ) -> Bool {
        var notEquals: [NSEvent.ModifierFlags] = [.shift, .command, .control, .option]

        equals.forEach{ val in notEquals.removeFirst(where: { $0 == val }) }

        var result = true

        equals.forEach{ val in
            if result {
                result = self.contains(val)
            }
        }

        notEquals.forEach{ val in
            if result {
                result = !self.contains(val)
            }
        }

        return result
    }
}
用法:
FileIcon()
.asDragable( url: recent.url, tapAction: {}, dTapAction: {})此元素将是可拖动的,并在按下MOVE键时执行.command。
并在另一种情况下执行COPY。
此外,它只执行拖动行动以外的宽度。但这很容易改变。
https://stackoverflow.com/questions/73754718
复制相似问题
腾讯云开发者

Copyright © 2013 - 2026 Tencent Cloud. All Rights Reserved. 腾讯云 版权所有
深圳市腾讯计算机系统有限公司 ICP备案/许可证号:粤B2-20090059 ![]() 粤公网安备44030502008569号
粤公网安备44030502008569号
腾讯云计算(北京)有限责任公司 京ICP证150476号 | 京ICP备11018762号