
16位拜耳编码原始图像的Debayering
16位拜耳编码原始图像的Debayering
提问于 2022-09-11 19:45:10
我有拜耳编码(RGGB)的图像,每个像素都是16位。当我解压字节文件并读取图像时,它看起来是绿色的。我想知道接下来我应该应用什么图像处理步骤。1200×1648,每像素16位
我试过使用简单的图像删除器和彩色去色库,但是结果我得到了一个白色的图像。
代码的主要区域(我的怀疑点)在if(带== 1)中。我无法产生正确的彩色图像。我看到一个绿色的形象,我相信这是因为RGGB的终审法院。
指向图像的链接是:1100LMA02.IMG
image_path = "ZL0_0206_0685235537_613RAD_N0071836ZCAM08234_1100LMA02.IMG"

import os
import requests
from bs4 import BeautifulSoup
import struct
import numpy as np
import cv2
import matplotlib.pyplot as plt
import re
import os
import shutil
import time

import colour
from colour_demosaicing import demosaicing_CFA_Bayer_Malvar2004,demosaicing_CFA_Bayer_Menon2007

#############  convert image to png  #############

def readHeader(file):
    # print("Calling readHeader")
    f = open(file,'rb')
    continuing = 1
    count = 0

    h_bytes = -1
    h_lines = -1
    h_line_samples = -1
    h_sample_type = 'UNSET' #MSB_INTEGER, IEEE_REAL
    h_sample_bits = -1
    h_bands = -1
    while continuing == 1:
        line = f.readline()
        count = count + 1
        arr = str(line, 'utf8').split("=")
        arr[0] = str(arr[0]).strip()
        if 'BYTES' == arr[0] and len(arr[0])>1:
            h_bytes=int(str(arr[1]).strip())
        elif 'LINES' == arr[0] and len(arr[0])>1:
            h_lines=int(str(arr[1]).strip())
        elif 'LINE_SAMPLES' == arr[0] and len(arr[0])>1:
            h_line_samples=int(str(arr[1]).strip())
        elif 'SAMPLE_TYPE' == arr[0] and len(arr[0])>1:
            h_sample_type=str(arr[1]).strip()
        elif 'SAMPLE_BITS' == arr[0] and len(arr[0])>1:
            h_sample_bits = int(str(arr[1]).strip())
        elif 'BANDS' == arr[0] and len(arr[0])>1:
            h_bands=int(str(arr[1]).strip())
        if (line.endswith(b'END\r\n') or count>600):
            continuing = 0
    f.close()
    return h_bytes, h_lines,h_line_samples,h_sample_type,h_sample_bits,h_bands

def readImage(file, pixelbytes, sample_type,sample_bits, lines, line_samples, bands):
    # print("Calling Read image")
    f = open(file,'rb')
    filesize = os.fstat(f.fileno()).st_size
    h_bytes = filesize - pixelbytes
    f.seek(h_bytes) # skip past the header bytes

    fmt = '{endian}{pixels}{fmt}'.format(endian='>', pixels=lines*line_samples*bands, fmt=getFmt(sample_type,sample_bits))

    if (bands==3):
        print(pixelbytes,lines,line_samples,fmt)
        img = np.array(struct.unpack(fmt,f.read(pixelbytes))).reshape(bands,lines,line_samples)
        print(img)
        m = np.max(np.max(img, axis=1))
        img = np.clip(img/m,0,1) #normalize and clip so values are between 0 and 1
        img = np.stack([img[0,:,:],img[1,:,:],img[2,:,:]],axis=2)
        # print(img.shape)

    elif (bands==1):
        print(pixelbytes,lines,line_samples,fmt)
        img = np.array(struct.unpack(fmt,f.read(pixelbytes))).reshape(lines,line_samples)
        # data = np.fromfile(f, np.uint8, line_samples * lines * 3//2)
        # data = data.astype(np.uint16)  # Cast the data to uint16 type.
        # result = np.zeros(data.size*2//3, np.uint16)
        # img = np.array(struct.unpack(fmt,f.read(pixelbytes))).reshape(lines,line_samples)
        # result[0::2] = ((data[1::3] & 15) << 8) | data[0::3]
        # result[1::2] = (data[1::3] >> 4) | (data[2::3] << 4)
        # bayer_im = np.reshape(result, (lines, line_samples))
        img = cv2.cvtColor(np.uint16(img), cv2.COLOR_BAYER_BG2BGR)

    return img
    # return img


# fmtMap - converts sample_type from header to python format fmt.
def getFmt(sample_type, samplebits):
    # print("Calling getFM funtion")
    if (sample_type=='IEEE_REAL'):
        return 'f'
    elif (sample_type=='MSB_INTEGER'):
        return 'H'
    elif (sample_type=='UNSIGNED_INTEGER'):
        return 'B'
    else:
        return 'X'


def convert_to_png(sol_folder_path):

  hbytes,hlines,hline_samples,hsample_type,hsample_bits,hbands = readHeader(full_path)
  numpixels = hlines * hline_samples * hbands
  pixelbytes = numpixels*hsample_bits//8 # // is for integer division

  img = readImage(full_path, pixelbytes, hsample_type,hsample_bits, hlines, hline_samples, hbands)
plt.imsave('debayer_test.png',np.uint8(img))回答 1
Stack Overflow用户
发布于 2022-09-11 21:05:31
拜耳马赛克格式的原始图像是“单波段”图像。
采用除藻算法后,输出为3路彩色通道图像。
跳过头后,我们可以读取原始数据,并在几个步骤中应用演示:
- 读取原始数据字节(1200 * 1648 *2字节): data =f.read(像素字节)
- 将数据字节转换为
uint16NumPy数组并将其重塑为图像维度: img = np.frombuffer(data,np.uint16).reshape(line,line_samples) - 通过交换每个大端元素的高字节和低字节将从
uint16转换为小endian格式(因为输入格式是大端字节): img = (img >> 8) + (img << 8) - 使用OpenCV
cvtColor方法(从拜耳转换为BGR)应用去噪: img = cv2.cvtColor(img,cv2.COLOR_BAYER_BG2BGR)
作为“奖励”,我添加了伽马校正 (使用标准的sRGB伽马传递函数)。
在应用伽玛校正(或不进行伽马校正)后,我们可以将结果转换为uint8类型并保存为PNG。
为了将uint16转换为uint8,我们可以通过255/(2**16-1)进行扩展。
代码示例:
import os
import numpy as np
import cv2

def readHeader(file):
    # print("Calling readHeader")
    f = open(file,'rb')
    continuing = 1
    count = 0

    h_bytes = -1
    h_lines = -1
    h_line_samples = -1
    h_sample_type = 'UNSET' #MSB_INTEGER, IEEE_REAL
    h_sample_bits = -1
    h_bands = -1
    while continuing == 1:
        line = f.readline()
        count = count + 1
        arr = str(line, 'utf8').split("=")
        arr[0] = str(arr[0]).strip()
        if 'BYTES' == arr[0] and len(arr[0])>1:
            h_bytes=int(str(arr[1]).strip())
        elif 'LINES' == arr[0] and len(arr[0])>1:
            h_lines=int(str(arr[1]).strip())
        elif 'LINE_SAMPLES' == arr[0] and len(arr[0])>1:
            h_line_samples=int(str(arr[1]).strip())
        elif 'SAMPLE_TYPE' == arr[0] and len(arr[0])>1:
            h_sample_type=str(arr[1]).strip()
        elif 'SAMPLE_BITS' == arr[0] and len(arr[0])>1:
            h_sample_bits = int(str(arr[1]).strip())
        elif 'BANDS' == arr[0] and len(arr[0])>1:
            h_bands=int(str(arr[1]).strip())
        if (line.endswith(b'END\r\n') or count>600):
            continuing = 0
    f.close()
    return h_bytes, h_lines,h_line_samples,h_sample_type,h_sample_bits,h_bands


def readImage(file, pixelbytes, sample_type,sample_bits, lines, line_samples, bands):
    f = open(file,'rb')
    filesize = os.fstat(f.fileno()).st_size
    h_bytes = filesize - pixelbytes
    f.seek(h_bytes) # skip past the header bytes

    # Assume bands = 1
    print(pixelbytes, lines, line_samples)

    data = f.read(pixelbytes)  # Read raw data bytes
    img = np.frombuffer(data, np.uint16).reshape(lines, line_samples)  # Convert to uint16 NumPy array and reshape to image dimensions.
    img = (img >> 8) + (img << 8)  # Convert from big endian to little endian

    img = cv2.cvtColor(img, cv2.COLOR_BAYER_BG2BGR)  # Apply demosaicing (convert from Bayer to BGR).

    return img


def lin2rgb(im):
    """ Convert im from "Linear sRGB" to sRGB - apply Gamma. """
    # sRGB standard applies gamma = 2.4, Break Point = 0.00304 (and computed Slope = 12.92)
    # lin2rgb MATLAB functions uses the exact formula [we may approximate it to power of (1/gamma)].
    g = 2.4
    bp = 0.00304
    inv_g = 1/g
    sls = 1 / (g/(bp**(inv_g - 1)) - g*bp + bp)
    fs = g*sls / (bp**(inv_g - 1))
    co = fs*bp**(inv_g) - sls*bp

    srgb = im.copy()
    srgb[im <= bp] = sls * im[im <= bp]
    srgb[im > bp] = np.power(fs*im[im > bp], inv_g) - co
    return srgb


def convert_to_png(full_path):
    hbytes, hlines, hline_samples, hsample_type, hsample_bits, hbands = readHeader(full_path)
    numpixels = hlines * hline_samples * hbands
    pixelbytes = numpixels*hsample_bits//8 # // is for integer division

    img = readImage(full_path, pixelbytes, hsample_type,hsample_bits, hlines, hline_samples, hbands)

    # Apply gamma correction, and convert to uint8
    img_in_range_0to1 = img.astype(np.float32) / (2**16-1)  # Convert to type float32 in range [0, 1] (before applying gamma correction).
    gamma_img = lin2rgb(img_in_range_0to1)
    gamma_img = np.round(gamma_img * 255).astype(np.uint8)  # Convert from range [0, 1] to uint8 in range [0, 255].

    cv2.imwrite('gamma_img.png', gamma_img)  # Save image after demosaicing and gamma correction.

    # Show the uint16 image and gamma_img for testing
    cv2.imshow('img', img)
    cv2.imshow('gamma_img', gamma_img)
    cv2.waitKey()
    cv2.destroyAllWindows()


image_path = "ZL0_0206_0685235537_613RAD_N0071836ZCAM08234_1100LMA02.IMG"

convert_to_png(image_path)
产出(缩小规模):
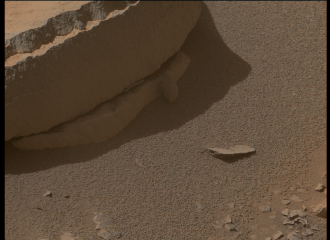
颜色可能不完美..。
当应用原始图像处理时,有很多“颜色科学”(为获得正确的颜色),但主题超出了问题的范围。
页面原文内容由Stack Overflow提供。腾讯云小微IT领域专用引擎提供翻译支持
原文链接:
https://stackoverflow.com/questions/73682222
复制相关文章
相似问题
腾讯云开发者

Copyright © 2013 - 2026 Tencent Cloud. All Rights Reserved. 腾讯云 版权所有
深圳市腾讯计算机系统有限公司 ICP备案/许可证号:粤B2-20090059 ![]() 粤公网安备44030502008569号
粤公网安备44030502008569号
腾讯云计算(北京)有限责任公司 京ICP证150476号 | 京ICP备11018762号