
更改按钮的位置
更改按钮的位置
提问于 2022-04-21 06:11:19
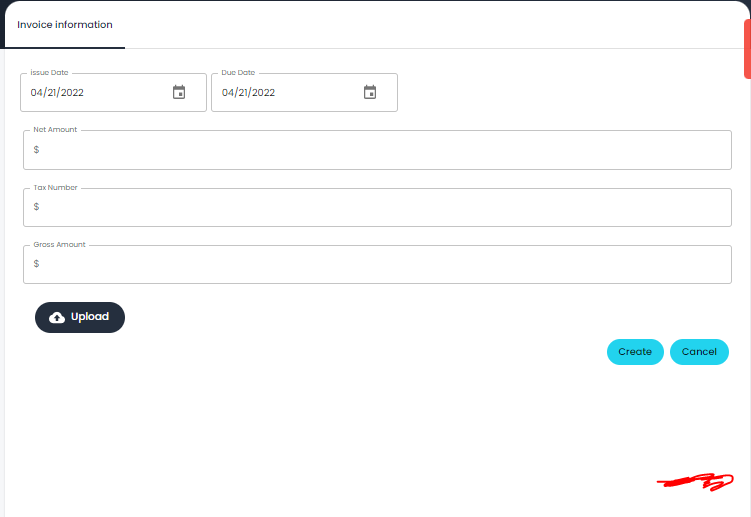
我有一个项目,在这个项目中,除了两个按钮之外,我还有一个包含几个字段的界面,第一个是“创建”,第二个是“取消”,在图片中很明显,在后面的两个按钮,但我希望这两个按钮位于用红色书写的区域。
我怎么能这么做?
而且接口的文件很大,所以我只使用编写这两个按钮的方法。
main.js:
        <div className="p-16 sm:p-24 max-w-2xl ">
            <div className={tabValue !== 0 ? "hidden" : ""}>
              <ShippingTab />
            </div>
          </div>
shipping.js:
import React, { useState } from "react";
import InputAdornment from "@material-ui/core/InputAdornment";
import TextField from "@material-ui/core/TextField";
import Grid from "@material-ui/core/Grid";
import "date-fns";
import DateFnsUtils from "@date-io/date-fns";
import {
  KeyboardDatePicker,
  MuiPickersUtilsProvider,
  DatePicker,
} from "@material-ui/pickers";
import { makeStyles } from "@material-ui/core/styles";
import Button from "@material-ui/core/Button";
import CloudUploadIcon from "@material-ui/icons/CloudUpload";
import { addInvoice } from "../../../store/invoiceSlice";
import { motion } from "framer-motion";
import { useDispatch } from "react-redux";
import "react-datepicker/dist/react-datepicker.css";
import Slide from "@material-ui/core/Slide";
import { useSnackbar } from "notistack";

const useStyles = makeStyles((theme) => ({
  root: {
    "& > *": {
      margin: theme.spacing(1),
    },
  },
  input: {
    display: "none",
  },
  button: {
    margin: theme.spacing(1),
    // padding: theme.spacing(4),
  },
}));

function ShippingTab(props) {
  const dispatch = useDispatch();
  const classes = useStyles();
  const [issueDate, setIssueDate] = useState(new Date());
  const [dueDate, setDueDate] = useState(new Date());
  const [netAmount, setNetAmount] = useState("");
  const [taxNumber, setTaxNumber] = useState("");
  const [grossAmount, setGrossAmount] = useState("");
  const [file, setFile] = useState(null);

  const { enqueueSnackbar, closeSnackbar } = useSnackbar();

  const handleUploadPDFFileMessageClick = () => {
    enqueueSnackbar(
      "PDF file has been uploaded successfully",
      { variant: "success" },
      {
        anchorOrigin: {
          vertical: "top",
          horizontal: "right",
        },
      },
      { TransitionComponent: Slide }
    );
  };

  const handleCreateInvoiceMessageClick = () => {
    enqueueSnackbar(
      "Invoice created successfully",
      { variant: "success" },
      {
        anchorOrigin: {
          vertical: "top",
          horizontal: "right",
        },
      },
      { TransitionComponent: Slide }
    );
  };
  const fileSelectedHandler = (event) => {
    console.log(event.target.files[0]);
    const file = event.target.files[0];

    if (event.target && file) {
      // formData.append("invoice", file);
      setFile(file);
    }
  };
  const uploadHandler = (event) => {
    const formData = new FormData();
    formData.append("grossAmount", grossAmount);
    formData.append("taxNumber", taxNumber);
    formData.append("netAmount", netAmount);
    formData.append("issueDate", issueDate);
    formData.append("dueDate", dueDate);
    formData.append("invoice", file);

    console.log(
      " invoice grossAmount,taxNumber,netAmount,",
      file,
      grossAmount,
      taxNumber,
      netAmount
    );
    console.log("dueDate,issueDate: ", dueDate, issueDate);
    // call api
    dispatch(addInvoice(formData));
  };

  const handleissueDateChange = (date) => {
    setIssueDate(date);
    console.log("date issssssssss: ", date);
    console.log("date issssssssss: ", issueDate);
  };

  const handleDueDateChange = (date) => {
    setDueDate(date);
  };

  const handleNetAmountChange = (event) => {
    setNetAmount(event.target.value);
  };

  const handleTaxAmountChange = (event) => {
    setTaxNumber(event.target.value);
  };

  const handleGrossAmountChange = (event) => {
    setGrossAmount(event.target.value);
  };
  return (
    <>
      <MuiPickersUtilsProvider utils={DateFnsUtils}>
        <div className="flex -mx-4">
          <KeyboardDatePicker
            inputVariant="outlined"
            className="mt-8 mb-16"
            margin="normal"
            id="date-picker-dialog"
            label="issue Date"
            format="MM/dd/yyyy"
            KeyboardButtonProps={{
              "aria-label": "change date",
            }}
            value={issueDate}
            onChange={handleissueDateChange}
          />

          <KeyboardDatePicker
            inputVariant="outlined"
            className="mt-8 mb-16 ml-6"
            margin="normal"
            id="date-picker-dialog"
            label="Due Date"
            format="MM/dd/yyyy"
            KeyboardButtonProps={{
              "aria-label": "change date",
            }}
            value={dueDate}
            onChange={handleDueDateChange}
          />
        </div>
      </MuiPickersUtilsProvider>
      <TextField
        className="mt-8 mb-16"
        label="Net Amount"
        id="extraShippingFee"
        variant="outlined"
        InputProps={{
          startAdornment: <InputAdornment position="start">$</InputAdornment>,
        }}
        value={netAmount}
        onChange={handleNetAmountChange}
        fullWidth
      />

      <TextField
        className="mt-8 mb-16"
        label="Tax Number"
        id="extraShippingFee"
        variant="outlined"
        InputProps={{
          startAdornment: <InputAdornment position="start">$</InputAdornment>,
        }}
        value={taxNumber}
        onChange={handleTaxAmountChange}
        fullWidth
      />

      <TextField
        className="mt-8 mb-16"
        label="Gross Amount"
        id="extraShippingFee"
        variant="outlined"
        InputProps={{
          startAdornment: <InputAdornment position="start">$</InputAdornment>,
        }}
        value={grossAmount}
        onChange={handleGrossAmountChange}
        fullWidth
      />

      <div className={classes.root}>
        <input
          accept="application/pdf"
          className={classes.input}
          id="contained-button-file"
          // multiple
          type="file"
          onChange={fileSelectedHandler}
        />
        <label htmlFor="contained-button-file">
          <Button
            variant="contained"
            color="primary"
            size="large"
            component="span"
            className={classes.button}
            startIcon={<CloudUploadIcon />}
          >
            {/* <Button variant="contained" color="primary" component="span"> */}{" "}
            Upload
          </Button>

          {/* </Button> */}
        </label>
      </div>

      <motion.div
        initial={{ opacity: 0, x: 20 }}
        animate={{ opacity: 1, x: 0, transition: { delay: 0.3 } }}
      >
        <Grid
          container
          direction="row-reverse"
          justifyContent="flex-start"
          alignItems="flex-end"
        >
          <Grid item>
            <Button
              className="whitespace-nowrap mx-4"
              variant="contained"
              color="secondary"
              // onClick={handleRemoveProduct}
            >
              Cancel
            </Button>
          </Grid>
          <Grid item>
            <Button
              className="whitespace-nowrap mx-4"
              variant="contained"
              color="secondary"
              // disabled={_.isEmpty(dirtyFields) || !isValid}

              onClick={(ev) => {
                uploadHandler();
                ev.stopPropagation();
                handleCreateInvoiceMessageClick(ev);
              }}
            >
              Create
            </Button>
          </Grid>
        </Grid>
      </motion.div>
    </>
  );
}

export default ShippingTab;回答 2
Stack Overflow用户
回答已采纳
发布于 2022-04-21 08:37:19
您可以使用flex和height: 100%将两个按钮对齐到左侧底部。
- 从
motion.div向上的两个按钮的父母,包括html和body,都需要有100%高度。
。
- 包含按钮和
motion.div的grid需要有flex-grow:1,这样它们才能占用各自容器中的所有空闲空间。
html,
body {
  height: 100%;
}

div.container {
  height: 100%;
  display: flex;
  flex-direction: column;
}

section.red {
  background: red;
  padding: 5rem 0
}

section.blue {
  background: blue;
  padding: 5rem 0
}

section.green {
  background: green;
  flex-grow: 1;
  display: flex;
}

section.green>div {
  height: 100%;
  width: 100%;
  display: flex;
  flex-direction: column;
}

section.left {
  flex-grow: 1;
  display: flex;
  justify-content: flex-end;
  align-items: flex-end;
}

button {
  padding: 1rem 2rem;
}<div class="container">
<section class="red"></section>
<section class="blue"></section>
<section class="green">
<div>
<section class="right">
<button>Right</button>
</section>
<section class="left">
<button>One</button>
<button>TWO</button>
</section>
</div>
</section>
</div>
如果ShippingTab有太多的父级,那么很难将100%高度设置在它的所有父级上。在这种情况下,您绝对可以将其放置在body或其最近的具有/可以具有100%高度的relative容器中。
Stack Overflow用户
发布于 2022-04-21 08:10:07
父元素是一个flex元素,所以尝试子元素上的margin-top: auto; (按钮或其容器)
页面原文内容由Stack Overflow提供。腾讯云小微IT领域专用引擎提供翻译支持
原文链接:
https://stackoverflow.com/questions/71949692
复制相关文章
相似问题
腾讯云开发者

Copyright © 2013 - 2026 Tencent Cloud. All Rights Reserved. 腾讯云 版权所有
深圳市腾讯计算机系统有限公司 ICP备案/许可证号:粤B2-20090059 ![]() 粤公网安备44030502008569号
粤公网安备44030502008569号
腾讯云计算(北京)有限责任公司 京ICP证150476号 | 京ICP备11018762号