【Vue】脚手架 && vue常用指令
原创

Ⅰ. 脚手架
一、Vue开发方式
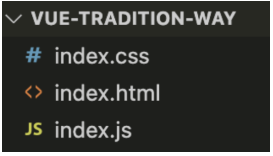
1. 传统开发模式
举个例子:
<script src="https://unpkg.com/vue@3/dist/vue.global.js"></script>
<script>
  Vue.createApp({
    setup() {
      const msg = 'Hello World'
      return { msg }
    }
  }).mount('#app')
</script>
判断是否为传统写法的依据:
- 是否使用
new Vue()new Vue({...})是 Vue 2 的标准写法,也是 "全局 Vue 对象 + 根实例" 的模式。- 现代 Vue 3 项目里,一般不会直接用
new Vue(),而是用createApp(App)来创建应用实例。
- 是否在 CDN 环境下
- 如果你直接在浏览器里
<script src="https://cdn.jsdelivr.net/.../vue.js"></script>然后写new Vue({...}),通常就是快速 demo / 教学 / 小型页面,不使用模块化打包工具。
- 如果你直接在浏览器里
- 语法风格
- 使用
data+methods+Vue.set这种选项式 API,也属于传统开发模式。 - 现代 Vue 3 推荐使用 组合式 API +
<script setup>,不需要Vue.set,逻辑可拆分为可复用的 composable 函数。
- 使用
- 优点:简单、上手快
- 缺点:功能单一、开发体验差
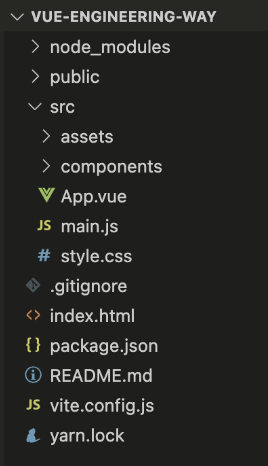
2. 工程化开发模式
import { createApp, ref } from 'vue'
import App from './App.vue'

createApp(App).mount('#app')
在构建工具(Vite/Webpack)环境下开发 Vue,这是最推荐的、也是企业采用的方式。其中 App.vue 是一个单文件组件(SFC),会被构建工具编译成 JS 模块。
- 优点:
- 功能全面
- 开发体验好
- ...
- 缺点:
- 目录结构复杂
- 理解难度提升
特点 | 学习版(CDN) | 模块化(ES Module) |
|---|---|---|
适用场景 | 快速演示、小项目 | 现代大型项目 |
引入方式 | <script src="vue.js"> | import { createApp } from 'vue' |
组件写法 | 直接写在 createApp({ setup(){...} }) | 单文件组件 .vue,逻辑写在 setup() |
推荐度 | 初学者 | 实战项目 |
二、准备工程化环境
1. 安装 Nodejs
官网:https://nodejs.org/en/
node -v
npm -v
npm换源:
// 查看 npm 源
npm config get registry
// 默认是指向 https://registry.npmjs.org/,也就是官方源

// 为了提高npm下载速度, 可以给npm换源
// 国内源有很多,我这里用淘宝源吧。毕竟是大公司,会比较稳定
npm config set registry https://registry.npmmirror.com

// 再一次查看 npm 源
npm config get registry
2. 安装 yarn 或 pnpm
yarn 和 pnpm、还有 npm三者的功能类似,都是包管理工具,用来下载或删除模块包,性能上 yarn 和 pnpm 优于 npm。
# windows系统
npm install yarn -g
npm install pnpm -g
___________________________________
# mac系统
sudo npm install yarn -g
sudo npm install pnpm -g
检测是否安装成功:
yarn -v
pnpm -v
三、创建Vue工程化项目
- 选定一个存放位置,比如选择桌面,根据自己情况,选择D盘或E盘等
- 执行命令
npm create vue@latest,会安装并执行 create-vue,它是 Vue 官方的项目脚手架工具 - 进入项目根目录:
cd 项目名称 - 安装 vue 等模块依赖:
npm i - 启动项目:
npm run dev,会开启一个本地服务器 - 浏览器网址栏输入:http://localhost:5173
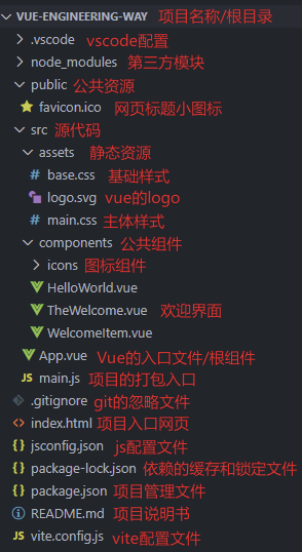
四、认识脚手架目录及文件
五、分析3个入口文件的关系
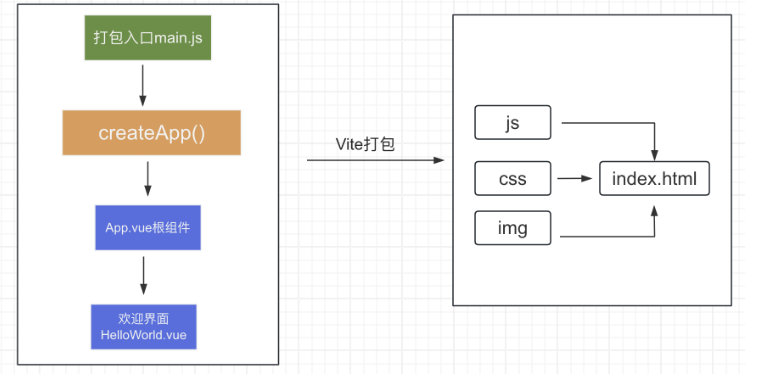
main.js:整个项目打包的入口,用于创建应用,是 Vue 代码通向网页代码的桥梁App.vue:Vue 代码的入口(根组件)index.html:项目入口网页
六、Vue单文件
- vue 推荐采用
.vue的文件来开发项目 - 一个 vue 文件通常有3部分组成,
script(JS)+template(HTML)+style(CSS) - 一个 vue 文件是独立的模块,作用域互不影响
- style 部分通常配合
scoped属性,保证样式只针对当前template内的标签生效 - vue 文件会被
vite打包成 js、css 等,最终交给 index.html 通过浏览器呈现效果
七、setup简写 + 插值表达式 + 响应式
1. 传统写法
<script>
    export default {
      setup() {
        // ...
        const msg = 'Hello Vue3+Vite'
        return {
          msg
        }
      }
    }
</script>

<template>
  <h1>{{ msg }}</h1>
</template>

<style></style>
2. 现代写法(推荐)
<script setup>
    const msg = 'Hello Vue3+Vite'
</script>

<template>
    <h1>{{ msg }}</h1>
</template>

<style></style>
3. 代码示例
<script setup>
    // 导入响应式函数
    import { reactive, ref } from 'vue'
    // 字符串
    const msg = ref('Hello Vue3+Vite')
    // 对象
    const obj = reactive({
      name: '小vue',
      age: 9
    })
    // 函数
    function fn() {
      return 100
    }
</script>
<template>
  <!-- 1. 直接放变量 -->
  <h1>{{ msg }}</h1>

  <!-- 2. 对象.属性 -->
  <p>我叫 {{ obj.name }}, 今年 {{ obj.age }} 岁</p>

  <!-- 3. 三元表达式 -->
  <p>{{ obj.age >= 18 ? '已成年' : '未成年' }}</p>

  <!-- 3. 算数运算 -->
  <p>来年我就 {{ obj.age + 1 }} 岁了</p>

  <!-- 4. 函数的调用 -->
  <p>fn的返回值是: {{ fn() }}</p>

  <!-- 4. 方法的调用 -->
  <p>{{ msg }} 中含有 {{ msg.split(' ').length }} 个单词</p>
</template>
Ⅱ. 指令
一、Vue中的常用指令
指令是 Vue 提供的带有 v- 前缀的特殊标签属性,用来增强标签、提高标签数据渲染的能力。vue3 中的指令按照不同的用途可以分为如下六大类:
- 内容渲染指令(v-html、v-text)
- 属性绑定指令(v-bind)
- 事件绑定指令(v-on)
- 条件渲染指令(v-show、v-if、v-else、v-else-if)
- 列表渲染指令(v-for)
- 双向绑定指令(v-model)
二、内容渲染指令:v-html && v-text
作用:辅助开发者渲染 DOM 元素的文本内容。
v-text(类似innerText)- 类似 innerText,使用该语法,只会覆盖 p 标签原有内容,不会解析标签。
v-html(类似innerHTML)- 类似 innerHTML,使用该语法,不仅会覆盖 p 标签原有内容,还能够将 HTML 标签的样式呈现出来。
代码示例:
<script setup>
    import { ref } from 'vue'
    const str = ref('<span style="color:red;">Hello Vue3+Vite</span>')
</script>
<template>
  <div>
    <p v-text="str"></p>
    <p v-html="str"></p>
  </div>
</template>
<style scoped></style>
三、属性绑定指令:v-bind
作用:把表达式的结果与标签的属性动态绑定。
语法如下所示:
v-bind:属性名="表达式"- 可简写成
:属性名="表达式"代码实例:
<script setup>
    import { ref } from 'vue'
    const url = ref('http://www.baidu.com')
</script>
<template>
  <div>
    <!-- v-bind: 标签属性动态绑定 -->
    <a v-bind:href="url">百度一下</a>

    <!-- 简写 -->
    <a :href="url">百度一下</a>
  </div>
</template>四、事件绑定指令:v-on
作用:给元素绑定事件。
有三种不同语法,以给按钮添加点击事件为例:
<button v-on:事件名="内联语句">按钮</button>
<button v-on:事件名="处理函数">按钮</button>
<button v-on:事件名="处理函数(实参列表)">按钮</button>v-on:可以简写为@- 处理函数需要在
<script>下声明
代码示例:
<script setup>
    import { ref } from 'vue'

    // 响应式数据 计数器
    const count = ref(0)

    // 无参函数
    const increase = () => {
      count.value++
    }

    // 有参函数
    const add = (n) => {
      count.value +=n
    }
</script>
<template>
  <div>
    <p>{{ count }}</p>
    <!-- 1. 内联语句 -->
    <button v-on:click="count++">+1</button>

    <!-- 2. 调用无参函数 -->
    <button v-on:click="increase">+1</button>

    <!-- 3. 调用有参函数 -->
    <button v-on:click="add(3)">+3</button>
    <button v-on:click="add(5)">+5</button>

    <!-- 4. 简写 @click -->
    <button @click="add(5)">+5</button>
  </div>
</template>五、条件渲染指令:v-show && v-if
作用:辅助开发者控制 DOM 的显示与隐藏。
v-show- 作用:控制元素显示隐藏
- 语法:
v-show="布尔表达式",表达式值为 true 显示,false 隐藏 - 原理:切换
display:none控制显示隐藏 - 场景:适合需要频繁切换显示隐藏的场景
v-if- 作用:控制元素显示隐藏(条件渲染)
- 语法:
v-if="布尔表达式",表达式值 true 显示,false 隐藏 - 原理:基于条件判断,创建或移除 DOM 元素
- 场景:适合不需要频繁切换的场景
v-else和v-else-if- 作用:辅助 v-if 进行判断渲染
- 语法:
v-else v-else-if="表达式" - 需要紧接着 v-if 使用
代码示例:
<script setup>
    import { ref } from 'vue'
    // 是否可见
    const visible = ref(true)
    // 是否登录
    const isLogin = ref(true)
    // 成绩
    const mark = ref(100)
</script>

<template>
  <!-- v-show -->
  <div class="red" v-show="visible"></div>

  <!-- v-if -->
  <div class="green" v-if="visible"></div>
  <hr>

  <!-- 双分支的条件渲染 -->
  <div v-if="isLogin">xxx, 欢迎回来</div>
  <div v-else>你好, 请登录</div>
  <hr>

  <!--
  多分支的条件渲染:
      1. 90及其以上优秀
      2. 70到90之间良好
      3. 其他的差
  -->
  <div v-if="mark >= 90">优秀</div>
  <div v-else-if="mark >= 70">良好</div>
  <div v-else>差</div>
</template>

<style scoped>
.red, .green {
  width: 200px;
  height: 200px;
}
.red {
  background: red;
}
.green {
  background: green;
}
</style>六、列表渲染指令:v-for
作用:基于数组进行遍历列表渲染
v-for 指令需要使用 (item, index) in 目标结构 形式的特殊语法,其中:
item:数组中的每一项index:每一项的索引,不需要可以省略- 目标结构:被遍历的数组/对象/数字
<script setup>
import { ref } from 'vue'
// 数字数组
const nums = ref([11, 22, 33, 44])
// 商品列表
const goodsList = ref([
{ id: 1, name: '篮球', price: 299 },
{ id: 2, name: '足球', price: 99 },
{ id: 3, name: '排球', price: 199 }
])
// 准备对象
const obj = {
id: 10001,
name: 'liren',
age: 9
}
</script>
<template>
<div>
<ul>
<!-- 遍历数字数组 -->
<li v-for="(item, index) in nums">{{ item }} => {{ index }}</li>
</ul>
<div class="goods-list">
<!-- 遍历对象数组 -->
<div
class="goods-item"
v-for="item in goodsList">
<p>id = {{ item.id }}</p>
<p>name = {{ item.name }}</p>
<p>price = {{ item.price }}</p>
</div>
<ul>
<!-- 遍历对象 -->
<li v-for="(value, key, index) in obj">
{{ value }} => {{ key }} => {{ index }}
</li>
</ul>
<ul>
<!-- 遍历数字 -->
<li v-for="(item, index) in 5">{{ item }} => {{ index }}</li>
</ul>
</div>
</div>
</template>
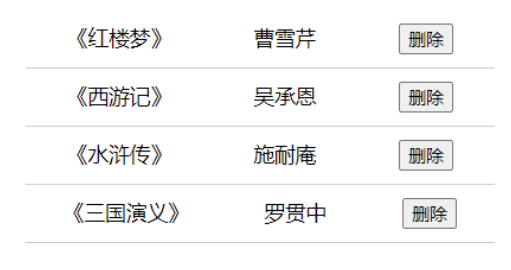
<style scoped></style>案例:书架
- 根据左侧数据渲染出右侧列表(
v-for) - 点击删除按钮时,应该把当前行从列表中删除(获取当前行的
index,利用splice删除)
<!-- @format -->
<script setup>
    import { ref } from 'vue'
    // 图书列表
    const bookList = ref([
      { id: 1, name: '《红楼梦》', author: '曹雪芹' },
      { id: 2, name: '《西游记》', author: '吴承恩' },
      { id: 3, name: '《三国演义》', author: '罗贯中' },
      { id: 4, name: '《水浒传》', author: '施耐庵' }
    ])

    // 删除函数
    const onDel = (i) => {
      // i: 当前点击的下标
      if (window.confirm('确定删除么?')) {
        // 调用 splice 进行删除
        bookList.value.splice(i, 1)
      }
    }
</script>

<template>
  <h3>书架</h3>
  <ul>
    <li
        v-for="(item, index) in bookList"
        :key="item.id"
    >
      <span>{{ item.name }}</span>
      <span>{{ item.author }}</span>
      <button @click="onDel(index)">删除</button>
    </li>
  </ul>
</template>

<style>
#app {
  width: 400px;
  margin: 100px auto;
}
ul {
  list-style: none;
}
ul li {
  display: flex;
  justify-content: space-around;
  padding: 10px 0;
  border-bottom: 1px solid #ccc;
}
</style>
为什么要给 v-for 添加 key
语法::key="唯一值"
作用:给列表项添加的唯一标识,便于 Vue 进行列表项的正确排序复用,因为 Vue 的默认行为会尝试原地修改元素(就地复用)
注意事项:
key的类型只能是数字或字符串key的值必须唯一, 不能重复- 推荐用
id作为key(因为id唯一),不推荐用index作为key(会变化)
七、双向绑定指令:v-model
所谓双向绑定就是:
- 数据变了->视图的变化
- 视图变了->数据的变化
作用在表单元素(input、select、radio、checkbox)上,实现数据双向绑定,从而可以快速获取或设置表单元素的值。
语法:v-model="响应式数据"
使用双向绑定实现以下需求:
- 点击登录按钮获取表单中的内容
- 点击重置按钮清空表单中的内容
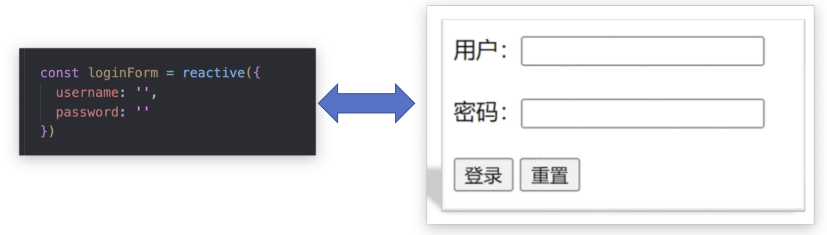
<script setup>
    import { reactive } from 'vue'
    // 登录表单对象
    const loginForm = reactive({
      username: '',
      password: ''
    })
</script>

<template>
  <div class="login-box">
    账户:<input type="text" v-model="loginForm.username"/><br /><br />
    密码:<input type="password" v-model="loginForm.password"/><br /><br />
    <button>登 录</button>
    <button>重 置</button>
  </div>
</template>
原创声明:本文系作者授权腾讯云开发者社区发表,未经许可,不得转载。
如有侵权,请联系 cloudcommunity@tencent.com 删除。
原创声明:本文系作者授权腾讯云开发者社区发表,未经许可,不得转载。
如有侵权,请联系 cloudcommunity@tencent.com 删除。
评论
登录后参与评论
推荐阅读
目录
腾讯云开发者

Copyright © 2013 - 2026 Tencent Cloud. All Rights Reserved. 腾讯云 版权所有
深圳市腾讯计算机系统有限公司 ICP备案/许可证号:粤B2-20090059 ![]() 粤公网安备44030502008569号
粤公网安备44030502008569号
腾讯云计算(北京)有限责任公司 京ICP证150476号 | 京ICP备11018762号