手把手教你搭建自己的第一个鸿蒙应用
原创

友友们,又见面了。之前有小伙伴私信我希望可以写一个鸿蒙开发的详细入门教程。今天我将以最新版 DevEco Studio 为工具,使用 ArkTS 语言(鸿蒙原生开发语言),从工程创建到真机运行,一步步带大家搭建包含页面跳转功能的基础鸿蒙应用,零基础也能轻松上手。下面正文开始。
一、准备工作
- 安装最新版 DevEco Studio,确保开发环境配置完成(含鸿蒙 SDK 下载、模拟器或真机调试环境就绪)。
- 准备一台搭载 HarmonyOS 系统的真机(用于最终运行测试),或直接使用 DevEco Studio 内置模拟器。
二、创建 ArkTS 工程
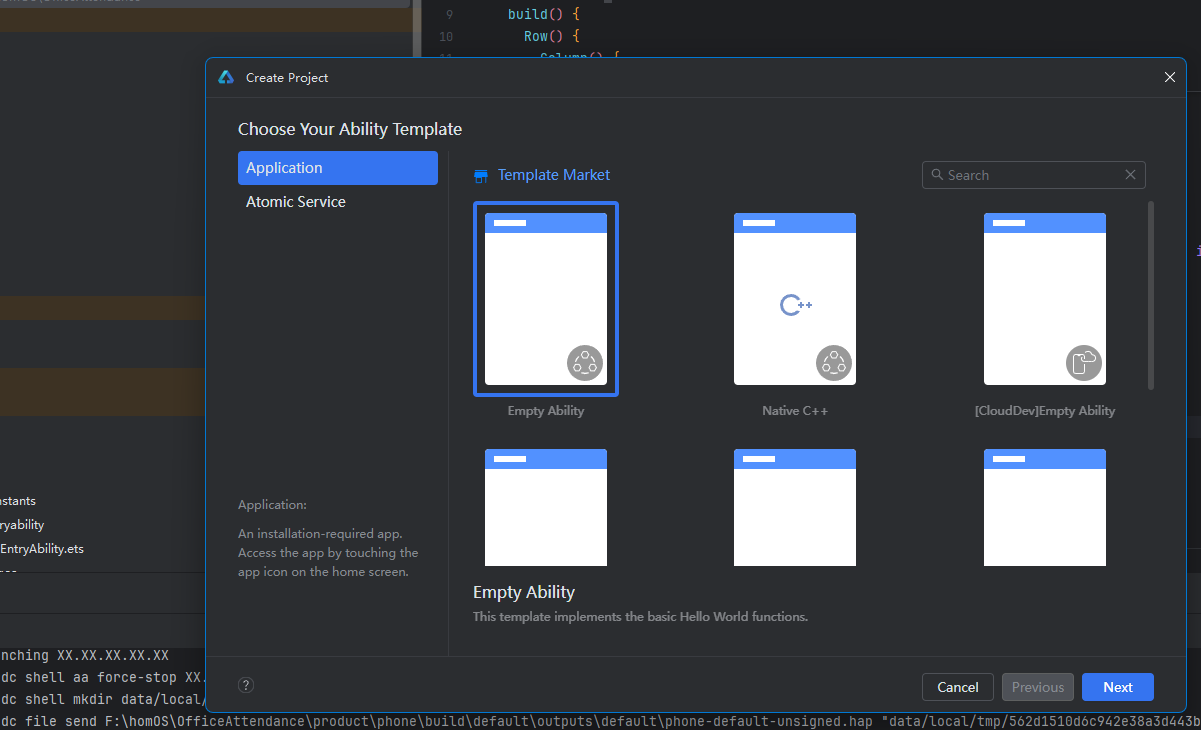
1.启动 DevEco Studio,首次打开可直接点击「Create Project」;若已打开其他工程,通过菜单栏「File > New > Create Project」创建新工程。
2.选择开发类型与模板:在弹出的界面中,选择「Application」(应用开发,需安装后使用),模板勾选「Empty Ability」(基础 Hello World 模板),点击「Next」。
3.配置工程参数:
- Project name:输入工程名称(如 MyFirstHarmonyApp)。
- Bundle name:默认生成的唯一标识(如 com.example.myfirstharmonyapp),无需修改。
- Compatible SDK:选择兼容的最低 API 版本(推荐 6.0.1 及以上,如 6.0.1 (21))。
- Device type:勾选目标设备(如 Phone、Tablet)。
4.点击「Finish」,工具将自动生成工程目录、示例代码及相关资源,等待工程同步完成(底部进度条走完即可)。
三、认识 ArkTS 工程目录(Stage 模型)
创建好后,我们来简单认识一下新建的工程目录都有哪些,作用又是什么。

目录结构
工程同步后,左侧 Project 窗口将显示完整目录结构,核心目录说明如下:
- AppScope:应用全局配置目录,包含 app.json5(全局配置文件)和全局资源。
- entry:主模块目录,编译后生成 HAP 包(鸿蒙应用安装包格式)。
- src/main/ets:存放 ArkTS 源码,核心开发目录。
- entryability:应用入口,负责应用的启动、生命周期管理。
- pages:存放应用所有页面(如 Index.ets 为默认首页)。
- src/main/resources:存放资源文件(图片、字符串、布局等)。
- module.json5:模块配置文件,包含 HAP 包信息、设备适配规则等。
- src/main/ets:存放 ArkTS 源码,核心开发目录。
- build-profile.json5:工程级编译配置文件,含签名、运行环境等设置。
四、构建第一个页面(首页)
ok,了解基本的目录结构后,我们就来开始尝试写一下代码,新建一个页面。
首页将实现「Hello World」文本展示和「跳转到第二页」按钮,步骤如下:
1.在 Project 窗口中,展开「entry > src > main > ets > pages」,打开默认生成的 Index.ets 文件。
2.修改页面布局与内容:将默认相对布局改为线性布局(Row+Column),添加文本组件和按钮组件,代码如下:
// Index.ets
@Entry
@Component
struct Index {
  // 定义页面文本状态变量
  @State message: string = 'Hello HarmonyOS!';

  build() {
    // 外层横向布局,占满屏幕高度
    Row() {
      // 内层纵向布局,占满屏幕宽度
      Column() {
        // 文本组件:显示欢迎语
        Text(this.message)
          .fontSize(50) // 字体大小
          .fontWeight(FontWeight.Bold) // 字体加粗
          .margin({ bottom: 30 }) // 底部间距

        // 按钮组件:用于跳转到第二页
        Button() {
          Text('去第二页')
            .fontSize(28)
            .fontWeight(FontWeight.Bold)
        }
        .type(ButtonType.Capsule) // 胶囊形按钮
        .backgroundColor('#1890FF') // 按钮颜色
        .width('50%') // 按钮宽度
        .height('6%') // 按钮高度
        .margin({ top: 20 }) // 顶部间距
      }
      .width('100%')
    }
    .height('100%')
  }
}
3.预览页面效果:点击编辑窗口右上角的「Previewer」,打开预览器,即可看到首页效果 —— 居中显示「Hello HarmonyOS!」文本和蓝色胶囊按钮。我这里用的是模拟器,运行效果如下。
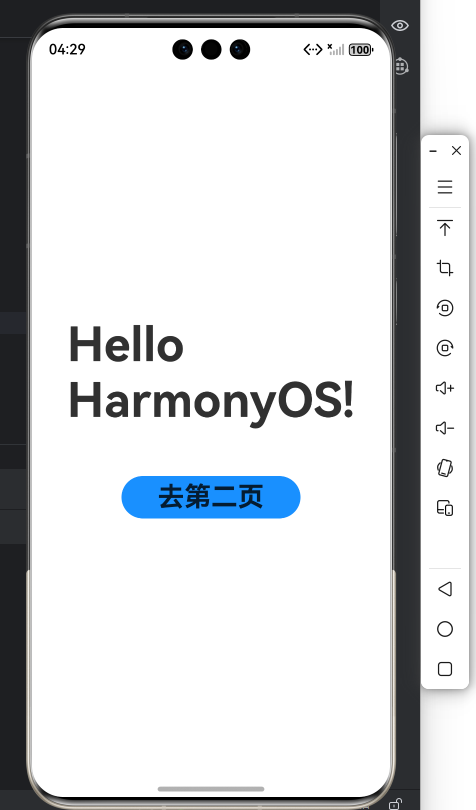
运行效果
五、构建第二个页面(跳转页)
接下来创建第二个页面,实现「Hi there」文本展示和「返回首页」按钮,步骤如下:
1.创建页面文件:右键点击「pages」文件夹,选择「New > ArkTS File」,命名为「Second」,回车确认(或选择「New > Page > Empty Page」,直接生成带路由配置的页面)。
2.配置页面路由:若手动创建 ArkTS 文件,需手动配置路由 —— 展开「entry > src > main > resources > base > profile」,打开「main_pages.json」,在「src」数组中添加第二个页面路径,代码如下:
{
  "src": [
    "pages/Index", // 首页路由
    "pages/Second" // 新增第二页路由
  ]
}
这里的json编译器如果报错,去掉后面的注释,或者把语法检查改一下即可。
3.编写第二页代码:打开 Second.ets 文件,添加文本和返回按钮,代码如下:
// Second.ets
@Entry
@Component
struct Second {
  @State message: string = 'Hi there!';

  build() {
    Row() {
      Column() {
        Text(this.message)
          .fontSize(50)
          .fontWeight(FontWeight.Bold)
          .margin({ bottom: 30 })

        // 返回首页按钮
        Button() {
          Text('返回首页')
            .fontSize(28)
            .fontWeight(FontWeight.Bold)
        }
        .type(ButtonType.Capsule)
        .backgroundColor('#1890FF')
        .width('50%')
        .height('6%')
        .margin({ top: 20 })
      }
      .width('100%')
    }
    .height('100%')
  }
}
六、实现页面间跳转
鸿蒙应用的页面跳转通过「路由(router)」实现,需导入路由模块并绑定按钮点击事件,步骤如下:
1. 首页跳转到第二页
修改 Index.ets 文件,为「去第二页」按钮添加 onClick 事件,通过 router.pushUrl 实现跳转:
// Index.ets(添加跳转逻辑后完整代码)
import { BusinessError } from '@kit.BasicServicesKit';

@Entry
@Component
struct Index {
  @State message: string = 'Hello HarmonyOS!';

  build() {
    Row() {
      Column() {
        Text(this.message)
          .fontSize(50)
          .fontWeight(FontWeight.Bold)
          .margin({ bottom: 30 })

        Button() {
          Text('去第二页')
            .fontSize(28)
            .fontWeight(FontWeight.Bold)
        }
        .type(ButtonType.Capsule)
        .backgroundColor('#1890FF')
        .width('50%')
        .height('6%')
        .margin({ top: 20 })
        // 绑定点击事件,实现跳转
        .onClick(() => {
          console.info('点击了"去第二页"按钮');
          // 获取UI上下文与路由实例
          const uiContext = this.getUIContext();
          const router = uiContext.getRouter();
          // 跳转到第二页
          router.pushUrl({ url: 'pages/Second' })
            .then(() => console.info('跳转第二页成功'))
            .catch((err: BusinessError) => {
              console.error(`跳转失败:错误码${err.code},信息${err.message}`);
            });
        })
      }
      .width('100%')
    }
    .height('100%')
  }
}
2. 第二页返回首页
修改 Second.ets 文件,为「返回首页」按钮添加 onClick 事件,通过 router.back 实现返回:
// Second.ets(添加返回逻辑后完整代码)
import { BusinessError } from '@kit.BasicServicesKit';

@Entry
@Component
struct Second {
  @State message: string = 'Hi there!';

  build() {
    Row() {
      Column() {
        Text(this.message)
          .fontSize(50)
          .fontWeight(FontWeight.Bold)
          .margin({ bottom: 30 })

        Button() {
          Text('返回首页')
            .fontSize(28)
            .fontWeight(FontWeight.Bold)
        }
        .type(ButtonType.Capsule)
        .backgroundColor('#1890FF')
        .width('50%')
        .height('6%')
        .margin({ top: 20 })
        // 绑定点击事件,实现返回
        .onClick(() => {
          console.info('点击了"返回首页"按钮');
          const uiContext = this.getUIContext();
          const router = uiContext.getRouter();
          try {
            router.back(); // 返回上一页
            console.info('返回首页成功');
          } catch (err) {
            const error = err as BusinessError;
            console.error(`返回失败:错误码${error.code},信息${error.message}`);
          }
        })
      }
      .width('100%')
    }
    .height('100%')
  }
}
第二页效果
七、真机运行应用
完成代码编写后,可通过真机运行查看最终效果,步骤如下:
- 连接真机:将鸿蒙系统真机通过 USB 线连接电脑,在手机上开启「开发者模式」和「USB 调试」(通常在「设置 > 关于手机」中连续点击版本号激活)。
- 配置签名:通过菜单栏「File > Project Structure > Project > Signing Configs」,勾选「Associate with registered application」,登录华为开发者账号后,工具将自动生成调试签名,点击「Apply > OK」。
- 运行应用:在编辑窗口右上角的工具栏中,选择已连接的真机(或模拟器),点击「运行」按钮(绿色三角图标)。
- 查看效果:应用将自动安装到真机上,打开后可见首页的「Hello HarmonyOS!」文本和按钮,点击「去第二页」可跳转到第二页,点击「返回首页」可回到初始页面,页面切换流畅无卡顿。
八、总结
至此,相信你已成功搭建了第一个鸿蒙应用!这里我一共给大家讲解了 ArkTS 工程创建、页面布局编写、路由跳转实现和真机运行的核心流程。当然鸿蒙应用开发还有更多有趣功能,比如分布式数据管理、跨设备交互、自定义组件等,后续大家可继续探索。
原创声明:本文系作者授权腾讯云开发者社区发表,未经许可,不得转载。
如有侵权,请联系 cloudcommunity@tencent.com 删除。
原创声明:本文系作者授权腾讯云开发者社区发表,未经许可,不得转载。
如有侵权,请联系 cloudcommunity@tencent.com 删除。
评论
登录后参与评论
推荐阅读
目录
腾讯云开发者

Copyright © 2013 - 2026 Tencent Cloud. All Rights Reserved. 腾讯云 版权所有
深圳市腾讯计算机系统有限公司 ICP备案/许可证号:粤B2-20090059 ![]() 粤公网安备44030502008569号
粤公网安备44030502008569号
腾讯云计算(北京)有限责任公司 京ICP证150476号 | 京ICP备11018762号