Three.js实战—中国地图
原创
Three.js实战—中国地图
原创
阶钟
发布于 2024-12-03 16:48:40
发布于 2024-12-03 16:48:40
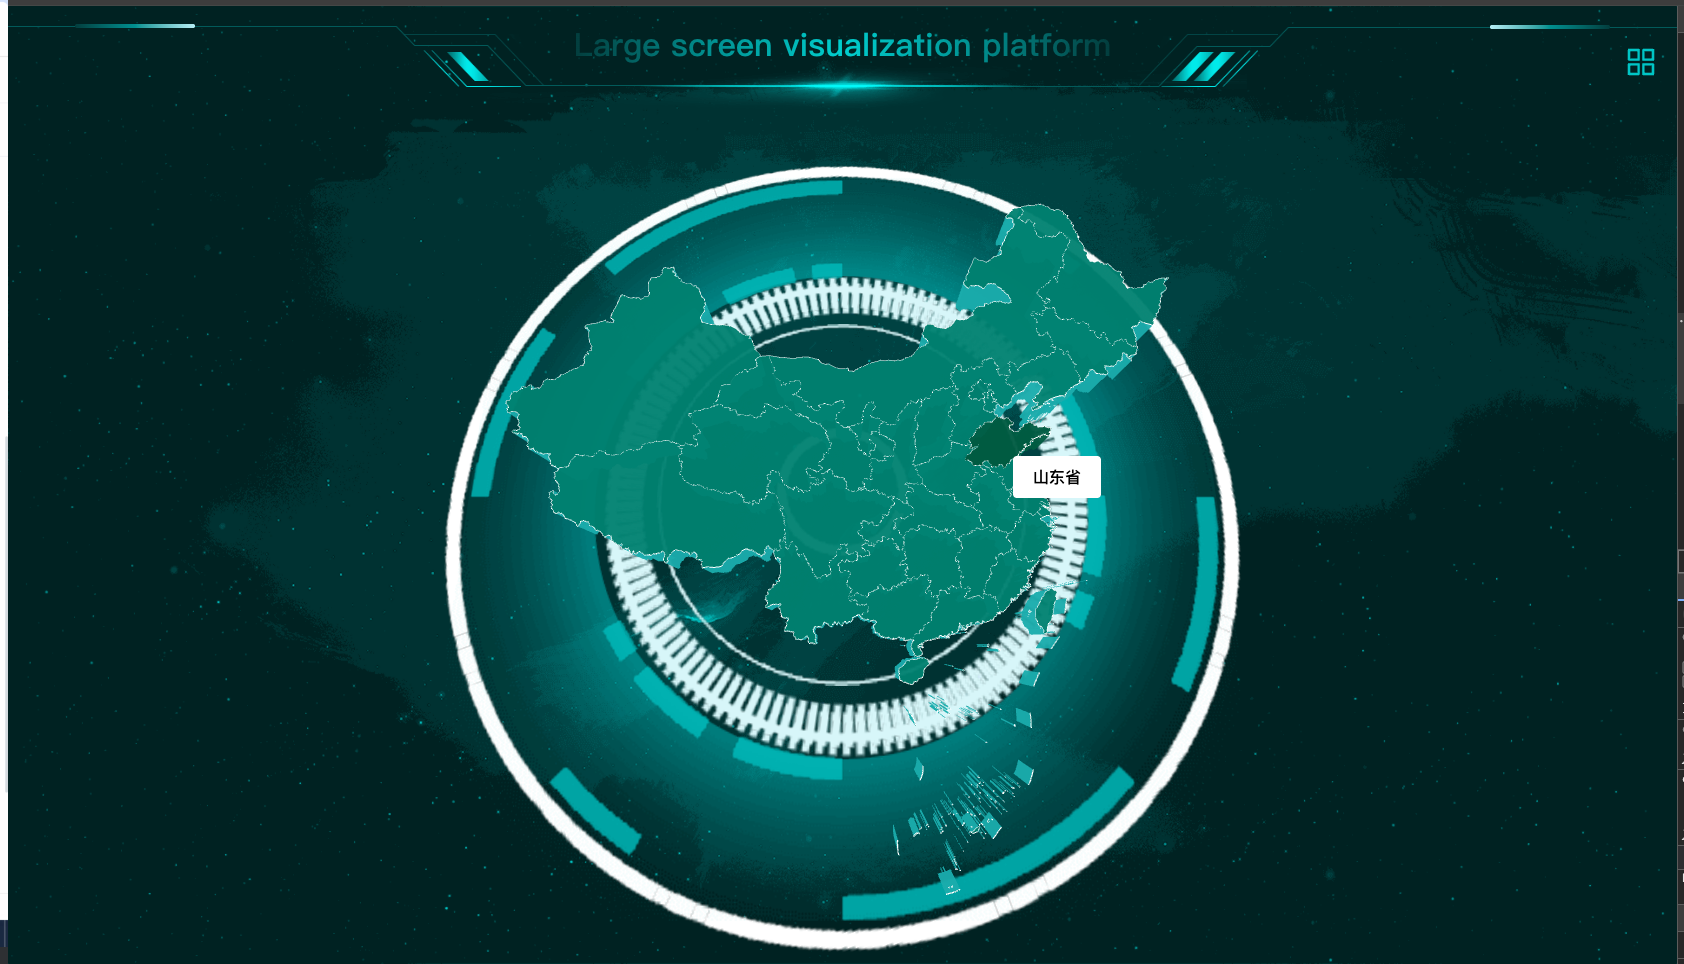
先来看下效果:
首先回顾一下three.js的基本要素~
Threejs 基本要素
场景(Scene):
- 场景是 Three.js 中的一个容器,用于存放所有的 3D 对象(如几何体、灯光、相机等)。
- 可以创建多个场景,并在不同的场景之间切换。
相机(Camera):
- 相机决定了场景中的视角和视野。
- Three.js 提供了多种相机类型,如透视相机(PerspectiveCamera)和正交相机(OrthographicCamera)。
几何体(Geometry):
- 几何体是 3D 对象的基本构建块。
- Three.js 提供了多种几何体类型,如立方体(BoxGeometry)、球体(SphereGeometry)、平面(PlaneGeometry)等。
材质(Material):
- 材质定义了 3D 对象的外观,如颜色、纹理、透明度等。
- Three.js 提供了多种材质类型,如基本材质(MeshBasicMaterial)、标准材质(MeshStandardMaterial)、物理材质(MeshPhysicalMaterial)等。
着色器(Renderer)
- Renderer绑定一个canvas对象,并可以设置大小,默认背景颜色等属性。
- 调用Renderer的render函数,传入scene和camera,就可以把图像渲染到canvas中了。
核心代码
初始化
  const init = () => {
    if (conatinerRef.current) {
      const { clientWidth, clientHeight } = conatinerRef.current;

      // 创建场景
      const scene = new Scene();
      sceneRef.current = scene;

      // 创建相机
      const camera = new PerspectiveCamera(
        75,
        clientWidth / clientHeight,
        0.1,
        1000
      );
      camera.position.set(0, 0, 10);
      cameraRef.current = camera;

      // 创建渲染器
      const renderer = new WebGLRenderer({ antialias: true });
      rendererRef.current = renderer;
      renderer.setSize(clientWidth, clientHeight);
      renderer.setPixelRatio(window.devicePixelRatio);
      renderer.shadowMap.enabled = true;

      // 将Canvas插入到页面
      conatinerRef.current.append(renderer.domElement);

      // 渲染
      render();

      initializeHandle && initializeHandle(scene, camera, renderer);
    }
  };
地图数据的获得
  // 加载地图数据
  const loadMapData = (scene: Scene) => {
    THREE.Cache.enabled = true;
    const loader = new FileLoader();
    loader.load("https://hv.z.wiki/autoupload/20241128/T4OS/content.json", (data: string | ArrayBuffer) => {
      console.log(data);
      // console.log(mapData);
      const jsondata = JSON.parse(data as string);
      createMap(jsondata, scene);
      dynamicBg.scale.set(0.32, 0.32, 1);
      dynamicBg.position.set(0, 0, -8);
      scene.add(dynamicBg);
      dynamicBgRef.current = dynamicBg;
});这里涉及到一个知识点,墨卡托投影转换。墨卡托投影转换可以把我们经纬度坐标转换成我们对应平面的2d坐标。具体原理
注意:这里有一个坑点,就是FileLoader的参数路径,这里我把绝对和相对路径各种写法都尝试了个遍,但还是报了路径错误:
<!DOCTYPE html>
<html lang="en">
  <head>
    <meta charset="utf-8" />
    <link rel="icon" href="%PUBLIC_URL%/favicon.ico" />
    <meta name="viewport" content="width=device-width, initial-scale=1" />
    <meta name="theme-color" content="#000000" />
    <meta
      name="description"
      content="Web site created using create-react-app"
    />
    <link rel="apple-touch-icon" href="%PUBLIC_URL%/logo192.png" />
    <!--
      manifest.json provides metadata used when your web app is installed on a
      user's mobile device or desktop. See https://developers.google.com/web/fundamentals/web-app-manifest/
    -->
    <!-- <link rel="manifest" href="%PUBLIC_URL%/manifest.json" /> -->
    <!--
      Notice the use of %PUBLIC_URL% in the tags above.
      It will be replaced with the URL of the `public` folder during the build.
      Only files inside the `public` folder can be referenced from the HTML.

      Unlike "/favicon.ico" or "favicon.ico", "%PUBLIC_URL%/favicon.ico" will
      work correctly both with client-side routing and a non-root public URL.
      Learn how to configure a non-root public URL by running `npm run build`.
    -->
    <title>React App</title>
  </head>
  <body>
    <noscript>You need to enable JavaScript to run this app.</noscript>
    <div id="root"></div>
    <!--
      This HTML file is a template.
      If you open it directly in the browser, you will see an empty page.

      You can add webfonts, meta tags, or analytics to this file.
      The build step will place the bundled scripts into the <body> tag.

      To begin the development, run `npm start` or `yarn start`.
      To create a production bundle, use `npm run build` or `yarn build`.
    -->
  </body>
</html>
最后实在没辙,用了个在线工具转换成在线地址了。。。有同学有其他解决方法的欢迎评论区留言讨论~
这里我直接用可视化框架——d3-geo 它里面有自带的墨卡托投影转换。
    // 墨卡托投影转换
    const projection = geoMercator()
      .center([104.0, 37.5])
      .scale(80)
      .translate([0, 0]);js代码解读复制代码
由于中国有很多省,每个省都对应一个Object3d。
我这里的整个中国是一个大的Object3d,每一个省是一个Object3d,省是挂在中国下的。 然后中国这个Map挂在scene这个Object3d下。
    // 初始化一个地图对象
    const map = new Object3D();
    // 遍历坐标数据
    data.features.forEach(
      (elem: {
        type: string;
        properties: Record<string, any>;
        geometry: { type: string; coordinates: any[] };
      }) => {
        // 创建一个省份3D对象
        const province = new Object3D();
        // 每个的 坐标 数组
        const { coordinates } = elem.geometry;
        // 循环坐标数组
        coordinates.forEach((multiPolygon: any[]) => {
          // ...
          // ...
          // 绘制各省边界线
        } )
绘制各省边界线
  // 创建地图对象并添加到场景中
  const createMap = (data: Record<string, any>, scene: Scene) => {
    // 初始化一个地图对象
    const map = new Object3D();
    // 墨卡托投影转换
    const projection = geoMercator()
      .center([104.0, 37.5])
      .scale(80)
      .translate([0, 0]);

    data.features.forEach(
      (elem: {
        type: string;
        properties: Record<string, any>;
        geometry: { type: string; coordinates: any[] };
      }) => {
        // 创建一个省份3D对象
        const province = new Object3D();
        // 每个的 坐标 数组
        const { coordinates } = elem.geometry;
        // 循环坐标数组
        coordinates.forEach((multiPolygon: any[]) => {
          multiPolygon.forEach((polygon) => {
            const shape = new Shape();

            // 给每个省的边界画线
            const lineGeometry = new BufferGeometry();
            const pointsArray = [];
            for (let i = 0; i < polygon.length; i++) {
              const projectionResult = projection(polygon[i]);
              if (projectionResult) {
                const [x, y] = projectionResult;
                if (i === 0) {
                  shape.moveTo(x, -y);
                } else {
                  shape.lineTo(x, -y);
                }
                pointsArray.push(new Vector3(x, -y, mapDepth));
              }
              // console.log(projection(polygon[i]))
            }
            lineGeometry.setFromPoints(pointsArray);

            const extrudeSettings = {
              depth: mapDepth,
              bevelEnabled: false,
              bevelThickness: 1,
              bevelSize: 1,
              bevelOffset: 0,
              bevelSegments: 1,
            };
            const geometry = new ExtrudeGeometry(shape, extrudeSettings);
            const material1 = new MeshBasicMaterial({
              color: mapColor,
              transparent: true,
              opacity: 0.95,
            });
            const material2 = new MeshBasicMaterial({
              color: mapSideColor,
              transparent: true,
              opacity: 0.95,
            });

            const mesh = new Mesh(geometry, [material1, material2]);
            const lineMaterial = new LineBasicMaterial({
              color: "white",
            });
            const line = new Line(lineGeometry, lineMaterial);
            // 将省份的属性 加进来
            // @ts-ignore
            province.properties = elem.properties;
            province.add(mesh);
            province.add(line);
          });
        });
        map.add(province);
      }
    );
    map.position.set(mapInitPosition.x, mapInitPosition.y, mapInitPosition.z);

    scene.add(map);
    mapRef.current = map;
  };
遍历第一个点的的和canvas2d画图其实是一模一样的, 移动起点, 然后后面在划线, 画出轮廓。然后我们在这里可以设置拉伸的深度, 然后接下来就是设置材质了。lineGeometry 其实 对应的是轮廓的边线。
射线追踪
但是对于我自己而言还是不满意, 我怎么知道的我点击的是哪一个省份呢,OK这时候就要引入我们three中非常重要的一个类了,Raycaster 。这个类用于进行光线投射。 光线投射用于进行鼠标拾取(在三维空间中计算出鼠标移过了什么物体)
我们可以对canvas监听的onmouseMove 事件,然后 我们就可以知道当前移动的鼠标是选择的哪一个mesh。但是在这之前,我们先对每一个province这个对象上增加一个属性来表示他是哪一个省份的。
我怎么知道我到底找到没,我们对找到的mesh将它的表面变成灰色,但是这样会导致一个问题,我们鼠标再一次移动的时候要把上一次的材质给他恢复过来。
// 恢复上一次清空的
if (lastPick.current) {
   lastPick.current.object.material[0].color.set(mapColor);
   lastPick.current.object.material[1].color.set(mapSideColor);
   if (tooltipRef.current) {
   tooltipRef.current.style.visibility = "hidden";
 }
}
 // 通过摄像机和鼠标位置更新射线
raycaster.current.setFromCamera(mouse.current as Vector2, camera);
// 算出射线 与当场景相交的对象有那些
const intersects = raycaster.current.intersectObjects(
  scene.children,
  true
);
lastPick.current = intersects.find(
  (item: any) => item.object.material && item.object.material.length === 2
);
if (
  lastPick.current &&
  lastPick.current.object?.parent?.properties?.name
) {
  lastPick.current.object.material[0].color.set(mapHoverColor);
  lastPick.current.object.material[1].color.set(mapHoverColor);
  showTip();
}
showTip()
为了让交互更加完美,找到了同时在鼠标右下方显示个tooltip,那这个肯定是一个div默认是隐藏的,然后根据鼠标的移动移动相应的位置。
  const showTip = () => {
    if (tooltipRef.current) {
      // 显示省份的信息
      if (lastPick.current) {
        const { properties } = lastPick.current.object.parent;
        tooltipRef.current.textContent = properties.name;
        tooltipRef.current.style.visibility = "visible";
      } else {
        tooltipRef.current.style.visibility = "hidden";
      }
    }
  };
原创声明:本文系作者授权腾讯云开发者社区发表,未经许可,不得转载。
如有侵权,请联系 cloudcommunity@tencent.com 删除。
原创声明:本文系作者授权腾讯云开发者社区发表,未经许可,不得转载。
如有侵权,请联系 cloudcommunity@tencent.com 删除。
评论
登录后参与评论
推荐阅读
目录
腾讯云开发者

Copyright © 2013 - 2026 Tencent Cloud. All Rights Reserved. 腾讯云 版权所有
深圳市腾讯计算机系统有限公司 ICP备案/许可证号:粤B2-20090059 ![]() 粤公网安备44030502008569号
粤公网安备44030502008569号
腾讯云计算(北京)有限责任公司 京ICP证150476号 | 京ICP备11018762号